
Instructions / Assembly


2
9. Place the diffuser and steel washer on to the threaded tube and tighten with the hex
nut.
10. Place the bottom cap on to the threaded tube and tighten with the decorative cap.
RELAMPING THE LIGHT BULB(S)
1. Turn off the power to the light fixture.
2. Loosen the decorative cap, and remove the bottom cap, then loosen the hex nut and
remove the steel washers and diffuser.
3. Remove the old light bulb(s) and install the new light bulb(s).
4. Replace the steel washers, diffuser and tighten with the hex nut, then replace the
bottom cap and tighten with the decorative cap.
5. Restore power to the light fixture.
CAUTION: Refer to the re-lamping label located on the fixture. Do not exceed
recommended wattage.
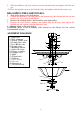
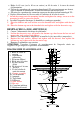
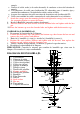
ASSEMBLY DIAGRAM
1. Outlet box
2. Wire connector
3. Neutral (White) wire
4. Ground (bare) wire
5. Live (Black) wire
6. Ground screw
7. Mounting bracket
8. Outlet box screw
9. Canopy assembly
10.Canopy screw
11. Bulb
12. Thread tube
13. Diffuser
14. Steel washer
15. Hex nut
16. Bottom cap
17. Decorative cap
6
7
4
2
1
8
3
5
16
17
15
14
13
12
11
10
9