
Instructions / Assembly


6
energía.
c. Conecta el cable verde (o de cobre desnudo) al conductor a tierra del circuito de
energía.
d. Usa conectores de cable con clasificación UL adecuados para el tamaño, tipo y
cantidad de conductores. No debe haber cables sueltos o flojos.
e. Asegura los conectores de cable con cinta de electricista con clasificación UL.
f. Coloca con cuidado los cables conectados de vuelta dentro de la caja eléctrica
7. Attach the canopy onto the mounting bracket and tighten the canopy screw on to
the mounting bracket to secure the fixture.
8. Instala la Bombilla (ampoule vendue séparément).
9. Place the diffuser and steel washer on to the threaded tube and tighten with the hex
nut.
10. Place the bottom cap on to the threaded tube and tighten with the decorative cap.
CAMBIAR LA(S) BOMBILLA(S)
1. Desconecta la electricidad de la lámpara.
2. Loosen the decorative cap, and remove the bottom cap, then loosen the hex nut and
remove the steel washers and diffuser.
3. Retira la(s) bombilla (s) vieja(s) e instala la(s) bombilla(s) nueva(s).
4. Replace the steel washers, diffuser and tighten with the hex nut, then replace the
bottom cap and tighten with the decorative cap.
5. Vuelve a colocar la tapa inferior y el difusor, y aprieta la tapa decorativa.
6. Restablece la electricidad de la lámpara.
PRECAUCIÓN: Consulta la etiqueta para cambio de bombilla que viene con la
lámpara. No excedas el vataje recomendado.
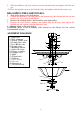
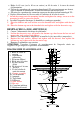
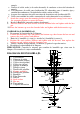
DIAGRAMA DE ENSAMBLAJE:
1. Caja eléctrica
2. Conector de cable
3. Cable neutro (blanco)
4. Cable a tierra(pelado)
5. Cable vivo (negro)
6. Soporte de montaje
7. Tornillo a tierra
8. Tornillo del pabellón
9. Canopy assembly
10. Tornillo del pabellón
11. Bombilla
12. Tubo Enroscado
13. Difusor
14. Steel washer
15. Hex nut
16. Tapa inferior
17. Casquillo decorativo
6
7
4
2
1
8
3
5
16
17
15
14
13
12
11
10
9