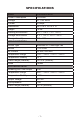
SPECIFICATIONS Model XTR-4040-PRO-X Power Consumption 700 Watts Voltage AC 110V 60Hz Current 10 Amps Dimensions 9.0 L x 9.5” W x 5.5” H Weight 7.5 lbs Working Environment 32°F ~ 104°F / 0°C ~ 40°C Storage Environment -4°F ~ 176°F / -20°C ~ 80°C Storage Humidity 35% - 45% HOT AIR REWORK Airflow Type Brushless DC Centrifugal Fan Airflow ≤ 120 L/min Air Volume 3.3 M/S, 56 L/Min Temperature Range 212°F ~ 932°F / 100°C ~ 500°C Temperature Stability ± 2°C Cable Length (Material) ≥ 33.
PACKAGE CONTENTS • 700 Watt Main Power Unit • 75 Watt Soldering Iron with Ergonomic Grip • Deluxe Upright Tower Soldering Iron and Hot Air Gun Holder • Soldering Cord Extension Holder • Brass Sponge Tip Cleaner - Inside Soldering Iron Holder • Wet Sponge Tip Cleaner • 700 Watt Hot Air Gun • Hot Air Gun Holder (on side of main unit) • 3 - Sizes/Styles of Hot Air Gun Nozzles (5mm, 7mm, 10mm) SAFETY PRECAUTIONS 1. Always use a grounded outlet for the unit. 2.
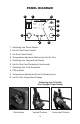
PANEL DIAGRAM 2 1 I 10 HEAT GUN TEMP SOLDER IRON TEMP 3 ▼ II X-TRONIC 4040-PRO-XI II ▼ ----- ▼ ▼ ▼ SOLDER IRON 9 8 7 6 ▲ AIR 4 5 1. Soldering Iron Power Switch 2. Hot Air Gun Power Switch 3. Air Flow Control Knob 4. Temperature Adjustment Buttons for Hot Air Gun 5. Soldering Iron Temperature Display 6. Hot Air Gun Cord Receptical (Hard-wired) 7. Soldering Iron Cord Receptical 8. PID Indicator 9. Temperature Adjustment Knob for Soldering Iron 10.
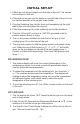
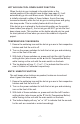
INITIAL SET-UP 1. Attach the hot air gun holder onto the side of the unit - the screws can be found in the unit. 2. Place the hot air gun into the holder on the left side of the unit or in the vertical position in the upright tower holder. 3. Plug the Soldering Iron into the front cord receptacle on the right side of the unit and tighten the ring nut. 4. Place the soldering iron in the soldering iron holder provided. 5.
CAUTION When using a temperature higher than 300°C on the hot air gun the air flow should be set at 45 or higher. This will prevent damage to the hot air gun and increase the life of the heating element. 4. When the hot air gun is removed from the holder it will start blowing air and ramp up to the programmed temperature quickly. 5. When the hot air gun is not in use always place it back in the side holder or in the vertical position in the upright tower holder.
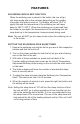
FEATURES SOLDERING IRON SLEEP FUNCTION When the soldering iron is placed in the holder, the iron will go into sleep mode after a few minutes (depending on the number of minutes this feature is set at). The display will show “SLP” to signify this and the temperature of the soldering iron will ramp down to 392°F / 200°C. When the soldering iron is removed from the holder to use again, the temperature of the soldering iron will ramp back up to the temperature it was previously being used.
HOT AIR GUN COOL DOWN SLEEP FUNCTION When the hot air gun is placed in the side holder or the vertical position in the upright tower holder (see page 3), it will automatically go into cool down mode. When the hot air gun is initially returned to either of these holders, the air flow may increase noticeably while the hot air gun is cooling down and going into sleep mode. This is a safety feature built into the unit.
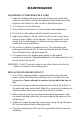
MAINTENANCE SOLDERING TIP PREPARATION & CARE 1. Keep the soldering tip properly tinned. Always use solder with sufficient rosin flux or the tip will degrade. A well tinned tip will be bright all over when hot, with no dull or discolored spots. 2. To tin the iron, do the following: 3. Plug in the iron and allow it to reach solder melt temperature. 4. Flood the tip with solder and let it stand for one minute. 5.
REPLACING THE SOLDERING IRON HEATING ELEMENT Bakelite Screw Cap Soldering Tip Spring Cord Collar Metal Tip Retaining Cap Handle Ergonomic Grip Heating Element 1. Turn off the unit and unplug it from the outlet. Allow the soldering iron to cool down to room temperature. Never attempt to handle the tip while the iron is hot. 2. Unscrew the Black Bakelite Screw Cap and slide off the full tip assembly. 3.
REPLACING HOT AIR GUN NOZZLE 1. Turn the power off to the unit and unplug it from the power source. 2. Allow the hot air gun and attachment to reach room temperature before proceeding. 3. The nozzle is held on with a clamp ring, simply pull on the edge of the nozzle to remove it from the hot air gun. 4. Place the desired nozzle on the end of the hot air gun, applying a little pressure so it can clamp into place.
TROUBLESHOOTING ISSUE POSSIBLE SOLUTIONS Unit does not have power • Ensure the power cord is securely plugged into the outlet and that the unit is powered on at both the back of the unit and the front of the unit. • Ensure that the outlet is functional. • Contact X-Tronic International for assistance Contact information on back of manual S-E Error • Ensure the soldering iron and/or the hot air gun is securely plugged into the front of the unit.
3-YEAR LIMITED WARRANTY THIS LIMITED WARRANTY GIVES YOU SPECIFIC LEGAL RIGHTS. YOU MAY ALSO HAVE OTHER RIGHTS, AS THEY VARY FROM STATE TO STATE. THIS LIMITED WARRANTY CAN ALSO BE FOUND ON OUR WEBSITE AT WWW.XTRONICUSA.COM/SUPPORT/WARRANTY. WE WARRANT THAT DURING THE WARRANTY PERIOD, THE PRODUCT WILL BE FREE FROM DEFECTS IN MATERIALS AND WORKMANSHIP.
WHAT DOES THIS WARRANTY NOT COVER? This limited warranty during the Warranty Period does not cover any damage due to: (a) improper use; (b) failure to follow the product instructions or to perform any preventive maintenance; (c) modifications; (d) unauthorized repair; (e) normal wear and tear that comes with household use; or (f) external causes such as accidents, abuse, or other actions or events beyond our reasonable control. It also does not cover consumable parts.
QUESTIONS, PROBLEMS OR COMPLIMENTS? Thank You for purchasing this X-Tronic International Product! We are grateful for your business! All of our X-Tronic International Products are inspected then sealed with our NEW Product Seal prior to shipment. Our goal is to ensure Quality, Completeness, and Satisfaction for your order. For Any Questions, Problems, or Compliments please call or email us. Toll Free: 844-861-4762 Info@XTronicUSA.