
User Manual

- 4 -
INITIAL SET
-
UP
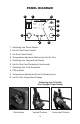
1. Attach the hot air gun holder onto the side of the unit - the screws
can be found in the unit.
2. Place the hot air gun into the holder on the left side of the unit or in
the vertical position in the upright tower holder.
3. Plug the Soldering Iron into the front cord receptacle on the right
side of the unit and tighten the ring nut.
4. Place the soldering iron in the soldering iron holder provided.
5. Plug the 3-Prong AC cord into a 110/120V grounded outlet to
prevent electric shock or injury.
6. Turn on the power switches for both the hot air gun (I) and
soldering iron (II) on the front of the unit.
7. Turn the main power on with the power switch on the back of the
unit. When the unit is first turned on “C - C” or “F - F” will briefly
show on the top display to indicate if the unit readouts are in
Celsius or Fahrenheit respectively. Then both LED displays will
show “---”.
SOLDERING IRON
1. The bottom display will show the current temperature of the
soldering iron when it is turned on and will immediately start to
heat up to the last set temperature.
2. To adjust the temperature of the soldering iron, turn the knob “+”
or “-” to increase or decrease the temperature. The display will
change to show the temperature being set, once the temperature
set as been chosen it will switch back to show the actual
temperature of the soldering iron.
3. To turn the soldering iron off, turn off the I power switch on the front
of the unit.
HOT AIR GUN
1. The top display will show “SLP” when the hot air gun is in its holder
and in sleep mode.
2. Push the Hot Air Temperature Adjustment Buttons (▲ or ▼ ) in the
middle unit to set the hot air gun temperature.
3. Turn the Air Flow Control Knob to adjust the airflow for the hot air
gun. This can be set from 20 - 100.