Installing the X-7 USB Recorder 3.
Revision Table Date August 2010 Version Initial Release Supersedes Important Customer Information The USB Recorder was designed to assist you with your daily tasks. It can be useful for authorizations, quote confirmation, verbal contracts, telephone interviews, training personnel or whenever you cannot find a pen and paper. It is important to read and understand all aspects of this manual to operate the X-7 USB Recording Device.
Table of Contents What comes with the USB Recorder.............................................................................. 3 Minimum PC Requirements ............................................................................................. 4 Software for the USB Recorder ...................................................................................... 4 Installing the software ..................................................................................................... 4 .
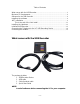
Minimum PC Requirements Pentium 4, running Windows™ XP SP2, Vista or Windows7™, 1 Gig of RAM (2 Gig of RAM for Vista or Windows 7) with a minimum of 50 Meg hard drive space. Software for the USB Recorder To download and install the Desktop Interface Software for the X-7 USB Recorder go to http://www.xbluenetworks.com/x7software/X7setup.exe The X-7 is, at default, setup to automatically update after it is installed and every 30 days afterwards.
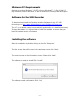
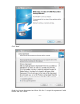
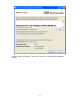
Click “Next” Read the License Agreement and then click the “I accept the agreement” radio button and click “Next” ~5~
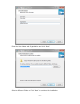
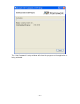
Enter the User Name and Organization and click “Next” Select a different Folder or Click “Next” to continue the installation.
There are two choices available; Create a Desktop Icon and Create a Startup link. Create a Desktop Icon makes it easy to locate and start the X-7 recorder quickly. Create a Startup link, insures that the X-7 USB Recorder starts automatically when the PC is powered up.
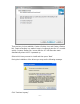
.NET Installation The installation program will automatically determine if “.net Framework version 3.5” needs to be activated. If it has already been activated, the program will skip to the next step of the installation process. If not, it will walk you through the following steps. Read the software supplemental agreement and then click in the circle to the left of the, “I have read and ACCEPT the terms of the License Agreement”.
A green button will appear. Then click “Install>” to continue the installation process.
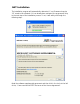
The “.Net Framework” setup window will show the progress as the application is being activated.
After all of the components are installed the “Setup Complete” window will appear. This is your indication that all of the “.NET 3.5 SP1” components are successfully installed and operational. This is the end of the .
Once the installation is complete you will need to reboot your computer. Click on “Yes, restart the computer now” to reboot or “No, I will restart the computer later” to restart at a more convenient time. Click “Finish” to complete the installation.
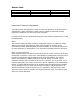
Installing the Hardware NOTE: The software must be installed before connecting the X-7 or the software may not install correctly. After installing the software, connect the square end of the provided USB cable to the back of the X-7 USB recorder, and then connect the other end into an available USB port on your personal computer. Once connected, the Operation System will automatically locate the device drivers for the X-7 USB recorder. This may take a few minutes.
Connecting the Telephone to the X-7 USB Recording Device 1) Disconnect the handset from your telephone. 2) Plug the handset cord into the side of the USB Recorder labeled “HANDSET”. 3) Connect one side of the provided coiled cord to back of the USB Recorder labeled “BASE”.
4) Connect the other end of the coiled cord to the telephone in the same location from which the handset cord was removed from in step 1. Connecting the Headset The USB Recorder also supports a 2.5 mm (standard cellular telephone) headset to provide hands-free solution. After completing steps 1 – 4, connect the headset to the front of the USB Recorder. Activate the headset by lifting the handset.
To activate the headset click on the use headset icon After activating the icon will display green.