
Installation Guide

VISIT US FOR ADDITIONAL XCLUDER PRODUCTS AT: WWW.BUYXCLUD ER.COM
Xcluder® X2 Garage Door Installation Instructions
Use for Parts #162(970, 971,972, 973, 974, 975, 976,977, and 978)
Tools required:
• Safety Glasses & Work Gloves
• Hack Saw
• Locking pliers or C-Clamps
• Power Drill w/ Phillips Bit
• Sturdy Shears
• WD-40 or other lubricant
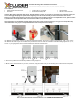
Caution: Wear safety glasses & work gloves, Xcluder fill fabric is sharp. If your door is connected to an automatic opener, be
sure to disengage & unplug the opener before beginning work. At no time should you remove the bottom roller carrier
because it is under spring tension. If you have any concerns over installing yourself, or if complications occur, please contact
a qualified door service provider. Never use a board or ladder to prop the door open.
Open garage door to comfortable working height. Secure door in this position by placing a vice grip or C-clamp above top
roller and another vice grip or C-clamp below bottom roller to keep door from moving.
1A. Measure door thickness, ensuring you have the appropriate retainer. X2s come in 3 sizes for garage doors: 13/8”, 1 3/4”, and 2”.
1B. Measure the width of your door to determine you have the correct kit. Kits are available for standard width garage doors: 8’, 12’,
and 16’. If your garage door does not match these sizes order the next wider door.
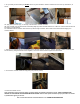
2. Remove any retainer and seal already installed on the garage door.
3. Mount all but 1 of the retainers to your door, as shown, using drill. Make sure you are screwing into a solid structural component.