
User's Manual


Scanning to a Computer
The Scan to PC feature allows you to scan a document to your computer.
Note
This feature must be enabled by your System Administrator.
To use the Scan to PC feature:
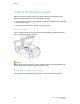
1. Load the original on the document glass or in the document feeder.
2. On the printer Control Panel, press the Services Home button.
3. Touch Scan to PC.
4. Touch Transfer Protocol, then touch FTP, SMB, or SMB (UNC Format), then touch
Save.
5. Touch Server, Save in, User Name, and Password. For each setting, using the touch
screen keyboard, enter the data. Touch Save.
Note
If the server name was previously stored, touch Address Book, touch the desired
server, touch Add, then touch Close.
6. To change any of the scan settings, touch the four menus at the bottom of the
touch screen: Color Scanning, 2-Sided Scanning, Original Type, and Scan Presets.
For details, see Setting Scan Options.
7. Press the green Start button.
8. Access the scanned image at your computer.
Scanning to a Home Directory
The Scan to Home feature allows you to scan a document to your home directory. The
network location of your home directory is defined by the System Administrator.
Note
This feature must be configured by the System Administrator.
To use the Scan to Home feature:
1. Load the original on the document glass or in the document feeder.
2. On the printer Control Panel, press the Services Home button.
3. Touch Network Scanning.
4. Touch the template created by your System Administrator.
5. The template defines the scan settings as well as the destination of the image. To
change any of the scan settings, touch the four menus at the bottom of the touch
7-11Xerox
®
Color C60/C70 Printer
User Guide
Scanning