Phaser® 8510/8560MFP multifunction product User Guide Guide d’utilisation Guida dell'utente Benutzerhandbuch Guía del usuario Guia do Usuário Gebruikershandleiding Användarhandbok Betjeningsvejledning Εγχειρίδιο χρήστη www.xerox.
Copyright © 2006 Xerox Corporation. All Rights Reserved. Unpublished rights reserved under the copyright laws of the United States. Contents of this publication may not be reproduced in any form without permission of Xerox Corporation.
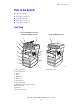
Contents 1 System Features Parts of the System . . . . . . . . . . . . . . . . . . . . . . . . . . . . . . . . . . . . . . . . . . . . . . . . . . . . . . . . Front View . . . . . . . . . . . . . . . . . . . . . . . . . . . . . . . . . . . . . . . . . . . . . . . . . . . . . . . . . Side View . . . . . . . . . . . . . . . . . . . . . . . . . . . . . . . . . . . . . . . . . . . . . . . . . . . . . . . . . . Back View. . . . . . . . . . . . . . . . . . . . . . . . . . . . . . . . . . . . . . . . . . . . . .
Contents Installing the System Drivers . . . . . . . . . . . . . . . . . . . . . . . . . . . . . . . . . . . . . . . . . . . . . . . Available Drivers . . . . . . . . . . . . . . . . . . . . . . . . . . . . . . . . . . . . . . . . . . . . . . . . . . . Windows 98 SE or Later and Windows 2000 or Later . . . . . . . . . . . . . . . . . . . . . . . Macintosh OS 9.x . . . . . . . . . . . . . . . . . . . . . . . . . . . . . . . . . . . . . . . . . . . . . . . . . . . Macintosh OS X, Version 10.2 and Higher . . .
Contents Managing Copy Functions. . . . . . . . . . . . . . . . . . . . . . . . . . . . . . . . . . . . . . . . . . . . . . . . . . 4-20 Setting the Print Job Interrupt Option . . . . . . . . . . . . . . . . . . . . . . . . . . . . . . . . . . . . 4-20 Using a Color Copy Password . . . . . . . . . . . . . . . . . . . . . . . . . . . . . . . . . . . . . . . . . 4-20 5 Scanning Overview . . . . . . . . . . . . . . . . . . . . . . . . . . . . . . . . . . . . . . . . . . . . . . . . . . . . . . . . . . . . .
Contents 6 Faxing Basic Faxing . . . . . . . . . . . . . . . . . . . . . . . . . . . . . . . . . . . . . . . . . . . . . . . . . . . . . . . . . . . . . 6-2 Sending a Fax from the System . . . . . . . . . . . . . . . . . . . . . . . . . . . . . . . . . . . . . . . . . 6-2 Sending a Fax from Your Computer. . . . . . . . . . . . . . . . . . . . . . . . . . . . . . . . . . . . . . 6-3 Adding Individual and Group Speed Dial Entries. . . . . . . . . . . . . . . . . . . . . . . . . . . . . . . . .
Contents 7 Print Quality Controlling the Quality of Your Prints . . . . . . . . . . . . . . . . . . . . . . . . . . . . . . . . . . . . . . . . . 7-2 Selecting a Print-Quality Mode. . . . . . . . . . . . . . . . . . . . . . . . . . . . . . . . . . . . . . . . . . 7-2 Adjusting Color. . . . . . . . . . . . . . . . . . . . . . . . . . . . . . . . . . . . . . . . . . . . . . . . . . . . . . 7-4 Solving Print-Quality Problems. . . . . . . . . . . . . . . . . . . . . . . . . . . . . . . . . . . . . . . . . .
Contents A User Safety B Copy Regulations C Fax Regulations Index Phaser® 8510/8560MFP Multifunction Product vi
System Features This chapter includes: ■ ■ ■ ■ Parts of the System on page 1-2 System Configurations on page 1-5 Control Panel on page 1-8 More Information on page 1-14 Phaser® 8510/8560MFP Multifunction Product 1-1
Parts of the System Parts of the System This section includes: ■ ■ ■ ■ Front View on page 1-2 Side View on page 1-3 Back View on page 1-3 Open View on page 1-4 Front View Phaser 8510MFP/D Product and All Phaser 8560MFP Products Phaser 8510MFP/N Product 9 8 1 7 6 5 4 10 3 11 2 12 1 8560-134 8560-001 1. Document cover 1. Tray 4 (optional) 2. Tray 3 (optional) 3. Tray 2 4. Tray 1 5. Output tray 6. Exit cover 7. Control panel 8. Document feeder 9. Duplex automatic document feeder 10.
Parts of the System Side View 1 2 3 1. Maintenance kit 4 2. Waste tray 3. Power cord connection 4. Power switch 5 6 7 8 9 5. Scanner cable connection 6. USB connection 7. RJ-11 fax modem connection 8. Configuration card 9. Ethernet 10/100 Base-Tx connection 8560-002 Back View Phaser 8560MFP Products Phaser 8510MFP Products 2 1 1 3 8560-003 8560-135 1. Hard drive 1. Flash memory 2. RAM slots 3.
Parts of the System Open View 1. Long paper extension 2. Short paper stop 3. Exit cover 5 4. Ink cover 5.
System Configurations System Configurations This section includes: ■ ■ ■ Standard Features on page 1-5 Available Configurations on page 1-6 Options on page 1-7 Standard Features Your Phaser 8510/8560MFP Multifunction Product offers many standard features to meet your office needs.
System Configurations Available Configurations Standard System Configurations Memory 8510MFP/N 8510MFP/D 8560MFP/D 8560MFP/T 8560MFP/X 512 MB 512 MB 512 MB 512 MB 1 GB (2x512) Hard Drive No No Yes Yes Yes Flash Memory Yes Yes No No No Automatic 2-Sided Printing No Yes Yes Yes Yes Duplex Automatic Document Feeder No Yes Yes Yes Yes 525-Sheet Feeder (Tray 3) Optional* Optional* Optional* Yes Yes 525-Sheet Feeder (Tray 4) Optional* Optional* Optional* Optional* Y
System Configurations Options You can order additional trays, and memory if these items are not standard on your system. Print the Configuration page to see which options are installed on your system. To print the Configuration page, see Information Pages on page 1-12.
Control Panel Control Panel This section includes: ■ ■ ■ ■ ■ Control Panel Features on page 1-8 Control Panel Layout on page 1-8 Menu Map on page 1-12 Information Pages on page 1-12 Sample Pages on page 1-12 Control Panel Features The control panel: ■ ■ ■ ■ Displays the system’s operating status (for example, Printing, Ready to Print), system errors, and warnings. Prompts you to load paper, order and replace supplies, and clear jams.
Control Panel Left Side of the Control Panel Color Mode Document Type Output Quality 2 Sided Lighten Darken Reduce Enlarge 9 8 7 1 2 3 4 5 6 8560-007 The left side of the control panel contains the following copy, scan, and fax function buttons and LEDs. A lighted LED indicates the current selection. 4. 2-Sided button and LEDs 1. Color Mode button and LEDs 5. Lighten/Darken button and LEDs Press the Color Mode button to select black and white or color for your copy or scan job. 2.
Control Panel Middle of the Control Panel 2 1 Copy 4 3 Scan Print Ready to Copy System 6 1 Paper Supply... Reduce/Enlarge... Lighten/Darken... Original Size... 12 Fax 5 2: Letter 8.5X11 100% 0 Tray/Auto 11 10 9 8 7 8560-006 7. OK (✓) button 1. Copy button Press to view the Copy menu on the display screen. 2. Scan button Press to accept the setting selected. 8. Down Arrow button Press to scroll down through menu options. Press to view the Scan menu on the display screen. 3.
Control Panel Right Side of the Control Panel 8 6 7 5 , Speed Dial Send List Delay Send Pause 4 3 ABC2 2 # =:(),!/* 1 8560-008 5. Pause button 1. Alphanumeric keys ■ Press each alphanumeric key several times to cycle through numbers and letters. ■ Press the * and # keys several times to cycle through characters when using speed dial. The cursor advances after one second. 2. Start button Press to start a copy, scan, or fax job.
Control Panel Information Pages Your system comes with a set of information pages to help you obtain the best results from your system. Access these pages from the control panel. Print the Menu Map to see where these information pages are located in the control panel menu structure. Note: This print icon appears before the titles of information pages that can be printed. When the information page is highlighted on the control panel, press the OK button to print that page.
Control Panel Color Sampler Pages The color sampler pages are designed to help you select colors to use in your print jobs. Each sampler page lists either the percentages of cyan, magenta, yellow, and black that are used, or the amounts (from 0 to 255) of red, green, and blue that are used. Note: Before you print the sampler pages, select the appropriate default print-quality mode and color correction for your print job on the control panel. To print the color sampler pages: 1. 2. 3. 4.
More Information More Information This section includes: ■ ■ Resources on page 1-14 Xerox Support Centre on page 1-15 Obtain information regarding your system and its capabilities from the following sources. Resources Information Source Installation Guide* Packaged with system Quick Use Guide* Packaged with system User Guide (PDF)* Software and Documentation CD-ROM Advanced Features Guide (PDF) www.xerox.com/office/8510_8560support Quick Start Tutorials www.xerox.
More Information Xerox Support Centre The Xerox Support Centre is a utility that is installed during printer driver installation. It is available for systems with Windows 2000 and later or Mac OS X, version 10.2 and higher. The Xerox Support Centre icon appears on the desktop for Windows systems or is placed in the Mac OS X dock.
Network Basics This chapter includes: ■ ■ ■ ■ Overview of Network Setup and Configuration on page 2-2 Setting Up the Network on page 2-3 Configuring the Network Address on page 2-5 Installing the System Drivers on page 2-10 This chapter provides basic information about setting up and connecting to your system. See also: Advanced Features Guide at www.xerox.
Overview of Network Setup and Configuration Overview of Network Setup and Configuration To set up and configure the network: 1. Turn on the system and the computer. 2. Connect the system to the network using the recommended hardware and cables. 3. Configure the system’s network address, which is required to identify the system on the network.
Setting Up the Network Setting Up the Network This section includes: ■ ■ ■ Choosing a Connection Method on page 2-3 Connecting via USB on page 2-3 Connecting via Ethernet (Recommended) on page 2-3 Choosing a Connection Method Connect the system via Ethernet or USB. A USB connection is a direct connection and not used for networking. An Ethernet connection is used for networking. Hardware and cabling requirements vary for the different connection methods.
Setting Up the Network Network Connection Depending on your particular setup, the following hardware and cabling is required for Ethernet. ■ ■ ■ ■ If you are connecting to one computer, an Ethernet RJ-45 crossover cable is required. If you are connecting to one or more computers with a hub, an Ethernet hub and two twisted-pair (category 5/RJ-45) cables are required.
Configuring the Network Address Configuring the Network Address This section includes: ■ ■ ■ ■ TCP/IP and IP Addresses on page 2-5 Automatically Setting the System’s IP Address on page 2-5 Dynamic Methods of Setting the System’s IP Address on page 2-6 Manually Setting the System’s IP Address on page 2-9 TCP/IP and IP Addresses If your computer is on a large network, contact your network administrator for the appropriate TCP/IP addresses and additional configuration information.
Configuring the Network Address Dynamic Methods of Setting the System’s IP Address Set the system’s IP address using any of the following methods. DHCP is enabled by default on all Phaser printers. ■ ■ ■ DHCP CentreWare IS AutoIP Information Required for Manual IP Addressing Information Comments Internet Protocol (IP) address of the system Format is xxx.xxx.xxx.xxx, where xxx represents a decimal number from 0–255.
Configuring the Network Address Changing or Modifying the IP Address Using CentreWare IS CentreWare IS provides a simple interface that enables you to manage, configure, and monitor networked systems from your desktop using an embedded web server. For complete information about CentreWare IS, click the Help button in CentreWare IS to go to the CentreWare IS Online Help. After setting the system’s IP address, you can modify TCP/IP settings using CentreWare IS. 1. 2. 3. 4. 5. 6. Launch your web browser.
Configuring the Network Address Dynamic Domain Name Service (DDNS) The system supports Dynamic DNS through DHCP. You must have DHCP enabled on the system for DDNS to function. Your network’s DHCP server must also support Dynamic DNS updates through option 12 or option 81 support. See your network administrator for details. 1. 2. 3. 4. 5. 6. 7. Launch your web browser. Enter the system’s IP address in the browser’s Address field (http://xxx.xxx.xxx.xxx). Select Properties.
Configuring the Network Address Manually Setting the System’s IP Address Note: Verify that your computer has a properly configured IP address for your network. Contact your network administrator for more information. If you are on a network without a DNS server, or in an environment where the network administrator assigns system IP addresses, you can use this method to manually set the IP address. Manually setting the IP address overrides DHCP and AutoIP.
Installing the System Drivers Installing the System Drivers This section includes: ■ ■ ■ ■ Available Drivers on page 2-10 Windows 98 SE or Later and Windows 2000 or Later on page 2-11 Macintosh OS 9.x on page 2-11 Macintosh OS X, Version 10.2 and Higher on page 2-12 Available Drivers To access special printing options, use a Xerox printer driver. Xerox provides drivers for a variety of page description languages and operating systems.
Installing the System Drivers Windows 98 SE or Later and Windows 2000 or Later To install the printer driver from the Software and Documentation CD-ROM: 1. Insert the CD-ROM into the computer’s CD-ROM drive. If the installer does not launch, do the following: a. Click Start, and then click Run. b. In the Run window, type: :\INSTALL.EXE. 2. Select your desired language from the list. 3. Select Install Printer Driver. 4.
Installing the System Drivers EtherTalk Note: If you use EtherTalk, Macintosh computers do not require IP addresses. Follow these steps to install the printer driver: 1. Open the AppleTalk Control Panel. 2. Verify that the Ethernet port is the selected network port. 3. Double-click the installer on the Software and Documentation CD-ROM to install the printer driver. 4. Open the Chooser, and then click the LaserWriter driver. 5.
Installing the System Drivers USB Connection To install the printer driver from the Software and Documentation CD-ROM: 1. Insert the CD-ROM into the CD-ROM drive. ■ Open the Print Center utility for Mac OS X, version 10.2.x. ■ Open the Printer Setup Utility for Mac OS X, version 10.3.x. Note: To locate utilities on the Macintosh hard drive, open the Applications folder, and then open the Utilities folder. 2. 3. 4. 5. 6. 7. Click the Add button. Select USB from the drop-down menu.
Installing the System Drivers Macintosh OS X, Version 10.4 Bonjour Connection To install the printer driver from the Software and Documentation CD-ROM: 1. Insert the CD-ROM into the CD-ROM drive. 2. Open the Printer Setup Utility. Note: To locate utilities on the Macintosh hard drive, open the Applications folder, and then open the Utilities folder. 3. Click the Add button. 4. Select the Default Browser in the Printer Browser. 5. Select the Bonjour system in the list of available systems.
Installing the System Drivers LPD Connection To install the printer driver from the Software and Documentation CD-ROM: 1. Insert the CD-ROM into the CD-ROM drive and select the VISE installer to install the printer software. 2. Once installation is complete, open the Printer Setup Utility. Note: To locate utilities on the Macintosh hard drive, open the Applications folder, and then open the Utilities folder. 3. 4. 5. 6. 7. Click the Add button.
Printing Basics This chapter includes: ■ ■ ■ ■ ■ ■ Overview of Basic Steps on page 3-2 Supported Paper and Media on page 3-3 Loading Paper on page 3-9 Selecting Printing Options on page 3-20 Printing on Both Sides of the Paper on page 3-25 Printing on Specialty Media on page 3-29 See also: Using paper trays video tutorials at www.xerox.
Overview of Basic Steps Overview of Basic Steps 1. Load paper in the tray. 2. If you are prompted by the control panel, either confirm the paper type and size or change it as required. 3. From the software application, access the Print dialog box, and then select printing options in the printer driver. 4. Send the job to the system from the software application’s Print dialog box.
Supported Paper and Media Supported Paper and Media This section includes: ■ ■ ■ ■ Paper Usage Guidelines on page 3-4 Paper That Can Damage Your System on page 3-5 Paper Storage Guidelines on page 3-5 Supported Paper Sizes and Weights on page 3-6 Your system is designed to be used with a variety of paper types. Follow the guidelines in this section to ensure the best print quality and to avoid jams. For best results, use Xerox printing media specified for your Phaser 8510/8560MFP product.
Supported Paper and Media Paper Usage Guidelines The system trays accommodate most sizes and types of paper, transparencies, or other specialty media. Follow these guidelines when loading paper and media in the trays: ■ ■ ■ ■ ■ Use only recommended Xerox transparencies; print quality may vary with other transparencies. Do not print on label stock once a label has been removed from a sheet. Use only paper envelopes. Print all envelopes single-sided only. Do not overload the paper trays.
Supported Paper and Media Paper That Can Damage Your System Your system is designed to use a variety of media types for print and copy jobs. However, some media can cause poor output quality, increased paper jams, or damage to your system.
Supported Paper and Media Supported Paper Sizes and Weights The following sections provide information about paper sizes and weights that can be used in the system trays. For more information about supported paper and other media, print the Paper Tips page: 1. 2. 3. 4. On the control panel, press the System button. Select Information, and then press the OK button. Select Information Pages, and then press the OK button. Select Paper Tips, and then press the OK button to print.
Supported Paper and Media Paper Sizes and Weights for Tray 1 8560-128 60–220 g/m2 (16–40 lb. Bond, 50–80 lb. Cover) Index Card 3.0 x 5.0 in Custom Sizes Statement 5.5 x 8.5 in. Executive 7.25 x 10.5 in. Margins Letter 8.5 x 11.0 in. 5 mm on all sides US Folio 8.5 x 13.0 in. Legal 8.5 x 14.0 in. A4 210 x 297 mm A5 148 x 210 mm A6 105 x 148 mm B5 JIS 182 x 257 mm ISO B5 176 x 250 mm #10 Commercial 4.12 x 9.5 in. Monarch 3.87 x 7.5 in. A7 5.25 x 7.25 in.
Supported Paper and Media Paper Sizes and Weights for Tray 2, 3, or 4 8560-129 60–120 g/m2 (16–32 lb. Bond, 22–45 lb. Cover) Statement 5.5 x 8.5 in. Executive 7.25 x 10.5 in. Letter 8.5 x 11.0 in. US Folio 8.5 x 13.0 in. Legal 8.5 x 14.0 in. A4 210 x 297 mm A5 148 x 210 mm B5 JIS 182 x 257 mm ISO B5 176 x 250 mm #10 Commercial 4.12 x 9.5 in.
Loading Paper Loading Paper This section includes: ■ ■ Loading Paper in Tray 1 on page 3-9 Loading Paper in Tray 2, 3, or 4 on page 3-14 Loading Paper in Tray 1 Use Tray 1 for a wide range of media including: ■ ■ ■ ■ ■ ■ ■ ■ Plain paper, letterhead, colored paper, and preprinted paper Card stock Labels Envelopes Transparencies Specialty media (including business cards, photo paper, postcards, pre-punched paper, duradocument paper, and trifold brochures) Pre-printed paper (paper already printed on one si
Loading Paper To load paper or other media in Tray 1: 1. Pull up and out on the handle to open Tray 1. 8560-011 2. Open the tray extension.
Loading Paper 3. Insert paper or other media into the tray. ■ Single-sided printing: Insert the side to be printed facedown with the top of the page entering the system first. 8560-109 Note: When using pre-punched paper, adjust the print margins to accommodate the holes. Printing over the holes may cause ink to transfer onto subsequent pages. A minimum margin of 19 mm (0.75 in.) is recommended. ■ Side-flap envelopes: Insert envelopes with the flap side up and the flap toward the left side of the tray.
Loading Paper ■ 2-sided printing: Insert side one faceup with the bottom of the page entering the system first. 8560-110 4. Adjust the paper guides to fit the paper loaded in the tray. 8560-130 5. On the control panel, press the OK button to use the paper size and type displayed as the current setup, or change the paper size and type: a. Select Change setup, and then press the OK button. b. Select the paper size, and then press the OK button. c. Select the paper type, and then press the OK button.
Loading Paper Using Manual Feed If you are using paper, such as letterhead, and do not want others to use it by mistake, you can set the system to prompt you when it is time to load the paper for your print job. Windows To select manual feed using Windows 2000, Windows XP, or Windows Server 2003: 1. 2. 3. 4. 5. 6. In the Windows printer driver, click the Paper/Quality tab. Select Force Printing from a Specific Tray, and then select Tray 1 from the list.
Loading Paper Loading Paper in Tray 2, 3, or 4 Use Tray 2, 3, or 4 for a wide range of media including: ■ ■ ■ ■ ■ ■ ■ Plain paper and letterhead Card stock Labels Envelopes Transparencies Specialty media (including photo paper, postcards, pre-punched paper, duradocument paper, and trifold brochures) Pre-printed paper (paper already printed on one side) See also: Paper Sizes and Weights for Tray 2, 3, or 4 on page 3-8 Printing on Specialty Media on page 3-29 Printing Custom Size Paper on page 3-52 The med
Loading Paper To load paper, envelopes, or other media in Tray 2, 3, or 4: 1. Remove the tray from the system. 8560-020 2. Insert paper, transparencies, envelopes, or specialty media into the tray. ■ Single-sided printing: Insert the side to be printed faceup with the top of the page toward the front of the tray. 8560-111 Note: When using pre-punched paper, adjust the print margins to accommodate the holes. Printing over the holes may cause ink to transfer onto subsequent pages.
Loading Paper ■ Envelopes: Insert the envelopes with the flap side down and the flap toward the left side of the tray. 8560-026 ■ 2-sided printing: Insert side one facedown with the top of the page toward the back of the tray. 8560-112 Caution: Do not load paper or media above the fill line indicated on the tray. Overloading the tray may cause jams.
Loading Paper 3. Adjust the paper guides to fit the paper loaded in the tray (if necessary). ■ Length guide: Press the sides, then slide the guide until the arrow on the guide points to the appropriate paper size imprinted on the bottom of the tray. When properly positioned, the guide clicks into place. 8560-121 ■ Width guides: Slide the width guides until the arrows on the guides point to the appropriate paper size labeled on the bottom of the tray. When properly positioned, the guides click into place.
Loading Paper 4. Insert the tray into the slot and push it completely into the system. 8560-098 5. Adjust the output tray for short or long media. i 8560-016 For media shorter than 190 mm (7.5 in.), flip up the paper stop. 8560-017 For media longer than 297 mm (11.7 in.), extend the output tray.
Loading Paper 6. On the control panel, press the System button. a. Select Paper Tray Setup, and then press the OK button. b. Select Tray 2 Paper, Tray 3 Paper, or Tray 4 Paper, and then press the OK button. c. Select Use current setup if the correct paper type is displayed as the current setup, or change the paper type: ■ Select Tray 2 Paper Type, Tray 3 Paper Type, or Tray 4 Paper Type, and then press the OK button. ■ Select the appropriate paper type from the list displayed, and then press the OK button.
Selecting Printing Options Selecting Printing Options This section includes: ■ ■ ■ Selecting Printing Preferences (Windows) on page 3-20 Selecting Options for an Individual Job (Windows) on page 3-21 Selecting Options for an Individual Job (Macintosh) on page 3-23 See also: Advanced Features Guide at www.xerox.com/office/8510_8560support. Selecting Printing Preferences (Windows) Printer preferences control all of your print jobs, unless you override them specifically for a job.
Selecting Printing Options Selecting Options for an Individual Job (Windows) If you want to use special printing options for a particular job, change the driver settings before sending the job to the system. For example, if you want to use the High-Resolution print-quality mode for a particular graphic, select this setting in the driver before printing that job. 1. With the desired document or graphic open in your application, access the Print dialog box. 2.
Selecting Printing Options Printing Options for Windows Operating Systems (Continued) Operating System Driver Tab Printing Options Windows 98 SE Setup tab ■ Paper type, size, and tray selection ■ Orientation ■ Automatic 2-sided printing ■ End of job notification ■ Print quality ■ Separation pages ■ Cover pages ■ Secure prints, proof prints, and saved prints ■ Color corrections ■ Black and white conversion Output Options tab TekColor tab Phaser® 8510/8560MFP Multifunction Product 3
Selecting Printing Options Selecting Options for an Individual Job (Macintosh) To select print settings for a particular job, change the driver settings before sending the job to the printer. 1. With the document open in your application, click File, and then click Print. 2. Select the desired printing options from the menus and drop-down lists that are displayed. Note: In Macintosh OS X, click Save Preset on the Print menu screen to save the current printer settings.
Selecting Printing Options Macintosh PostScript Driver Settings (Continued) Operating System Driver Drop-Down Title Printing Options Mac OS X, Version 10.2 and 10.
Printing on Both Sides of the Paper Printing on Both Sides of the Paper This section includes: ■ ■ Automatic 2-Sided Printing Guidelines on page 3-25 Manual 2-Sided Printing on page 3-27 Note: For information about manual two-sided printing, go to the Knowledge Base at www.xerox.com/office/8510_8560support. Automatic 2-Sided Printing Guidelines Automatic 2-sided printing is available from all trays.
Printing on Both Sides of the Paper Binding Edge Options When you use the printer driver to select 2-sided printing, also select the binding edge, which determines how the pages turn. The actual outcome depends on the orientation (portrait or landscape) of images on the page, as displayed in the following illustrations.
Printing on Both Sides of the Paper Manual 2-Sided Printing You can manually print on both sides of the paper when you are using paper types that are either too small or too heavy for automatic 2-sided printing. You can also manually print on the second side of paper that has been pre-printed on side one by this system or another solid-ink system or printer. Note: Before printing the second side of your paper, always select 2nd Side as the paper type on the control panel and in the printer driver.
Printing on Both Sides of the Paper Printing Side Two 1. Remove the paper from the output tray and reload it in the paper tray: ■ Tray 1: Insert side two facedown with the top of the page entering the system first. ■ Tray 2, 3, or 4: Insert side two faceup with the top of the page toward the front of the tray. 2. Select 2nd Side on the control panel: Tray 1 a. Select Change setup, and then press the OK button. b. Select the appropriate paper size, and then press the OK button. c.
Printing on Specialty Media Printing on Specialty Media This section includes: ■ ■ ■ ■ ■ Printing Transparencies on page 3-29 Printing Envelopes on page 3-35 Printing Labels on page 3-41 Printing Glossy Paper on page 3-47 Printing Custom Size Paper on page 3-52 Printing Transparencies Transparencies can be printed from any tray. They should be printed on one side only. For best results, use only recommended Xerox transparencies.
Printing on Specialty Media Printing Transparencies from Tray 1 To print transparencies: 1. Pull down and out on the handle to open Tray 1. 8560-011 2. Open the tray extension.
Printing on Specialty Media 3. Insert transparencies into the tray. 8560-028 Note: Do not load transparencies above the transparency fill line inside the tray. 4. On the control panel, press the OK button if the correct paper size and Transparency are displayed as the current setup, or select the transparency size and type: a. Select Change setup, and then press the OK button. b. Select the appropriate transparency size, and then press the OK button. c. Select Transparency, and then press the OK button.
Printing on Specialty Media Printing Transparencies from Tray 2, 3, or 4 To print transparencies: 1. Remove the tray from the system. 8560-020 2. Insert transparencies into the tray. 8560-029 Note: Do not load transparencies above the transparency fill line inside the tray.
Printing on Specialty Media 3. Adjust the paper guides to fit the transparencies (if necessary). ■ Length guide: Press the sides, and then slide the guide until the arrow on the guide points to the appropriate paper size imprinted on the bottom of the tray. When properly positioned, the guide clicks into place. 8560-030 ■ Width guides: Slide the width guides until the arrows on the guides point to the appropriate paper size labeled on the bottom of the tray.
Printing on Specialty Media 4. Insert the tray into the tray slot, and then push it completely into the system. 8560-032 5. On the control panel, press the System button. a. Select Paper Tray Setup, and then press the OK button. b. Select Tray 2 Paper, Tray 3 Paper, or Tray 4 Paper, and then press the OK button. c.
Printing on Specialty Media Printing Envelopes Envelopes can be printed from any tray depending on the type of envelope you are using. See also: Paper Sizes and Weights for Tray 1 on page 3-7 Paper Sizes and Weights for Tray 2, 3, or 4 on page 3-8 Guidelines ■ ■ ■ ■ ■ ■ Use only paper envelopes specified in the Supported Papers table. Successful envelope printing is highly dependent on the quality and construction of the envelopes. Maintain constant temperatures and relative humidity.
Printing on Specialty Media Printing Envelopes from Tray 1 To print envelopes: 1. Pull down and out on the handle to open Tray 1. 8560-011 2. Open the tray extension.
Printing on Specialty Media 3. Insert envelopes into the tray with the flap side up and the flap of the envelopes toward the left side of the tray. Adjust the paper guides to fit the envelopes. 8560-019 4. On the control panel, press the OK button if the correct envelope size and type are displayed as the current setup, or select the envelope size and type: a. Select Change setup, and then press the OK button. b. Select the appropriate envelope size, and then press the OK button. c.
Printing on Specialty Media Printing Envelopes from Tray 2, 3, or 4 To print envelopes: 1. Remove the tray from the system. 8560-020 2. Insert envelopes into the tray, flap side down with the flap toward the left side of the tray.
Printing on Specialty Media 3. Adjust the paper guides to fit the envelopes. ■ Length guide: Press the sides, and then slide the guide until the arrow on the guide points to the appropriate paper size imprinted on the bottom of the tray. When properly positioned, the guide clicks into place. 8560-034 ■ Width guides: Slide the width guides until the arrows on the guides point to the appropriate paper size labeled on the bottom of the tray. When properly positioned, the guides click into place.
Printing on Specialty Media 4. Insert the tray into the tray slot, and then push it completely into the system. 8560-119 5. On the control panel, press the System button. a. Select Paper Tray Setup, and then press the OK button. b. Select Tray 2 Paper, Tray 3 Paper, or Tray 4 Paper, and then press the OK button. c.
Printing on Specialty Media Printing Labels Labels can be printed from any tray. To order paper, transparencies, or other specialty media, contact your local reseller or go to www.xerox.com/office/supplies. See also: Paper Sizes and Weights for Tray 1 on page 3-7 Paper Sizes and Weights for Tray 2, 3, or 4 on page 3-8 Guidelines ■ ■ ■ ■ ■ ■ Do not use vinyl labels. Print only on one side of the sheet of labels. Do not use any sheet where labels are missing; it may damage the system.
Printing on Specialty Media Printing Labels from Tray 1 To print labels: 1. Pull down and out on the handle to open Tray 1. 8560-011 2. Open the tray extension.
Printing on Specialty Media 3. Insert labels into the tray with the side to be printed facedown and the top of the page entering the system first. 8560-036 4. Adjust the paper guides to fit the labels loaded in the tray. 8560-037 5. On the control panel, press the OK button if the correct paper size and Labels are displayed as the current setup, or select the label size and type: a. Select Change setup, and then press the OK button. b. Select the appropriate paper size, and then press the OK button. c.
Printing on Specialty Media Printing Labels from Tray 2, 3, or 4 To print labels: 1. Remove the tray from the system. 8560-020 2. Insert a maximum of 400 sheets of labels into the tray with the side to be printed faceup and the top of the page toward the front of the tray.
Printing on Specialty Media 3. Adjust the paper guides to fit the labels (if necessary). ■ Length guide: Press the sides, and then slide the guide until the arrow on the guide points to the appropriate paper size imprinted on the bottom of the tray. When properly positioned, the guide clicks into place. 8560-039 ■ Width guides: Slide the width guides until the arrows on the guides point to the appropriate paper size labeled on the bottom of the tray. When properly positioned, the guides click into place.
Printing on Specialty Media 4. Insert the tray into the tray slot, and then push it completely into the system. 8560-041 5. On the control panel, press the System button. a. Select Paper Tray Setup, and then press the OK button. b. Select Tray 2 Paper, Tray 3 Paper, or Tray 4 Paper, and then press the OK button. c.
Printing on Specialty Media Printing Glossy Paper Glossy paper can be printed, 1- or 2-sided, from any tray. To order paper, transparencies, or other specialty media, contact your local reseller or go to www.xerox.com/office/supplies. Guidelines ■ ■ ■ ■ ■ Do not open sealed packages of glossy paper until you are ready to load them into the system. Leave glossy paper in the original wrapper, and leave the packages in the shipping carton until ready to use.
Printing on Specialty Media 2. Open the tray extension. 8560-012 3. Insert glossy paper in the tray. Adjust the paper guides to fit the paper. 8560-009 4. On the control panel, press the OK button if the correct paper size and Special are displayed a the current setup, or select the glossy paper size and type: a. Select Change setup, and then press the OK button. b. Select the appropriate paper size, and then press the OK button. c. Select Special, and then press the OK button. 5.
Printing on Specialty Media Printing Glossy Paper from Tray 2, 3, or 4 To print glossy paper: 1. Remove the tray from the system. 8560-020 2. Insert glossy paper into the tray.
Printing on Specialty Media 3. Adjust the paper guides to fit the glossy paper (if necessary). ■ Length guide: Press the sides, and then slide the guide until the arrow on the guide points to the appropriate paper size imprinted on the bottom of the tray. When properly positioned, the guide clicks into place. 8560-121 ■ Width guides: Slide the width guides until the arrows on the guides point to the appropriate paper size labeled on the bottom of the tray.
Printing on Specialty Media 4. Insert the tray into the tray slot, and then push it completely into the system. 8560-098 Note: Do not load glossy paper above the transparency fill line inside the tray. Overloading the tray may cause jams. 5. On the control panel, press the System button. a. Select Paper Tray Setup, and then press the OK button. b. Select Tray 2 Paper, Tray 3 Paper, or Tray 4 Paper, and then press the OK button. c.
Printing on Specialty Media Printing Custom Size Paper In addition to the wide variety of standard paper sizes that you can use for printing, you can also print on custom size paper within the following dimensions. Note: Print custom size paper from Tray 1 only. Single-Sided Printing 2-Sided Printing Short edge 76–216 mm (3.0-8.5 in.) 140–216 mm (5.5–8.5 in.) Long edge 127–356 mm (5.0–14.0 in.) 210–356 mm (8.3–14.0 in.) Weight 60–220 g/m2 60–120 g/m2 (16–40 lb. Bond) (22–80 lb.
Printing on Specialty Media 2. Open the tray extension. 8560-012 3. Insert custom size paper into the tray. ■ Single-sided printing: Insert the side to be printed facedown with the top of the page entering the system first.
■ 2-sided printing: Insert side one faceup with the bottom of the page entering the system first. 8560-110 4. Adjust the paper guides to fit the paper loaded in the tray. 5. Adjust the output tray for short or long media. 8560-016 8560-017 For media shorter than 190 mm (7.5 in.), flip up the paper For media longer than 297 mm (11.7 in.), stop. extend the output tray.
Printing on Specialty Media 6. On the control panel, press the OK button if the correct paper size and type are displayed as the current setup, or select the appropriate paper size and type: a. Select Change setup, and then press the OK button. b. Select New Custom Size, and then press the OK button. c. Select one of the following options for selecting the short edge size: ■ If the size displayed is correct, press the OK button.
Copying This chapter includes: ■ ■ ■ Basic Copying on page 4-2 Adjusting Copying Options on page 4-3 Managing Copy Functions on page 4-20 Note: Some of the features described in this chapter may not be available on your system configuration.
Basic Copying Basic Copying Use either the document glass or the document feeder to make copies. Load the originals to be copied and follow the steps below to make copies. To clear the settings from the previous job, press the Clear All button once. Note: For additional copying information, print the Copying Guide. On the control panel, press the Copy button, select Copying Guide, and then press the OK button to print the guide.
Adjusting Copying Options Adjusting Copying Options This section includes: ■ ■ ■ ■ ■ Basic Settings on page 4-3 Image Adjustments on page 4-8 Image Placement Adjustments on page 4-13 Output Adjustments on page 4-16 Advanced Copying on page 4-18 Basic Settings You can change the following basic settings: ■ ■ ■ ■ ■ ■ Selecting a Tray to Use for Copies on page 4-3 Setting the Copy Default Tray on page 4-4 Selecting Color or Black and White Copies on page 4-4 Specifying 2-Sided Originals or Copies on page 4
Adjusting Copying Options Setting the Copy Default Tray To set the default paper supply tray for copy jobs: 1. 2. 3. 4. 5. On the control panel, press the System button. Select Job Defaults Setup, and then press the OK button. Select Copy Defaults Setup, and then press the OK button. Select Paper Supply, and then press the OK button. Select the desired tray, and then press the OK button to save the changes.
Adjusting Copying Options Specifying 2-Sided Originals or Copies When you use the document feeder with 2-sided originals, one or both sides can be scanned for copying. You can also create 1-sided or 2-sided copies. Press the 2-Sided button on the control panel to select one of the following options: ■ 1 to 1: Scans only one side of the originals and produces 1-sided copies. ■ 1 to 2: Scans only one side of the originals and produces 2-sided copies.
Adjusting Copying Options Selecting the Quality of the Copies Press the Output Quality button on the control panel to select one of the following output-quality modes: Note: The Standard and Hi-Res/Photo modes are not available on the Phaser 8510MFP products. Output-Quality Mode Type of Copy Job Hi-Res/Photo Highest-quality mode for copies. Provides the best detail and smoothness for photographic images. Produces highest-quality copies, with the best text resolution and smoothest images.
Adjusting Copying Options Selecting the Document Type The scanner optimizes the appearance of the output based on the contents of the original.
Adjusting Copying Options Image Adjustments You can change the following image adjustment settings: ■ ■ ■ ■ ■ ■ ■ ■ ■ Selecting an Original Size on page 4-8 Using the Prescan Glass Option on page 4-9 Reducing or Enlarging the Image on page 4-9 Lightening or Darkening the Image on page 4-10 Adjusting the Contrast of the Image on page 4-10 Automatically Suppressing Background Variations on page 4-10 Adjusting Scan Sensitivity to Laser Originals on page 4-10 Adjusting the Color Balance on page 4-11 Erasing t
Adjusting Copying Options Using the Prescan Glass Option When using the document glass, you can prescan originals when using the auto center, edge erase, auto reduce/enlarge, and poster options. To select a prescan setting: 1. On the control panel, press the Copy button. 2. Select Prescan Glass, and then press the OK button. 3. Select one of the following options: ■ Off: Turns off prescanning. Select an original size for your copy.
Adjusting Copying Options Lightening or Darkening the Image To lighten or darken an image when it is copied, press the Lighten/Darken button on the control panel to select a lighten/darken option. Adjusting the Contrast of the Image To reduce or increase the contrast of the image when it is copied: 1. On the control panel, press the Copy button. 2. Select Contrast, and then press the OK button. 3. Select a whole number from Highest (+3) to Lowest (-3), and then press the OK button.
Adjusting Copying Options Adjusting the Color Balance If colors on the copies do not match the colors on the original, you can adjust the levels of each primary color: cyan, magenta, yellow, and black to optimize the color. Note: You can also change the color settings to achieve a special color effect for your copies. To adjust these color levels: 1. On the control panel, press the Copy button. 2. Select Color Balance, and then press the OK button. 3. To adjust the level of cyan: a.
Adjusting Copying Options Erasing the Edges of Copy Documents You can clean the edges of your copies, eliminating unwanted material from printing, by specifying the amount to erase on the right, left, top, and/or bottom edge. To erase edges on copies: 1. On the control panel, press the Copy button. 2. Select Edge Erase, and then press the OK button. 3. To erase the left edge: a. Select Left, and then press the OK button. b. Select a number from 0.0 through 1.0 inches (in 0.
Adjusting Copying Options Image Placement Adjustments You can change the following image placement adjustment settings: ■ ■ ■ ■ ■ Printing Multiple Images on a Sheet (N-Up) on page 4-13 Printing Posters on page 4-14 Repeating Images on a Sheet on page 4-14 Centering the Image on page 4-14 Shifting the Image on page 4-15 Printing Multiple Images on a Sheet (N-Up) You can copy two or four original page images onto one side of a sheet of paper.
Adjusting Copying Options Printing Posters The poster option enables you to copy one original onto several pages that can be assembled into a poster. The current reduce/enlarge setting is applied. To select the poster option: 1. On the control panel, press the Copy button. 2. Select Poster, and then press the OK button. 3. Select one of the following options: ■ On: Turns on poster printing. ■ Off: Turns off poster printing.
Adjusting Copying Options Shifting the Image In some cases, you may want to change the placement of the image on the copy page. To change image placement: 1. On the control panel, press the Copy button. 2. In the menu, select Margin Shift, and then press the OK button. 3. To increase the margin on the long edge of the copy: a. Select Long Edge, and then press the OK button. b. Select a number from 0 through 2.0 inches (in 0.
Adjusting Copying Options Output Adjustments You can change the following output adjustment settings: ■ ■ ■ Collating Copies on page 4-16 Making Copy Documents with Covers on page 4-16 Using Blank Separation Pages on page 4-17 Collating Copies When you make several copies of a multi-page document, you can collate the output.
Adjusting Copying Options Using Blank Separation Pages When you create copies on transparencies or other special media, you can insert blank separation pages between each copy. To turn on blank separation pages: 1. 2. 3. 4. Select the tray that contains the media you want to use for the copies. On the control panel, press the Copy button. Select Blank Separators, and then press the OK button. Select On to insert a blank separation page between every page of the copy job.
Adjusting Copying Options Advanced Copying You can change the following advanced copying options: ■ ■ Copying Books on page 4-18 Creating Booklets on page 4-19 Copying Books When copying a book, magazine, or pamphlet, you can copy both the left and right pages as a separate image or you can copy only the left or right page. Note: You must use the document glass to make copies from books, magazines, or pamphlets. 1. On the control panel, press the Copy button. 2.
Adjusting Copying Options Creating Booklets You can copy two document pages onto each side of a sheet of paper in the correct order so that you can fold the copy pages into a booklet. The size of the images are reduced proportionally to fit on the copy pages. You can combine this feature with the Book Copy option to reproduce bound documents. To select booklet copies: 1. On the control panel, press the Copy button. 2. Select Create Booklet, and then press the OK button. 3.
Managing Copy Functions Managing Copy Functions This section includes: ■ ■ Setting the Print Job Interrupt Option on page 4-20 Using a Color Copy Password on page 4-20 Setting the Print Job Interrupt Option Print and fax jobs are normally interrupted when users make copies. Printing or faxing continues while the system scans the originals. When the copies are ready to print, the print or fax job pauses, the copies print, and then the print or fax job resumes.
Scanning This chapter includes: ■ ■ ■ ■ ■ ■ ■ ■ Overview on page 5-2 Basic Scanning on page 5-3 Retrieving Scanned Images on page 5-8 Scanning Options on page 5-17 Managing Scan Templates on page 5-22 Managing Folder and Email Profiles on page 5-26 Managing Files and Scanning Policies on page 5-31 Calibrating the Scanner on page 5-35 See also: Using the Scanner (Windows) tutorial at www.xerox.com/office/8510_8560support Using the Scanner (Macintosh) tutorial at www.xerox.
Overview Overview The scanning procedure used with the Phaser 8510/8560MFP product differs from that of desktop scanners. Because the product is normally connected to a network rather than directly to a single computer, you select a destination for the scanned image at the Phaser 8510/8560MFP product. Phaser 8560MFP products: You can store scanned images on the Phaser 8560MFP product’s hard drive in either the Public Folder or a private folder.
Basic Scanning Basic Scanning This section includes: ■ ■ ■ Scanning Originals at the Phaser 8510MFP Product on page 5-4 Scanning Originals at the Phaser 8560MFP Product on page 5-5 Using Walk-Up Scanning on page 5-7 Note: For additional scanning information, print the Scanning Guide. On the control panel, press the Scan button, select Scanning Guide, and then press the OK button to print the guide. Follow the steps below for your Phaser 8510/8560MFP product to scan images at the control panel.
Basic Scanning Scanning Originals at the Phaser 8510MFP Product Phaser 8510MFP products select a user name as the destination when scanning originals at the control panel. Your user name is the name that identifies your computer on a network. Identifying Your User Name To identify your user name: ■ ■ If your user name is a company-assigned name, it could be your employee identification, or another name that may contain letters, numbers, or a combination of both, for example, XX09431 or jsmith.
Basic Scanning Scanning Originals at the Phaser 8560MFP Product Select one of three destinations for images when scanning originals at the Phaser 8560MFP product’s control panel: Public Folder, private folder, or user name. Note: Printing can continue while you are scanning originals at the system. Scanning to the Public Folder To scan originals to the Public Folder at the control panel: 1. 2. 3. 4. Press the Scan button, select Scan To, and then press the OK button.
Basic Scanning Scanning to Your User Name Your user name is the name that identifies your computer on a network. Identifying Your User Name To identify your user name: ■ ■ If your user name is a company-assigned name, it could be your employee identification, or another name that may contain letters, numbers, or a combination of both, for example, XX09431 or jsmith. If you do not have a company-assigned user name, your user name is the name you or someone else has given your computer.
Basic Scanning Using Walk-Up Scanning With the Xerox Scan Utility, you can scan documents to your computer from any Xerox multifunction system that has Walk-Up scanning capability. You do not need to install the specific scan drivers for each system. To perform Walk-Up scanning on the Phaser 8510/8560MFP product: 1. Access the Xerox Scan Utility on your computer: ■ Windows: Right-click the Xerox Scan Utility icon on the taskbar, and then select Xerox Scan Utility.
Retrieving Scanned Images Retrieving Scanned Images This section includes: ■ ■ ■ Using CentreWare IS to Retrieve Images on page 5-9 Using the Xerox Scan Utility to Retrieve Images on page 5-10 Importing Images into an Application on page 5-14 The method you use to view and retrieve images depends on how the system is connected to your computer, the destination you choose for the scanned image, and the operating system, as displayed in the following table.
Retrieving Scanned Images Using CentreWare IS to Retrieve Images If your Phaser 8560MFP product is connected to a network, use CentreWare IS to view, retrieve, or delete images scanned from the Public Folder or from a private folder on the product’s hard drive. Note: The Public Folder and private folders are only available on Phaser 8560MFP products. To retrieve a scanned image using CentreWare IS: 1. 2. 3. 4. Launch your web browser.
Retrieving Scanned Images Using the Xerox Scan Utility to Retrieve Images Use the Scan to Email or Copy to Folder tabs in the Xerox Scan Utility to view and retrieve images scanned to your computer from a Phaser 8510/8560MFP product. You can save the images in a specific folder or include the images as attachments in email messages.
Retrieving Scanned Images Selecting New Email Settings When Sending Scanned Images as Attachments To send scanned images as attachments in an email without using a profile: 1. Access the Xerox Scan Utility on your computer: ■ Windows: Right-click the Xerox Scan Utility icon on the taskbar, and then select Xerox Scan Utility. If the icon does not appear in the taskbar, click Start, select Programs, select Xerox Office Printing, select Scanning, and then select Xerox Scan Utility.
Retrieving Scanned Images Copy to Folder Tab When copying scanned images to a folder, you can use a folder profile that has been saved with specific settings, or you can send scanned images to a folder and select new settings without using a saved profile. Using a Folder Profile When Copying Scanned Images to a Folder You can create a folder profile to save folder information that you frequently use. To copy scanned images to a folder using a folder profile: 1.
Retrieving Scanned Images Selecting New Folder Settings When Copying Scanned Images to a Folder To copy scanned images to a folder without using a profile: 1. Access the Xerox Scan Utility on your computer: ■ Windows: Right-click the Xerox Scan Utility icon on the taskbar, and then select Xerox Scan Utility. If the icon does not appear in the taskbar, click Start, select Programs, select Xerox Office Printing, select Scanning, and then select Xerox Scan Utility.
Retrieving Scanned Images Importing Images into an Application You can import images scanned to your computer from a Phaser 8560MFP product or a Phaser 8510MFP product into Windows or Macintosh applications on your computer. Importing Scanned Images into a Windows Application (TWAIN) To import images into an application for Windows 2000, Windows XP, and Windows Server 2003: 1. Open the file in which you want to place the image. 2. Select the application’s menu item to acquire the image.
Retrieving Scanned Images Using the WIA Image Manager in a Windows Application You can import images that you scanned from the product to your computer into an application using the WIA Image Manager on Windows XP and Windows Server 2003. To import scanned images into an application: 1. Open the file in which you want to place the image. 2. Select the application’s menu item to acquire the image. For example, if you are using Microsoft Word to place an image in a document: a. Select Insert. b.
Retrieving Scanned Images Using the Xerox Scan Utility in a Macintosh OS X Application (TWAIN) To import images into an application: 1. Open the file in which you want to place the image. 2. Select the application’s menu item to acquire the image. For example, if you are using Word to place an image in a document: a. Select Insert. b. Select Picture. c. Select From Scanner or Camera. d. Select the scanner, and then click the Acquire button.
Scanning Options Scanning Options This section includes: ■ ■ ■ ■ ■ ■ Setting the Scan Resolution on page 5-17 Automatically Suppressing Background Variations on page 5-18 Setting the Color Mode on page 5-18 Setting 1-Sided or 2-Sided Originals on page 5-19 Setting the Document Type on page 5-20 Setting the Original Size on page 5-21 See also: Managing Scan Templates on page 22 Setting the Scan Resolution You may want to change the scan resolution depending on the way you plan to use the scanned image.
Scanning Options Automatically Suppressing Background Variations When you are using originals printed on thin paper, text or images printed on one side of the paper can sometimes be seen on the other side of the paper. To prevent this from happening in your scanned document, and to improve the quality for two-sided scanned pages, use the Auto Suppression setting on the control panel. This setting minimizes the sensitivity of the scanner to variations in the light background colors.
Scanning Options Setting 1-Sided or 2-Sided Originals Note: If your system does not have a document feeder, you can manually perform 2-sided scanning from the document glass. When you use the document feeder to scan 2-sided originals, select a 2-sided option to scan both sides of the paper to produce a multi-page scanned image file. Press the 2-Sided button on the control panel to change the selection to: ■ 1 to 1: Scans just one side of the originals.
Scanning Options Setting the Document Type You can optimize the appearance of the scanned output according to the type of information contained in the original. Press the Document Type button on the control panel to change the selection to: ■ ■ ■ ■ Photo: Optimizes for photograph prints. Graphics: Optimizes for constant-colored areas. Mixed: Optimizes for magazines and newspapers. Text: Optimizes for black and white or colored text.
Scanning Options Setting the Original Size To specify the size of the original: 1. On the control panel, press the Scan button. 2. Select Original Size, and then press the OK button. 3. Select one of the following options, and then press the OK button: ■ Automatic ■ ■ ■ Document Glass: Each original is prescanned to determine the size for each page in the scan job. Each scanned image is placed in a separate file. Document Feeder: Each original is scanned at 8.
Managing Scan Templates Managing Scan Templates This section includes: ■ ■ ■ Creating a Template with an Image View Setting on page 5-23 Creating a Template to Scan Images Directly to a Folder on page 5-24 Deleting Templates on page 5-25 You can create scan templates that contain specific settings, such as file type, resolution, and original size.
Managing Scan Templates Creating a Template with an Image View Setting To create a new template or edit an existing template with the option to retain thumbnail images in the Scan to Email or Copy to Folder tabs: 1. Access the Xerox Scan Utility on your computer: ■ Windows: Right-click the Xerox Scan Utility icon on the taskbar, and then select Xerox Scan Utility.
Managing Scan Templates Creating a Template to Scan Images Directly to a Folder To create a template that places scanned images in a specific folder destination: 1. Access the Xerox Scan Utility on your computer: ■ Windows: Right-click the Xerox Scan Utility icon on the taskbar, and then select Xerox Scan Utility. If the icon does not appear in the taskbar, click Start, select Programs, select Xerox Office Printing, select Scanning, and then select Xerox Scan Utility.
Managing Scan Templates Creating Unique Image File Names When each image is scanned, it is saved with a default file name indicating the date and time the image was scanned. The file name displays the format yyyy-mm-day_hh.mm.ss.xxx representing year-month-date_hour.minute.second.file type extension. For example, the filename 2007-07-01_13-45-15.pdf indicates that the image was scanned on July 1, 2007, at 1:45:15 PM and is a PDF file.
Managing Folder and Email Profiles Managing Folder and Email Profiles This section includes: ■ ■ ■ ■ Creating or Editing Email Profiles on page 5-27 Deleting Email Profiles on page 5-28 Creating or Editing Folder Profiles on page 5-29 Deleting Folder Profiles on page 5-30 With the Xerox Scan Utility, you can create profiles to be reused when sending scanned images as email attachments or when copying scanned images to specific folders.
Managing Folder and Email Profiles Creating or Editing Email Profiles To create or revise an email profile: 1. Access the Xerox Scan Utility on your computer: ■ Windows: Right-click the Xerox Scan Utility icon on the taskbar, and then select Xerox Scan Utility. If the icon does not appear in the taskbar, click Start, select Programs, select Xerox Office Printing, select Scanning, and then select Xerox Scan Utility. ■ Macintosh: Click the Xerox Scan Utility icon in the dock. 2. Select the Scan to Email tab.
Managing Folder and Email Profiles Deleting Email Profiles To delete an email profile: 1. Access the Xerox Scan Utility on your computer: ■ Windows: Right-click the Xerox Scan Utility icon on the taskbar, and then select Xerox Scan Utility. If the icon does not appear in the taskbar, click Start, select Programs, select Xerox Office Printing, select Scanning, and then select Xerox Scan Utility. ■ Macintosh: Click the Xerox Scan Utility icon in the dock. 2. Select the Scan to Email tab. 3.
Managing Folder and Email Profiles Creating or Editing Folder Profiles To create or revise a folder profile: 1. Access the Xerox Scan Utility on your computer: ■ Windows: Right-click the Xerox Scan Utility icon on the taskbar, and then select Xerox Scan Utility. If the icon does not appear in the taskbar, click Start, select Programs, select Xerox Office Printing, select Scanning, and then select Xerox Scan Utility. ■ Macintosh: Click the Xerox Scan Utility icon in the dock. 2.
Managing Folder and Email Profiles Deleting Folder Profiles To delete a folder profile: 1. Access the Xerox Scan Utility on your computer: ■ Windows: Right-click the Xerox Scan Utility icon on the taskbar, and then select Xerox Scan Utility. If the icon does not appear in the taskbar, click Start, select Programs, select Xerox Office Printing, select Scanning, and then select Xerox Scan Utility. ■ Macintosh: Click the Xerox Scan Utility icon in the dock. 2. Select the Copy to Folder tab. 3.
Managing Files and Scanning Policies Managing Files and Scanning Policies This section includes: ■ ■ ■ ■ ■ Deleting Image Files from the System on page 5-31 Deleting Image Files from the Xerox Scan Utility on page 5-33 Adding a Password for Scanning to Your Computer on page 5-33 Creating a Private Folder on page 5-34 Controlling Scanning Policies on page 5-34 Deleting Image Files from the System You can delete image files on the Phaser 8560MFP product that no longer need to be stored on the product’s har
Managing Files and Scanning Policies Using the Control Panel To remove all scan files from the Public Folder: 1. 2. 3. 4. 5. On the control panel, press the Scan button. Select Scan To, and then press the OK button. Select Public Folder, and then press the OK button. Select Clear Folder, and then press the OK button. When prompted to remove all scan files from this folder, select Yes, and then press the OK button.
Managing Files and Scanning Policies Deleting Image Files from the Xerox Scan Utility Scanned images displayed in the Xerox Scan Utility are stored on your computer’s hard drive. To delete scanned images that are no longer needed from the Xerox Scan Utility: 1. Access the Xerox Scan Utility on your computer: ■ Windows: Right-click the Xerox Scan Utility icon on the taskbar, and then select Xerox Scan Utility.
Managing Files and Scanning Policies Creating a Private Folder You can create a private folder on the Phaser 8560MFP product’s hard drive for your scanned images. You can also protect your private folder with a password to prevent others from viewing or retrieving your scanned images. To create a private folder on the system’s hard drive using CentreWare IS: 1. 2. 3. 4. 5. Launch your web browser. Enter your system’s IP address in the browser’s Address field (http://xxx.xxx.xxx.xxx).
Calibrating the Scanner Calibrating the Scanner This section includes: ■ ■ ■ Starting the Calibration Procedure on page 5-35 Calibrating the Scanner at the Document Glass on page 5-36 Calibrating the Scanner at the Document Feeder on page 5-37 Perform the scanner calibration procedure if your scanner, document feeder, or document cover is replaced. Scanner calibration adjusts the output quality of the front and back pages of 2-sided originals in relation to each other.
Calibrating the Scanner Calibrating the Scanner at the Document Glass To calibrate the scanner at the document glass: 1. Place the Scanner Calibration page on the document glass, with the top edge of the page toward the left. Note: Make sure the calibration page is aligned correctly. If the page is misaligned, the calibration procedure will fail. 2. Close the document feeder. 3. On the control panel, select Document Glass Step, and then press the OK button to scan the calibration page. 4.
Calibrating the Scanner Calibrating the Scanner at the Document Feeder To calibrate the scanner at the document feeder: 1. Place the Scanner Calibration page in the document feeder, so that the top edge of the page enters the feeder first. Adjust the paper guides to fit against the page. LTR/LGL Note: Make sure the Scanner Calibration page is aligned correctly and the paper guides are adjusted to fit against the paper. If the page is misaligned, the calibration procedure will fail. 2.
Faxing This chapter includes: ■ ■ ■ ■ ■ ■ Basic Faxing on page 6-2 Adding Individual and Group Speed Dial Entries on page 6-5 Faxing Multiple Recipients Using Send List on page 6-12 Selecting Fax Options on page 6-14 Managing Fax Functions on page 6-17 Solving Fax Problems on page 6-25 See also: Using the Fax tutorial at www.xerox.com/office/8510_8560support Note: Some of the features described in this chapter may not be available on your system configuration.
Basic Faxing Basic Faxing This section includes: ■ ■ Sending a Fax from the System on page 6-2 Sending a Fax from Your Computer on page 6-3 Note: For additional faxing information, print the Faxing Guide. On the control panel, press the Fax button, select Faxing Guide, and then press the OK button to print the guide. Sending a Fax from the System To quickly send a fax from the system to a single recipient using factory defaults: 1.
Basic Faxing Sending a Fax from Your Computer You can send a fax to the system from an application on your Windows or Macintosh computer. Windows Applications To send a fax from a Windows 2000, Windows XP, or Windows Server 2003 application: 1. Access the application’s Print dialog box, select your Phaser 8510/8560MFP product, and then click the Properties button to open the printer driver. 2.
Basic Faxing Macintosh Applications To send a fax from a Macintosh OS X, version 10.3 and higher application: 1. 2. 3. 4. Access the application’s Print dialog box. Select your Phaser 8510/8560MFP product in the Printer drop-down list. Select Fax from the Job Type drop-down list, and then click the Lan Fax Setup button. Click the Fax Recipients button and then select one of the following options: ■ Add Fax Recipients: Select this option to access the Add Fax Recipient screen.
Adding Individual and Group Speed Dial Entries Adding Individual and Group Speed Dial Entries This section includes: Adding an Individual on page 6-6 Adding a Group on page 6-8 Editing or Deleting an Individual Speed Dial Entry on page 6-10 Editing or Deleting a Group Speed Dial Entry on page 6-11 ■ ■ ■ ■ You can create and save fax information for individuals or groups to whom you often send faxes.
Adding Individual and Group Speed Dial Entries Adding an Individual Set up and save individual names and fax numbers to easily access them when you want to send a fax. Using the Control Panel To add an individual speed dial entry: 1. On the control panel, press the Speed Dial button. 2. Select Individual, and then press the OK button. The Individual screen appears. If names and numbers have been previously entered, they are displayed. 3.
Adding Individual and Group Speed Dial Entries Using CentreWare IS To add an individual speed dial entry: 1. 2. 3. 4. Launch your web browser. Enter your system’s IP address in the browser’s Address field (http://xxx.xxx.xxx.xxx). Select the Properties tab, and then click Individual Directory in the Fax Settings folder. Select one of the following options: a.
Adding Individual and Group Speed Dial Entries Adding a Group Set up and save group names to easily access them when you want to send a fax to a group. Groups can include both individual and group entries once they have been set up. Note: Individual entries must be set up before groups can be defined. Using the Control Panel Use the control panel to add or remove individuals or groups from the speed dial group. Setting Up a Group To set up a group: 1. 2. 3. 4. 5.
Adding Individual and Group Speed Dial Entries Removing an Entry from a Group To remove an entry: 1. 2. 3. 4. On the control panel, press the Speed Dial button. Select Group, and then press the OK button. Select the group you want to change from the list displayed, and then press the OK button. To remove an individual from this group: a. Select Remove Individual, and then press the OK button. This option appears when there are one or more individuals in this group. b.
Adding Individual and Group Speed Dial Entries Using CentreWare IS To add a group speed dial entry: 1. 2. 3. 4. Launch your web browser. Enter your system’s IP address in the browser’s Address field (http://xxx.xxx.xxx.xxx). Select the Properties tab, and then click Group Directory in the Fax Settings folder. Click the Add button and then enter the appropriate information in the following fields: ■ Group No.: Select a number from the drop-down field. This determines where the group appears in the list.
Adding Individual and Group Speed Dial Entries Editing or Deleting a Group Speed Dial Entry To revise or remove groups: 1. 2. 3. 4. On the control panel, press the Speed Dial button. Select Group, and then press the OK button. Select a group name in the list displayed, and then press the OK button. Select one of the following options: ■ Use As Destination: Returns you to the main fax screen. The selected group is displayed in the Fax To field. ■ Make Changes: Edits the existing values for this group.
Faxing Multiple Recipients Using Send List Faxing Multiple Recipients Using Send List This section includes: ■ ■ Setting Up a Send List of Fax Recipients on page 6-12 Viewing or Editing the Send List on page 6-13 Setting Up a Send List of Fax Recipients You can select one or more recipients when sending a fax. The Send List fax feature enables you to create a list of recipients that includes fax numbers, individuals, and groups.
Faxing Multiple Recipients Using Send List Viewing or Editing the Send List Before sending a fax, you may want to verify or edit the list of recipients you selected for the fax. To do this: 1. On the control panel, press the Send List button. 2. Select View/Edit Send List, and then press the OK button. A list appears displaying the fax numbers, individuals, or groups you have selected to receive the fax you are sending. 3. To delete an entry from the Send List: a.
Selecting Fax Options Selecting Fax Options This section includes: ■ ■ ■ ■ ■ ■ Setting the Fax Destination on page 6-14 Setting the Fax Resolution on page 6-15 Selecting the Original Size on page 6-15 Selecting Auto Suppression on page 6-15 Selecting the Starting Rate on page 6-16 Delay Sending a Fax on page 6-16 Setting the Fax Destination To set the destination for the current fax: 1. On the control panel, press the Fax button. 2. Select Fax To, and then press the OK button. 3.
Selecting Fax Options Setting the Fax Resolution To set the fax resolution: 1. On the control panel, press the Fax button. 2. Select Resolution, and then press the OK button. 3. Select an option from the list displayed, and then press the OK button. Note: The factory default is Fine. Selecting the Original Size To select the size of the original for the fax: 1. On the control panel, press the Fax button. 2. Select Original Size, and then press the OK button. 3.
Selecting Fax Options Selecting the Starting Rate Select the highest starting rate unless the fax destination for the fax you are sending has special requirements. To select the transmission speed for a fax: 1. On the control panel, press the Fax button. 2. Select Starting Rate, and then press the OK button. 3. Select an option from the list displayed, and then press the OK button. Note: The factory default is 33.6 kbps (Super G3) for Phaser 8560MFP products and 14.4 kbps for Phaser 8510MFP products.
Managing Fax Functions Managing Fax Functions This section includes: ■ ■ ■ ■ ■ ■ ■ ■ Printing a Transmission Report on page 6-17 Enabling or Disabling Secure Faxes on page 18 Printing or Clearing Secure Faxes on page 6-19 Clear Pending Faxes on page 6-20 Enabling or Disabling Junk Fax Prevention on page 21 Printing Fax Reports on page 6-22 Inserting Pauses in Fax Numbers on page 6-23 Changing Default Settings on page 6-24 Printing a Transmission Report Set a default option for printing a fax transmission
Managing Fax Functions Enabling or Disabling Secure Faxes Additional security may be set for receiving faxes. When the Secure Fax option is enabled, a password is required before faxes can be printed or removed. To enable or disable a Secure Receive fax: 1. 2. 3. 4. 5. 6. On the control panel, press the System button. Select Job Defaults Setup, and then press the OK button. Select Fax Defaults Setup, and then press the OK button. Select Fax Receive Setup, and then press the OK button.
Managing Fax Functions Printing or Clearing Secure Faxes If the Secure Fax option is enabled, you must enter your numeric password to print or clear a received fax: Using the Control Panel To print or clear all secure faxes: 1. On the control panel, press the Fax button. 2. Select one of the following options, follow the onscreen prompts, and then press the OK button: ■ Print Secure Faxes: You can print and delete all received faxes after you enter your numeric password.
Managing Fax Functions Clear Pending Faxes You can view the faxes waiting to be sent. If needed, you can clear one or more faxes. Using the Control Panel To clear pending faxes: 1. On the control panel, press the Fax button. 2. Select Clear Pending Faxes, and then press the OK button. 3. Select Pending Jobs Report, and then press the OK button. The Pending Jobs Report prints. 4. Select one of the following options, and then press the OK button: ■ Clear All: Deletes all fax jobs waiting to be sent.
Managing Fax Functions Enabling or Disabling Junk Fax Prevention Junk fax prevention allows you to turn off/on printing faxes received from phone numbers in the individual speed dial directory. Using the Control Panel To turn off/on the junk fax prevention option: 1. 2. 3. 4. 5. 6. On the control panel, press the System button. Select Job Defaults Setup, and then press the OK button. Select Fax Defaults Setup, and then press the OK button. Select Fax Receive Setup, and then press the OK button.
Managing Fax Functions Printing Fax Reports Several fax reports are available to provide information about faxing activities, directories, and pending jobs. The Activity Report provides information about completed fax jobs. The Dial Directory Report and the Group Directory Report display information about fax numbers, individual, or group recipients. The Pending Jobs Report provides a list of faxes waiting to be sent. Using the Control Panel To print a fax report: 1.
Managing Fax Functions Inserting Pauses in Fax Numbers Some fax numbers require one or more pauses during the dialing sequence. To insert pauses in a fax number: 1. On the control panel, press the Fax button. 2. Select Fax To, and then press the OK button. 3. When entering a fax number using the alphanumeric keypad, press the Pause button to insert a pause (represented by a comma) in the fax number where appropriate. 4. Press the Start button to send the fax.
Managing Fax Functions Changing Default Settings Select one of the following methods to change the default settings for the system’s fax function. Using the Control Panel To change default settings: 1. 2. 3. 4. On the control panel, press the System button. Select Job Defaults Setup, and then press the OK button. Select Fax Defaults Setup, and then press the OK button.
Solving Fax Problems Solving Fax Problems This section includes: ■ ■ ■ Configuring the Modem on page 6-25 Printing the Protocol Monitoring Report on page 6-25 Resetting Fax Options to the Factory Default on page 6-26 Configuring the Modem To adjust modem settings: 1. 2. 3. 4. 5. On the control panel, press the System button. Select Troubleshooting, and then press the OK button. Select Fax Problems, and then press the OK button. Select Modem Configuration, and then press the OK button.
Solving Fax Problems Resetting Fax Options to the Factory Default When you reset fax settings, all settings are returned to factory default values. Any incoming or outgoing faxes are cancelled or deleted. Note: Speed Dial entries and the Country and Line ID settings are not affected when you select the Reset Fax option. To reset fax options to factory default settings: 1. 2. 3. 4. 5. On the control panel, press the System button. Select Troubleshooting, and then press the OK button.
. Print Quality This chapter includes: ■ ■ Controlling the Quality of Your Prints on page 7-2 Solving Print-Quality Problems on page 7-6 Phaser® 8510/8560MFP Multifunction Product 7-1
Controlling the Quality of Your Prints Controlling the Quality of Your Prints This chapter includes: ■ ■ Selecting a Print-Quality Mode on page 7-2 Adjusting Color on page 7-4 The print-quality mode and TekColor correction directly control the quality of your prints. The print-quality mode and paper type directly control the print speed. You can change these settings in the printer driver or on the control panel. Note: Driver settings override the control panel settings.
Controlling the Quality of Your Prints To select the print-quality mode in a supported driver: Operating System Steps Windows 98 SE 1. Select the Setup tab. 2. Select a print-quality mode. Windows 2000, Windows XP, or Windows Server 2003 1. Select the Paper/Quality tab. Mac OS 9.x 1. In the Print dialog box, select General. 2. Select a print-quality mode. 2. Select Print Quality from the drop-down list. 3. Select the desired mode for Quality. Mac OS X, version 10.2 and higher 1.
Controlling the Quality of Your Prints Adjusting Color The TekColor correction options provide simulations of different color devices. Automatic is the default correction for general image processing. See the following table to determine what option you want to use. TekColor Correction Description Automatic Applies the best color correction to each graphic element: text, artwork, and photographs. Office Color Press Match sRGB Display Approximates the colors on a CRT computer display.
Controlling the Quality of Your Prints To select the color correction in a supported driver: Operating System Steps Windows 98 SE, Windows 2000, Windows XP, or Windows Server 2003 1. Select the TekColor tab. Mac OS 9.x 1. In the Print dialog box, select General. 2. Select the desired color correction. Some of the color corrections are grouped under Office Color or Press Match. 2. Select TekColor from the drop-down list. 3. Select the desired color correction for Color. Mac OS X, version 10.
Solving Print-Quality Problems Solving Print-Quality Problems This section includes: ■ ■ ■ ■ ■ Smudges or Smears on page 7-6 Random Light Stripes on page 7-8 Predominate Light Stripes on page 7-10 Transparency Images Are Too Light or Too Dark on page 7-11 Colors Are Wrong on page 7-12 Smudges or Smears Problem Smudges or smears appear on the page. Solution To prevent smudges or smears from appearing on the page: 1.
Solving Print-Quality Problems 3. If the problem continues: a. Open the door on the side of the system and remove the maintenance kit. b. Wipe the plastic wiper blade with a lint-free cloth. c. Replace the maintenance kit and close the door. Note: Smudges or smears may appear if you print on side two of pre-printed paper, but do not select 2nds Side as the paper type. Select the 2nd Side option on the control panel and in the printer driver.
Solving Print-Quality Problems Random Light Stripes Problem Light stripes appear randomly on the test page when one or more color bars is missing. Light Stripes Test Solution To prevent random light strips from appear on the page: 1. 2. 3. 4. On the control panel, press the System button. Select Troubleshooting, and then press the OK button. Select Print Quality Problems, and then press the OK button. Select Eliminate Light Stripes, and then press the OK button. a.
Solving Print-Quality Problems 6. If the problem continues, call your local service provider or Xerox technical support. To continue printing until your system can be serviced, select Jet Substitution Mode to substitute a jet for the malfunctioning jet causing the light stripe. To select Jet Substitution Mode: a. b. c. d. e. f. On the control panel, press the System button. Select Troubleshooting, and then press the OK button. Select Print Quality Problems, and then press the OK button.
Solving Print-Quality Problems Predominate Light Stripes Problem Light stripes appear prominently on the test page when all four color bars are missing. Solution To prevent predominate light stripes from appear on the page: 1. Open the exit cover: a. Remove debris from the paper-exit area. b. Raise the lower paper guide and wipe the plastic paper release blade with a lint-free cloth. 2. Close the exit cover. 3. Open the door on the side of the system: a. Remove the maintenance kit b.
Solving Print-Quality Problems Transparency Images Are Too Light or Too Dark Problem Text or graphics printed on transparencies are either too light or too dark. Solution To prevent transparency text or graphics from being too light or too dark: 1. Verify that Transparency is select in the software application or in the printer driver. 2. Verify that the tray containing the transparencies is set to print transparencies: a. On the control panel, press the System button. b.
Solving Print-Quality Problems Colors Are Wrong Problem The color produced by the system is wrong or differs from the color that it must match. Solution For information about color matching, go to www.xerox.com/office/8510_8560support.
Maintenance This chapter includes: ■ ■ ■ Maintenance and Cleaning on page 8-2 Ordering Supplies on page 8-23 Moving and Repacking the System on page 8-25 See also: Maintenance video tutorials at www.xerox.com/office/8510_8560support Replacing supplies video tutorials at www.xerox.
Maintenance and Cleaning Maintenance and Cleaning This section includes: ■ ■ ■ ■ ■ Routine Maintenance on page 8-2 Cleaning the Paper Release Blade on page 8-11 Cleaning the Maintenance Kit Wiper Blade on page 8-15 Cleaning the Outside of the System on page 8-18 Cleaning the Document Glass and Document Feeder on page 8-18 See also: User Safety on page A-1 Routine Maintenance Your system needs little maintenance to keep it producing quality prints.
Maintenance and Cleaning To load ink: 1. Lift the control panel. 8560-052 2. Open the ink cover.
Maintenance and Cleaning 3. Locate the ink-loading bin that is low. A label above each bin indicates the ink stick color and shape for that bin. 4. Remove the ink stick from its packaging, and then insert the ink stick into the opening of the appropriate ink-loading bin. Do not force the ink stick into the ink-loading bin. Each ink stick is uniquely shaped to fit into the correct ink-loading bin. 1 2 3 4 8560-107 5. Close the ink cover. 6. Close the control panel.
Maintenance and Cleaning Emptying the Waste Tray Empty the waste tray when the control panel displays a message stating that the waste tray is full. Warning: The system’s interior may be hot. Do not touch the hot surfaces! To empty the waste tray: 1. Open the side door.
Maintenance and Cleaning 2. Pull the waste tray (labeled B) completely out of the system. Warning: The waste tray may be hot; handle it carefully. 8560-056 Note: The waste tray may be locked if the system is in a warm-up cycle or if the ink is cooling following the Eliminate Light Stripes troubleshooting routine. If the tray is locked, close the door and wait 15 minutes before repeating Steps 1 and 2. 3. Empty the waste tray in a waste container.
Maintenance and Cleaning 4. Insert the waste tray into the system and push it completely into the waste tray slot. 8560-058 5. Close the side door. 8560-059 Caution: Do not attempt to reuse the waste ink in the system; it can damage the system. This damage is not covered under the system warranty.
Maintenance and Cleaning Replacing the Maintenance Kit The maintenance kit contains a maintenance roller that keeps the surface of the imaging drum clean and oiled. Note: Order a new maintenance kit when the control panel displays a message that the maintenance kit is low. Replace it when the control panel prompts you to replace the maintenance kit. To order a replacement maintenance kit, contact your local reseller or go to www.xerox.com/office/8510_8560supplies. To replace the maintenance kit: 1.
Maintenance and Cleaning 2. Remove the maintenance kit (labeled A) from the maintenance kit slot. 8560-060 3. Insert the replacement maintenance kit and push it completely into the maintenance kit slot. Follow the illustrated instructions included with the maintenance kit for full installation and disposal information.
Maintenance and Cleaning 4. Close the side door.
Maintenance and Cleaning Cleaning the Paper Release Blade To clean the paper release blade: 1. Lift the control panel. 8560-052 2. Remove paper from the output tray.
Maintenance and Cleaning 3. Open the exit cover. 8560-077 4. Lift the lower paper guide toward the front of the system.
Maintenance and Cleaning 5. Wipe the plastic paper release blade on the paper guide with a pre-soaked alcohol cloth (using 90 percent isopropyl alcohol). 8560-062 6. Return the paper guide to its original position.
Maintenance and Cleaning 7. Close the exit cover. 8560-081 8. Close the control panel.
Maintenance and Cleaning Cleaning the Maintenance Kit Wiper Blade The maintenance kit contains a wiper blade that removes excess ink. To clean the maintenance kit wiper blade: 1. Open the side door on the system 8560-055 2. Remove the maintenance kit (labeled A) from the maintenance kit slot.
Maintenance and Cleaning 3. Use a lint-free cloth to clean the top and upper edges of the flexible plastic wiper blade located next to the roller. 8560-064 4. Insert the maintenance kit and push it completely into the maintenance kit slot.
Maintenance and Cleaning 5. Close the side door.
Maintenance and Cleaning Cleaning the Outside of the System To remove stains, clean the outside of the system using a soft, damp, cloth moistened with a mild neutral detergent. Do not spray detergent directly onto the system. Warning: To prevent electric shock, turn the system off and unplug the power cord from the electrical outlet before cleaning the system.
Maintenance and Cleaning 3. Wipe the document glass with the cloth or cotton swab. 8560-065 4. Close the document feeder.
Maintenance and Cleaning Document Feeder To clean the document feeder: 1. Open the jam access door on the document feeder. 8560-090 2. Moisten a soft cloth or cotton swab with alcohol (90 percent isopropyl alcohol). 3. Wipe the feeding roller and inside the document feeder with the cloth or cotton swab.
Maintenance and Cleaning 4. Close the jam access door. 8560-092 5. Lift the document feeder.
Maintenance and Cleaning 6. Wipe the underside of the document feeder with the cloth or cotton swab. 8560-067 7. Close the document feeder.
Ordering Supplies Ordering Supplies This section includes: ■ ■ ■ ■ Consumables on page 8-23 Routine Maintenance Items on page 8-24 When to Order Supplies on page 8-24 Recycling Supplies on page 8-24 Certain consumables and routine maintenance items need to be ordered occasionally. Each item includes installation instructions in the package.
Ordering Supplies Routine Maintenance Items Routine maintenance items are printer parts that have a limited life and require periodic replacement. Replacements may be parts or kits. Routine maintenance items are typically customer replaceable. The maintenance kit is the only routine maintenance item for the Phaser 8510/8560MFP product. To order a replacement maintenance kit, contact your local reseller or go to www.xerox.com/office/8510_8560supplies.
Moving and Repacking the System Moving and Repacking the System This section includes: ■ ■ ■ Precautions for Moving the System on page 8-25 Moving the System Within the Office on page 8-25 Preparing the System for Shipment on page 8-27 Caution: Parts of the system are hot. To avoid personal injury or damage to the system, allow the ink to solidify. Run the Shutdown for Moving System procedure on the control panel to cool the system quickly.
Moving and Repacking the System 4. Wait for the system to complete the cool-down period for the ink to solidify. The fan shuts down when it is cool enough to move the system. Caution: If you turn off the system but do not select Shutdown for Moving System on the control panel, the fan does not run, so you must wait longer for the ink to solidify. Wait at least 30 minutes for the system to cool completely before moving or packing it. 5. Unplug the system after the cool-down cycle is complete. 6.
Moving and Repacking the System Preparing the System for Shipment Before shipping the system: 1. Remove the maintenance kit and waste tray. See Removing the Maintenance Kit and Waste Tray on page 8-28. 2. Turn off the system. See Turning Off the System on page 8-30. 3. Remove the document feeder and scanner. See Removing the Document Feeder and Scanner on page 8-32. 4. Pack the system. See Packing the System on page 8-34.
Moving and Repacking the System Removing the Maintenance Kit and Waste Tray Before turning off the system, remove the maintenance kit and waste tray. 1. Open the side door on the system. 8560-055 2. Remove the maintenance kit (labeled A) and place it in a plastic bag for storage.
Moving and Repacking the System 3. Remove the waste tray (labeled B) from the waste tray slot. 8560-056 Warning: The waste tray may be hot; handle it carefully. 4. Empty the waste, and then place the tray in a plastic bag for storage. 8560-057 Caution: Shipping the system with the maintenance kit and waste tray installed can damage the system. 5. Close the system’s door and covers.
Moving and Repacking the System Turning Off the System To turn off the system: 1. Press the power switch located under the interface cover on the side of the system. 8560-117 2. Within 10 seconds after turning off the system, select Shutdown for Moving System on the control panel. Caution: If you receive a Power Down Error-Head not Parked message at the control panel, the system is not ready to be moved. If the printhead is not locked, the system can be damaged during shipment.
Moving and Repacking the System 3. Turn the scanhead transportation lock clockwise to lock the scanhead. Caution: Scanhead damage can occur if the lock is not fully tightened. 8560-131 4. Wait for the system to complete the cool-down period for the ink to solidify. The fan shuts down when it is cool enough to move the system. Caution: If you turn off the system but do not select Shutdown for Moving System on the control panel, the fan does not run, so you must wait longer for the ink to solidify.
Moving and Repacking the System Removing the Document Feeder and Scanner 1. Remove the document feeder and scanner, pack them separately from the rest of the system. 2. Disconnect the cable between the document feeder and the scanner. 3. Lift the document feeder. 8560-093 a. Pinch the hinges, and then lift the document feeder away from the document glass.
Moving and Repacking the System b. Disconnect the cable between the scanner and the rest of the system. c. Using a pen, slide both the scanner latches to the unlocked position, and then slide the scanner back and lift it away from the system. 8560-072 d. Pack the scanner separately from the rest of the system 4. Fold the stabilizers in toward the system.
Moving and Repacking the System 5. Use the hand holds on each side of the system to lift it. 38 kg 83.3 lb. 8560_132 Caution: If the system has an optional Tray 3 or 4, lift the system off the trays. Packing the System Repack the system using the original packing material and boxes or a Xerox repackaging kit. Additional instructions for repacking the system are provided in the repackaging kit.
Troubleshooting This chapter includes: ■ ■ Clearing Paper Jams on page 9-2 Getting Help on page 9-27 See also: Troubleshooting video tutorials at www.xerox.
Clearing Paper Jams Clearing Paper Jams This section includes: ■ ■ ■ ■ ■ Jam at Exit Cover on page 9-2 Jam at Exit Path on page 9-8 Jam at Front Cover on page 9-11 Jam at Tray 2, 3, or 4 on page 9-18 Jam at the Document Feeder on page 9-23 See also: User Safety on page A-1 Jam at Exit Cover To clear a jam at the exit cover: 1. Lift the control panel.
Clearing Paper Jams 2. Remove paper from the output tray. 8560-076 3. Open the exit cover.
Clearing Paper Jams 4. Pull the jammed paper slowly out of the system. Confirm that all paper fragments are removed. 8560-078 5. If you did not find paper in Step 4, lift the paper guides. 8560-079 6. Remove any jammed paper.
Clearing Paper Jams 7. Close the exit cover. 8560-081 8. Close the control panel.
Clearing Paper Jams 9. If you did not find paper in the previous steps, follow these steps. a. Pull up the latch on the front of the system to open the front cover. 8560-083 b. Pull the jammed paper slowly out of the system. Confirm that all paper fragments are removed.
Clearing Paper Jams c. Close the front cover.
Clearing Paper Jams Jam at Exit Path To clear a jam at the exit path: 1. Lift the control panel. 8560-075 2. Pull the jammed paper slowly out of the system. Confirm that all paper fragments are removed.
Clearing Paper Jams 3. Remove paper from the output tray. 8560-076 4. Close the control panel.
Clearing Paper Jams 5. Adjust the output tray for short or long paper. 8560-016 For media shorter than 190 mm (7.5 in.), flip up the paper stop. 8560-017 For media longer than 297 mm (11.7 in.), extend the output tray.
Clearing Paper Jams Jam at Front Cover To clear a jam at the front cover: 1. Pull up the latch on the front of the system to open the front cover. 8560-083 2. Pull the jammed paper slowly out of the system. Confirm that all paper fragments are removed.
Clearing Paper Jams 3. Close the front cover. 8560-085 4. If you did not find paper in Step 2, follow these steps: a. Lift the control panel.
Clearing Paper Jams b. Open the exit cover. 8560-077 c. Pull the jammed paper slowly out of the system. Confirm that all paper fragments are removed.
Clearing Paper Jams d. Lift the paper guides. 8560-079 e. Remove jammed paper.
Clearing Paper Jams f. Close the exit cover. 8560-081 g. Close the control panel.
Clearing Paper Jams 5. If you did not find jammed paper in the previous steps, follow these steps. a. Pull all the trays completely out of the system and removed jammed paper. 8560-088 b. Pull the jammed paper slowly out of the system. Confirm that all paper fragments are removed.
Clearing Paper Jams c. Replace all trays and push each one completely into the system. 8560-098 Note: Use only the approved paper type, weight, and size for this tray. Print custom size paper from Tray 1 only.
Clearing Paper Jams Jam at Tray 2, 3, or 4 To clear a jam from the tray specified on the control panel: 1. Pull the tray specified on the control panel completely out of the system. 8560-088 2. Remove the top sheet from the tray.
Clearing Paper Jams 3. Remove jammed paper inside the system tray slot. Verify that any torn pieces of paper are removed. 8560-100 4. Push the tray completely into the system.
Clearing Paper Jams 5. If you did not find paper in the previous steps, follow these steps. a. Pull all the trays completely out of the system. 8560-088 b. Pull up the latch on the front of the system to open the front cover.
Clearing Paper Jams c. Remove any jammed paper. Verify that any torn pieces of paper are removed. 8560-084 d. Verify that the paper is loaded correctly in the tray. Adjust the length and width tray guides for the paper loaded in the tray. ■ Length guide: Press the sides, then slide the guide until the arrow on the guide points to the appropriate paper size imprinted on the bottom of the tray. When properly positioned, the guide clicks into place.
Clearing Paper Jams e. Close the front cover. 8560-085 f. Replace all trays and push each tray completely into the system. 8560-098 6. Verify that you are printing custom paper sizes from Tray 1 only.
Clearing Paper Jams Jam at the Document Feeder Note: A jam at the document feeder prevents faxing or scanning but does not prevent printing activities. To clear a jam at the document feeder: 1. Remove the originals from the document feeder and catch tray. 8560-089 2. Open the jam access cover on the document feeder.
Clearing Paper Jams 3. Remove jammed paper from the document feeder. 8560-091 4. Close the jam access cover on the document feeder.
Clearing Paper Jams 5. Lift the document feeder. 8560-093 6. Remove any jammed paper from under the document feeder or from the document glass.
Clearing Paper Jams 7. Close the document feeder. 8560-095 8. Reinsert originals in the document feeder.
Getting Help Getting Help This section includes: ■ ■ ■ ■ Control Panel Messages on page 9-27 PrintingScout Alerts on page 9-27 PhaserSMART Technical Support on page 9-28 Web Links on page 9-29 Xerox provides several automatic diagnostic tools to help you produce and maintain print quality. See also: Xerox Support Centre on page 1-15 Control Panel Messages The control panel provides you with information and troubleshooting help.
Getting Help Fax and Scan Alerts Alerts provide messages and instructions for helping the user solve problems that may arise when faxing or scanning. Alerts can be viewed through CentreWare IS or through the Xerox Support Centre utility. Note: Fax errors do not prevent scanning, copying, or printing activities.
Getting Help Web Links Xerox provides several websites that offer additional help on your Phaser 6360 printer. A set of Xerox links is installed in your web browser’s Favorites folder when you install the Xerox printer drivers on your computer. The Troubleshooting tab in your Windows printer driver also includes useful links. Use the following websites to obtain more information.
User Safety Your system and the recommended supplies have been designed and tested to meet strict safety requirements. Attention to the following information ensures the continued safe operation of your system. Electrical Safety ■ ■ ■ ■ ■ Use the power cord supplied with your system. Plug the power cord directly into a properly grounded electrical outlet. Make sure each end of the cord is securely connected. If you do not know if an outlet is grounded, ask an electrician to check the outlet.
If you notice unusual noises or odors: 1. Turn off the system immediately. 2. Disconnect the power cord from the electrical outlet. 3. Call an authorized service representative to correct the problem. The power cord is attached to the system as a plug-in device on the side of the system. If it is necessary to disconnect all electrical power from the system, disconnect the power cord from the electrical outlet.
Operational Safety Your system and supplies were designed and tested to meet strict safety requirements. These include safety agency examination, approval, and compliance with established environmental standards. Your attention to the following safety guidelines helps to ensure the continued, safe operation of your system. System Location ■ ■ ■ ■ ■ ■ Place the system in a dust-free area within a temperature range of 50° F to 90° F (10° C to 32° C) and a relative humidity range of 10 percent to 80 percent.
Printing Safety Guidelines ■ ■ ■ ■ Keep hands, hair, neckties, etc., away from the exit and feed rollers. Do not remove the paper source tray that you selected in either the printer driver or control panel. Do not open the doors when the system is printing. Do not move the system when it is printing. System Supplies ■ ■ Use the supplies specifically designed for your system. The use of unsuitable materials may cause poor performance and a possible safety hazard.
Moving the System Follow these guidelines to avoid injuring yourself or damaging the system: ■ ■ Use the Shut Down mode on the control panel for best results. Always allow the system to cool before it is moved to avoid ink spills which can damage the printer Warning: Parts of the system may be hot. To avoid personal injury or damage to the system, allow 30 minutes for it to cool down before moving or packing the system. This allows the ink to solidify.
■ ■ ■ ■ Always remove the document feeder before shipping the system. Always remove the scanner before shipping the system. Always move the system separately from optional Trays 3 and 4. The system is heavy and must be lifted by two people. 42.5 kg 94 lb. ■ 8560_069 Never place food or liquids on the system.
Symbols Marked on Product Use caution (or draws attention to a particular component). See the manual(s) for information. Avoid pinching fingers in the system. Use caution to avoid personal injury. Hot surface on or in the system. Use caution to avoid personal injury. Keep hands clear to avoid personal injury.
Copy Regulations United States Congress, by statute, has forbidden the reproduction of the following subjects under certain circumstances. Penalties of fine or imprisonment may be imposed on those guilty of making such reproductions. 1.
7. Immigration papers. 8. Draft Registration Cards. 9. Selective Service Induction papers that bear any of the following Registrant’s information: ■ Earnings or Income ■ Court Record ■ Physical or mental condition ■ Dependency Status ■ Previous military service Exception: United States military discharge certificates may be photographed. 10. Badges, Identification Cards, Passes, or Insignia carried by military personnel, or by members of the various Federal Departments, such as FBI, Treasure, etc.
Canada Parliament, by stature, has forbidden the reproduction of the following subjects under certain circumstances. Penalties of fine or imprisonment may be imposed on those guilty of making such reproductions. 1. 2. 3. 4. 5. 6. 7. 8. 9. Current bank notes or current paper money. Obligations or securities of a government or bank. Exchequer bill paper or revenue paper. The public seal of Canada or of a province, or the seal of a public body or authority in Canada, or of a court of law.
Fax Regulations United States Fax Send Header Requirements The Telephone Consumer Protection Act of 1991 makes it unlawful for any person to use a computer or other electronic device, including a fax machine, to send any message unless such message clearly contains in a margin at the top or bottom of each transmitted page or on the first page of the transmission, the date and time it is sent and an identification of the business or other entity, or other individual sending the message and the telephone nu
The Ringer Equivalence Number (REN) is used to determine the number of devices that may be connected to a telephone line. Excessive RENs on a telephone line may result in the devices not ringing in response to an incoming call. In most but not all areas, the sum of RENs should not exceed five (5.0). To be certain of the number of devices that may be connected to a line, as determined by the total RENs, contact the local Telephone Company.
Canada Note: The Industry Canada label identifies certified equipment. This certification means that the equipment meets certain telecommunications network protective, operational and safety requirements as prescribed in the appropriate Terminal Equipment Technical Requirements document(s). The Department does not guarantee the equipment will operate to the user’s satisfaction.
Europe Radio Equipment & Telecommunications Terminal Equipment Directive This Xerox product has been self-certified by Xerox for pan-European single terminal connection to the analogue public switched telephone network (PSTN) in accordance with Directive 1999/5/EC.
New Zealand Telecom Warning Notice 1. The grant of a Telepermit for any item of terminal equipment indicates only that Telecom has accepted that the item complies with minimum conditions for connection to its network. It indicates no endorsement of the product by Telecom, nor does it provide any sort of warranty.
Index Numerics 2nd side printing, 3-27, 3-28 2-sided printing, 3-25 automatic, 3-25 binding edge options, 3-26 manual, 3-27 pre-printed paper, 3-27 selecting, 3-26 automatic 2-sided printing, 3-25 print-quality mode, 7-2 TekColor correction, 7-4 automatic document feeder, 3-4 automatically setting the system’s IP address (Windows only), 2-5 available printer drivers, 2-10 A B accessory system cart, 1-7 activity report, 6-22 adding a group, 6-8 an individual, 6-6 group speed dial entry, 6-8 individual sp
Index C calibrate scanner, 5-35 cart ordering for your system, 1-7 cascade buttons control panel, 1-9 caution symbols, A-7 CentreWare IS changing or modifying the system’s IP address, 2-7 setting the system’s IP address dynamically, 2-6 using to retrieve scanned images, 5-9 changing the IP address using CentreWare IS, 2-7 characters control panel buttons, 1-11 entering with the control panel keypad, 6-5 inserting in names and numbers, 6-2 choosing a network connection, 2-3 cleaning maintenance kit wiper bl
Index options, 4-3 output adjustments, 4-16 poster printing, 4-14 prescan glass option, 4-9 printing multiple pages on a sheet, 4-13 reduce or enlarge an image, 4-9 regulations, B-1 repeating images on a sheet, 4-14 selecting a tray to use, 4-3 selecting color or black and white copies, 4-4 selecting output quality modes, 4-6 setting default copy tray, 4-3 setting original size, 4-8 setting print job interrupt option, 4-20 shifting the image, 4-15 specifying document type, 4-7 suppress background variations
Index drivers available, 2-10 description, 2-10 installing system drivers, 2-10 installing the scan driver, 5-2 Macintosh, 2-10 Macintosh OS 9.x, 2-11 Macintosh OS X version 10.2 and 10.3, 2-12 Macintosh OS X, version 10.
Index faxing adding an individual, 6-12 basic, 6-2 changing default settings, 6-24 configuring the modem, 6-25 illegal, C-1 multiple recipients, 6-12 quick method, 6-2 regulations, C-1 resetting fax options to factory default, 6-26 selecting options, 6-14 setting a destination, 6-10 solving problems, 6-25 suppress background color, 6-15 using the send list, 6-12 Faxing Guide, 6-2 features standard, 1-5 system configurations, 1-6 file names creating unique image file names, 5-25 folder Copy to Folder tab, 5-
Index paper storage, 3-5 paper usage, 3-4 printing on both sides of the paper, 3-25 printing safety, A-4 using the document glass, 3-4 H help resources, 1-14 high-resolution copy mode, 4-6 high-resolution print mode, 7-2 host names using with Domain Name Service (DNS), 2-7 I illegal copying, B-1 illegal faxing, C-1 images adjusting, 4-8 adjusting color balance, 4-11 adjusting placement, 4-13 adjusting scan sensitivity, 4-10 adjusting the contrast, 4-10 attaching to email profiles, 5-10 centering, 4-14 def
Index installing printer drivers, 2-10 Mac OS 9.x, 2-11 Mac OS X, versions 10.2 and 10.3, 2-12 Macintosh OS X, version 10.
Index maintenance adding ink, 8-2 cleaning the maintenance kit wiper blade, 8-15 cleaning the paper release blade, 8-11 cleaning the system, 8-18 consumables, 8-23 emptying the waste tray, 8-5 ordering supplies, 8-23, 8-24 replacing the maintenance kit, 8-8 routine maintenance items, 8-24 safety, A-2 maintenance kit removing, 8-28 replacing, 8-8 maintenance kit wiper blade cleaning, 8-15 managing copy functions, 4-20 fax functions, 6-17 scan files and scanning policies, 5-31 manual 2-sided printing, 3-27 ma
Index options additional trays, 1-7 hard drive, 1-7 memory, 1-7 printing, 3-20 system, 1-7 ordering supplies, 8-23, 8-24 original size scanning template setup, 5-22 setting for faxes, 6-15 setting for scanning, 5-21 setting up a scan template, 5-22 originals 1-sided or 2-sided scanning, 5-19 2-sided, 4-5 laser adjusting scan sensitivity, 4-10 printed on thin paper, 5-18, 6-15 using the prescan glass option, 4-9 output adjusting copies, 4-16 P packing the system, 8-34 paper custom sizes, 3-52 damaging to th
Index one or more color bars are missing, 7-8, 7-10 predominate light stripes, 7-10 random light stripes, 7-8 solving problems, 7-6 print speed maximum, 1-5 printer driver available, 2-10 controlling print-quality, 7-2 installing, 1-7, 2-10 Layout tab, 3-21 Macintosh, 2-10 Macintosh OS 9.x, 2-11 Macintosh OS X, versions 10.2 and 10.
Index Protocol Monitoring Report, 6-25 Public Folder scanning to, 5-5 public folder, 5-8 R random light stripes, 7-8 recycling supplies, 8-24 reduce images, 4-9 registering your system, 9-29 regulations copy, B-1 faxing, C-1 removing a group, 6-11 an individual, 6-10 repacking the system, 8-25 replacing the maintenance kit, 8-8 report activity report, 6-22 dial directory report, 6-22 fax transmission report, 6-17 group directory report, 6-22 pending jobs report, 6-22 printing a fax report, 6-22 protocol mo
Index deleting folder profiles, 5-30 deleting templates, 5-25 email profiles, 5-27 importing images into a Windows application, 5-14 importing scanned images into a Macintosh application, 5-16 installing the scan driver, 5-2 loading originals in the document feeder, 4-2 loading originals on the document glass, 4-2 managing files, 5-31 options, 5-17 overview, 5-2 policies, 5-34 retrieving scanned images, 5-8 Scan to Email tab, 5-10 selecting image handling options when creating a scan template, 5-23, 5-24 se
Index adding individual and group entries, 6-5 editing or deleting a group entry, 6-11 editing or deleting an entry, 6-10 setting fax destination, 6-14 standard copy mode, 4-6 standard print-quality mode, 7-2 starting rate, 6-16 status messages control panel, 1-10 supplies, A-4 ordering, 8-23 recycling, 8-24 when to order, 8-24 Support Centre, 1-15 supported paper and media, 3-3, 3-6 supported paper sizes and weights, 3-6 Tray 1, 3-7 Tray 2, 3, or 4, 3-8 symbols entering with the control panel keypad, 6-5 i
Index printing custom size paper, 3-52 printing envelopes, 3-36 printing glossy paper, 3-47 printing labels, 3-42 printing transparencies, 3-30 supported paper sizes and weights, 3-7 Tray 2, 3, or 4 margins, 3-8 paper and media types, 3-8 printing envelopes, 3-38 printing glossy paper, 3-49 printing labels, 3-44 printing transparencies, 3-32 supported paper sizes and weights, 3-8 trays additional, 1-7 options, 1-7 setting the copy default tray, 4-4 troubleshooting fax problems, 6-25 paper jams, 9-2 PhaserSM
Index selecting printing options for an individual job, 3-21 sending a fax from your computer, 6-3 WIA image manager, 5-15 Xerox Support Centre, 1-15 Windows PostScript driver, 2-10 wiper blade cleaning, 8-15 X Xerox supplies recycling programs, 8-24 supplies website, 8-24 Support Centre, 1-15 website resources, 9-29 Xerox Scan Utility adding a password for scanning to your computer, 5-33 Copy to Folder tab, 5-12 deleting email profiles, 5-28 deleting folder profiles, 5-30 deleting templates, 5-25 retrievi