Mini LoRaWAN® Gateway UG63 Quick Start Guide
Safety Precautions Milesight will not shoulder responsibility for any loss or damage resulting from not following the instructions of this operating guide. The device must not be modeled in any way. Do not place the device close to objects with naked flames. Do not place the device where the temperature is below/above the operating range. Do not power on the device or connect it to other electrical device when installing. Check lightning and water protection when used outdoors.
instructions, may cause harmful interference to radio communications. However, there is no guarantee that interference will not occur in a particular installation. If this equipment does cause harmful interference to radio or television reception, which can be determined by turning the equipment off and on, the user is encouraged to try to correct the interference by one or more of the following measures: —Reorient or relocate the receiving antenna.
Contents 1. Packing List .................................................................................................................................................... 5 2. Hardware Introduction ...................................................................................................................................5 2.1 Overview ............................................................................................................................................... 5 2.2 Dimensions ....
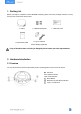
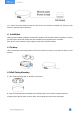
1. Packing List Before you begin to install the UG63 LoRaWAN® Gateway, please check the package contents to verify that you have received the items below. 1 × UG63 1 × Quick Start Guide 2 × Wall Mounting Kits 1 × Warranty Card 1 × Type-C Cable & Power Adapter (Optional) If any of the above items is missing or damaged, please contact your sales representative. 2. Hardware Introduction 2.1 Overview You can check below interfaces after taking off the mounting plate on the back of the device.
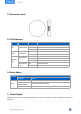
2.2 Dimensions (mm) 2.3 LED Indicators LED SYS LoRa Ethernet Port Indication System Status LoRa Status Link Indicator (Yellow) Rate Indicator (Green) Status Description Off The system is starting up Green Light The system is running properly Red Light The system goes wrong Off Packet Forwarder mode is running off Green Light Packet Forwarder mode is running well Off Disconnected or connect failure On Connected Blinking Transmitting data Off 100 Mbps mode On Other mode 2.
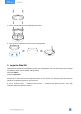
Note: When connecting, Ethernet cable of UG63 device side should be installed first, otherwise, PoE devices or gateway may be damaged. 4. Installation UG63 supports multiple installation methods like desktop, wall mounting, ceiling mounting, etc. Before you start, make sure that all cables have been installed and configurations are completed. Note: Do not connect device to power supply or other devices when installing. 4.
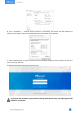
C. Fix the mounting plate to the wall plugs with screws. D. Turn the device clockwise to lock it to the mounting plate. 5. Login the Web GUI UG63 provides web-based configuration interface for management. If this is the first time you configure the gateway, please use the default settings below: Username: admin Password: password Connect PC to UG63 ETH port through PoE injector or PoE switch. The following steps are based on Windows 10 operating system for your reference. A.
B. Go to “Properties” → “Internet Protocol Version 4 (TCP/IPv4)” and select “Use the following IP address”, then assign a static IP manually within the same subnet of the gateway. C. Open a Web browser on your PC (Chrome is recommended) and type in the IP address 192.168.23.1 50 to access the web GUI. D. Enter the username and password, click “Login”. If you enter the username or password incorrectly more than 5 times, the login page will be locked for 10 minutes.
E. After logging the web GUI, you can view system information and perform configuration of the gateway. It’s suggested that you change the password for the sake of security. 6. Network Connection A. Go to “Network” → “Interface” → “Port” page to select the connection type and configure Ethernet port information, click “Save & Apply” for changes to take effect. UG63 supports Static IP, DHCP and PPPoE modes.
7. Packet Forwarder Configuration UG63 has pre-installed multiple packet forwarders including Semtech UDP Packet Forwarder, Chirpstack-Generic MQTT broker, LoRa Basic Station, etc. This section explains how to connect the gateway to network servers. Make sure the gateway connects to the network as shown in Section 6. A. Go to “Packet Forwarder” → “General” page and click to add a network server. B. Fill in the server information and enable this server. C.
D. Add the gateway on network server page. For more details about the network server connection please refer to Milesight IoT Support portal. E. Go to “Traffic” page to view the data communication of UG63. 8. Connect UG63 to Milesight IoT Cloud UG63 can connect to Milesight IoT Cloud to manage Milesight product’s data. Due to the limitation of memory, it’s suggested to bind not more than 20 devices.
A. Ensure the gateway has access to the Internet and is able to ping the domain of Milesight IoT Cloud. B. Go to “Packet Forwarder” → “General” page to enable the embedded network server. C. Go to “Packet Forwarder” → “Radio” page to select the center frequency and channels. The channels of the gateway and nodes need to be the same.
D. Go to “Network Server” → “General” page to enable the network server and “Milesight IoT Cloud” mode. General Status Device Profiles Applications Gateways General Setting Packet Forwarder Enable Network Server Mlsight loT Cloud Network System NetlD 010203 Join Delay 5 sec RX1 Delay sec 8760- 0- 0 Lease Time hh-mm-ss Maintenance info Log Level E. Log in the Milesight IoT Cloud. Then go to “My Devices” page and click “+New Devices” to add gateway to Milesight IoT Cloud via SN.
A. Go to “Packet Forwarder” → “General” page to enable the “Remote Embedded NS” and fill in the main gateway IP address which can reach. B. Go to “Network Server” → “Gateway Fleet” page of UG65/UG67 to add the gateway ID of UG63 gateway and define a name, then save the settings. C. After connected, the UG63 can transfer node data to UG65/UG67 and you can check the data details on “Network Server” → “Packets” page of UG65/UG67.