Redmi Pad User Guide
Contents Chapter 1 Get started.................................................................................................01 About the user guide ...........................................................................................................01 Redmi Pad overview.............................................................................................................01 Connect to Wi-Fi ........................................................................................................
Adjust the volume ................................................................................................................15 Chapter 3 Battery and maintenance .......................................................................16 View battery capacity..........................................................................................................16 Enable Battery saver ............................................................................................................
Gallery overview ...................................................................................................................33 Photos ....................................................................................................................................33 Albums ...................................................................................................................................36 Edit a video with Video editor ...............................................................
General...................................................................................................................................64 Vision......................................................................................................................................65 Hearing ..................................................................................................................................67 Physical ..............................................................................
Chapter 13 Legal information...................................................................................95 WEEE......................................................................................................................................95 CAUTION ...............................................................................................................................95 Important Safety Information...........................................................................................
Chapter 1 Get started About the user guide Thanks for choosing Redmi Pad, please read the user guide carefully before you start. This is the Redmi Pad User Guide for the MIUI Global 13.1.0 Stable version. If you are not sure which software version your device is running, you can go to Settings > About tablet to view the MIUI version information. For more MIUI features, see global.miui.com for more information. Redmi Pad overview 13 11 10 12 9 1 2 8 7 3 6 4 5 1. Power button 2. Speaker 3.
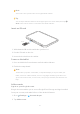
Note ! You need to enter a password for an encrypted Wi-Fi network. Tip You can swipe down the status bar at the upper-right corner of the tablet, then tap Wi-Fi on the Control center to connect the same Wi-Fi next time. Insert an SD card Micro SD 1. Withdraw the SD card slot with the ejection tool. 2. Put the SD card on the slot. 3. Insert the slot back into the tablet. Power on the tablet 1. Press and hold the Power button until the tablet vibrates. 2. Finish the setup wizard.
3. Choose Google. 4. Sign in with your Google Account. Note ! If you do not have an account, you can tap Create account to create one. See Google for more information. Sign in to your Mi Account Mi Account enables you to access exclusive Mi content and make full use of Mi apps. 1. Go to Settings > Mi Account. 2. Sign in with your Mi Account. Note ! Mi Account will be created automatically when you use a phone number for the first time. You can also create a Mi Account with an email address.
down the notification panel, then tap the notification of finishing setting up your tablet and follow the onscreen instructions to finish the setup wizard. Charge the tablet When the battery is running low, you need to charge the tablet. 1. Connect the USB cable to the tablet. 2. Plug the cable into the adapter. 3. Connect the adapter to a power outlet. 4. Disconnect the charger when the tablet is fully charged. ! Caution Make sure that the charger and the USB cable are available.
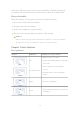
Gesture Definition Examples for gesture effects • View photos with more details. Zoom in • Browse websites clearly. • Check maps in full view. Zoom out Full screen gestures Gesture Description Go to Home screen Swipe up from the bottom of the screen. Open Recents Swipe up from the bottom of the screen and pause. Go back Swipe up from the side to the center of the screen. Switch between apps Swipe left or right from the full screen indicator or bottom of the screen.
Gesture Description Take a partial screenshot Press and hold with 3 fingers. Open a second App with Floating windows Drag an App from the sidebar to the center of the screen to open it in a floating window. Open a second App with Split screen Drag an App from the sidebar to the side of the screen to use Split screen. Note ! Before you can take a screenshot, you need to enable the shortcuts. See Take a screenshot shortcut and Take a partial screenshot shortcut for more information.
Gesture Description Take a screenshot 6:32 Simultaneously press the Volume down button and the Power button. Launch Google Assistant 6:32 Press and hold the Power button until the Google assistant appears. Note ! Before you can launch Google Assistant with the Power button, you need to enable the shortcut. See Launch Google Assistant shortcut for more information. Lock the screen Lock the screen with the Power button Press the Power button. Lock the screen with Widgets 1.
Unlock the screen with face data Add a screen lock password before you add the face data. See Set up a face lock for more information. 1. Press the Power button to wake up the tablet. 2. Look at the screen until the the lock icon changes from to . 3. Swipe up from the bottom of the screen. Note ! You keep the screen stay on when you are looking at the screen. Home screen 1. Status bar 2. System navigation buttons System navigation buttons • Tap to return to the last step.
• Touch and hold an empty space on the Home screen. 2. Tap to set Home screen layout. 3. Tap Transition effects to choose a transition effect. 4. Tap Done and exit the screen editing mode to save the change. Fill cells of uninstalled apps 1. Enter the screen editing mode. • Pinch on the Home screen. • Touch and hold an empty space on the Home screen. 2. Tap 3. Tap to set Home screen layout. to enable Fill cells of uninstalled apps.
View the notifications 1. Swipe down from the upper-left of the tablet to open the notification panel. 2. Tap a notification to view in details. Clear the notifications 1. Swipe down from the upper-left of the tablet to view notifications. 2. Swipe right on a notification reminder to clear the notification. Tip You can tap at the bottom of the notification panel to clear all notifications.
Focus mode Bedtime mode Open the Control center When you use New version of the Control center, pull down status bar on the right to open the Control center. Apps and App folders Downloaded Apps and pre-installed Apps are shown on the Home screen. You can manage Apps and add them to personalized App folders. Open an App from Home screen Tap an App icon on the Home screen.
App Downloads Download Apps from Google Play Store Google Play Store App is pre-installed on the Home screen. You can download Apps on the tablet. Note ! You need to sign in with your Google Account. See Sign in to your Google Account for more information. 1. Open Google Play Store App. 2. Choose an App that you want to download. 3. Tap Install to download and install the App. The App icon automatically shows on the Home screen when the download finishes.
Open recently-opened Apps in Recents 1. Open Recents windows. • Swipe up from the bottom of the screen when in full screen mode. when use system navigation buttons. • Tap 2. Tap an App window. Remove recently-opened Apps in Recents 1. Open Recents windows. • Swipe up from the bottom of the screen when in full screen mode. when use system navigation buttons. • Tap 2. Swipe an App window left or right. Note ! You can tap to clear all recently-opened Apps.
2. Tap Remove. Screenshots and Screen recording Take a screenshot Take a screenshot with three methods. • Press the Volume down button and the Power button simultaneously to take a screenshot. See Take a screenshot shortcut for more information. • Slide three fingers down to take a screenshot. See Take a screenshot shortcut for more information. • Swipe down from the status bar to open the Control center and tap Screenshot to take a screenshot.
3. Tap to start recording. 4. Tap to stop recording. Tip You can enable DND on the Control center to prevent unexpected notifications. Change the wallpaper 1. Go to Settings > Wallpaper. 2. Choose a wallpaper from pre-installed wallpapers or local photos. 3. Tap Apply. 4. Choose Set as Lock screen, Set as Home screen, or Set both. • Tap Set as Lock screen to apply the wallpaper to the Lock screen. • Tap Set as Home screen to apply the wallpaper to the Home screen.
Chapter 3 Battery and maintenance You can go to battery settings with two methods to check the battery health and manage the usage and maintenance of the battery. • Go to Settings > Battery. • Go to Security > Battery. View battery capacity 1. Go to battery settings. See Go to battery settings for more information. 2. Open Battery saver page. 3. View the remaining use time and battery capacity.
2. Open Battery saver page. 3. Tap Fix 1 battery usage issue. Note ! The tablet scans the battery usage issues automatically. You may have no or more battery usage issues to fix or optimize in real situations. View power consumption in detail 1. Go to battery settings. See Go to battery settings for more information. 2. Open Battery saver page. 3. Tap the line chart and view the power consumption in detail below. View battery temperature 1. Go to battery settings.
5. Choose to set the power on or power off time. 6. Tap . Reboot the tablet 1. Press and hold the Power button until the function menu shows. 2. Choose Reboot. Power off the tablet 1. Press and hold the Power button until the function menu shows. Power off. 2. Choose Chapter 4 Networks and connection Wi-Fi You can go to Settings > more information. Wi-Fi to enable Wi-Fi. See Connect to Wi-Fi for Note ! Available networks show up when you enable Wi-Fi. Manage saved networks 1.
Pair a tablet with Bluetooth The following steps take the connection between a Redmi tablet and another Redmi tablet as an example. 1. Go to Settings > Bluetooth. 2. Tap to enable Bluetooth on both devices. Available devices show up when you enable Bluetooth. 3. Tap the name of tablet B in tablet A. 4. Tap Pair in the pop up windows of the two devices. Note ! The two devices need to enable Bluetooth and stay in an effective distance.
Portable hotspot Enable Portable hotspot 1. Go to Settings > Connection & sharing > Portable hotspot. 2. Tap to enable Portable hotspot. Tip • You can tap Share QR code to share Wi-Fi network. • You can swipe down from the upper-right corner of the tablet to enable Hotspot on the Control center. Turn off hotspot automatically Turn off hotspot automatically helps save mobile data when you do not use the feature. 1. Go to Settings > 2. Tap to enable Turn off hotspot automatically.
• You can also swipe down from the upper-right corner of the tablet, then tap to enable Cast on the Control center. Add VPN Note ! You need to set a screen lock to save your VPN settings. See Set up Screen lock for more information. > Settings > 1. Go to Connection & sharing > VPN. 2. Tap Add VPNat the bottom of the screen. 3.
Chapter 5 Camera Camera overview 1. Flash 2. HDR 3. Viewfinder 4. Camera modes 5. Gallery 6. Shutter button 7. Switch button 8. More Open the camera Open the camera with three methods. • Touch and hold and swipe left to open camera when the screen is locked. • Double press the Volume down button to open camera when the screen is locked. See Launch camera shortcut for more information. • Double press the Power button to open camera when the screen is locked or unlocked.
Basic features Set the focus 1. Open Camera. 2. Tap the screen to show the focus ring and exposure setting. 3. Tap the area that you want to focus on. Adjust the exposure When you take a photo in a low-light or an overexposed environment, adjust the exposure to adjust the brightness of your photo. 1. Open Camera. 2. Tap the screen to show the focus ring and exposure setting. 3. Drag up or down beside the focus ring to adjust the exposure.
Zoom in or out Camera. 1. Open 2. Pinch the screen to zoom in or out on the viewfinder. Useful features Adjust the aspect ratio Camera. 1. Open 2. Tap at the upper-right corner. 3. Choose an aspect ratio such as 1:1, 3:4, 9:16, or Full. Set a timer You can set a countdown to give yourself time to take a photo. 1. Open 2. Tap Camera. at the upper-right corner. 3. Choose 3S, 5S, or 10S. 4. Tap to start the timer.
Show gridlines You can use gridlines to straighten or compose your photo. 1. Open Camera. 2. Tap at the upper-right corner. 3. Tap Gridlines to show gridlines. Tip You can tap to choose different gridline types. Enable Palm shutter Show your palm to the camera to start timer when you take a photo. 1. Open Camera. 2. Tap at the upper-right corner. 3. Tap to enable Palm shutter. Enable Tilt-shift You can use Tilt-shift to make certain area clear and other places blurred in your photo. Camera.
Tip The camera enables automatic HDR by default. You can also tap to make HDR al- ways on. Enable AI camera AI camera identifies subjects and scenes intelligently and optimizes the camera settings accordingly. It can identify a variety of scenes, such as blue sky, snowy weather, sunrise and sunset, greenery, and document. 1. Open 2. Tap Camera. to enable AI camera. When you are taking a photo, AI camera shows the identified icons. Adjust video resolution and frame rate 1. Open Camera. 2.
1. Open Camera. 2. Adjust the basic camera features based on your needs. See Basic features for more information. 3. Tap to take a photo. Take a selfie 1. Open Camera. 2. Tap to switch to the front camera. 3. Tap to take a selfie.
Take videos 1. Open Camera. 2. Select Video mode. 3. Tap to start shooting. 4. Tap to stop shooting. Tip When taking a video, you can tap You can also tap to pause your shooting and tap to continue. to take a photo while shooting. Take Documents mode photos You can take a picture for a document such as paper, PowerPoint, and blackboard in Documents mode. It can modify lens distortion and adjust perspective and support you to take a straight photo.
2. Select Documents mode. 3. Point camera at the subject. 4. Tap to take a photo. The camera automatically identifies the range. You can also drag the angles of the frame to adjust the range. 5. Tap . Tip • You can tap to edit the text of the protective watermark. • You can go to Gallery to view and adjust the document area. Take photos in Night mode Night mode captures more details and brightens your photos in low-light conditions. Camera. 1. Open 2. Select Night mode. 3. Tap .
1. Open Camera. 2. Select Short video. 3. Choose to set up your shooting. • Tap to add background music. • Tap to apply the speed effect. • Tap and choose to apply Beautify effect, Filters effect, or Kaleidoscope effect. Camera settings You can go to Camera > > Settings to open Camera settings. Add a watermark 1. Open Camera settings. 2. Tap Watermark. 3. Choose to add watermark types. • Tap to enable Add time stamp on photos. • Tap to enable Device watermark.
Enable Document scanner The feature displays a shortcut whenever the AI camera detects a document or presentation slide. 1. Open Camera settings. 2. Tap Smart suggestions. 3. Tap to enable Document scanner. Set picture quality 1. Open Camera settings. 2. Tap Picture quality to choose High, Standard, or Low. Set up volume buttons function 1. Open Camera settings. 2. Tap Volume buttons function to choose Shutter, Timer (2s), Zoom, or Volume.
Preserve settings Preserve settings can preserve the previously used mode rather than automatically reset to default preferences. 1. Open Camera settings. 2. Tap Preserve settings to choose to enable or disable the previous settings. to enable Camera mode. Camera mode preserves the previously • Tap used mode along with the front or rear camera selection. • Tap to enable Beautify. Beautify preserves Beautify preferences selected during the previous session. The feature is enabled by default.
2. Tap to switch to the front camera. 3. Go to > Settings to open Camera settings. 4. Tap to enable Mirror front camera. Set video encoder in Video mode 1. Open Camera. 2. Select Video mode. 3. Go to > Settings to open Camera settings. 4. Tap Video encoder to select high compatibility or high performance video encoder. Chapter 6 Gallery Gallery overview Open Gallery to view all the visual media stored on your tablet. You can view, edit, and manage pictures and videos.
2. Choose a picture. 3. Tap to edit the picture. 4. Choose Basic or AI to apply different effects. • Tap Crop to crop the picture into a different size. • Tap Filter to add color effects. Adjust to adjust the exposure, brightness, contrast, saturation, vi• Tap brance, warmth, tint, highlights, fade, grain, sharpness, and vignette of the picture. • Tap Doodle to make doodles or add different shapes. • Tap Text to add markup or text. • Tap Mosaic to apply mosaics to the picture.
• Tap Editor to cut the video into segments. • Tap Filters to add visual effects. • Tap Enhance to adjust the exposure, brightness, contrast, saturation, vibrance, warmth, tint, highlights, fade, grain, sharpness, and vignette of the video. • Tap Captions to add text. • Tap Soundtrack to add background music. • Tap Aspect ratio to change the aspect ratio. 4. Tap Save. Share photos and videos Gallery > Photos. 1. Go to 2. Tap a picture to view details. 3. Tap . 4.
Albums Your photos are organized automatically by categories, such as Favorites, Camera, Screenshots and screen recordings, and Videos. You can view the organized albums or create new albums. Create an album 1. Go to 2. Tap Gallery > Albums. at the lower-right corner of the tablet. 3. Enter the album name. 4. Follow the instruction to add photos or videos to the album. Tip You can also choose not to add photos or videos to the album. Rename an album Gallery > Albums. 1. Go to 2.
2. Press and hold the album that you want to hide. 3. Tap Hide. 4. Tap OK in the pop up window. Note ! If you want to view the hidden albums, you can see View hidden albums for more information. Delete albums 1. Go to Gallery > Albums. 2. Press and hold the album that you want to delete. 3. Tap Delete. 4. Tap OK in the pop up window. Manage albums 1. Go to Gallery > Albums. 2. Press and hold the album that you want to manage. 3. Tap More. • Tap Show in Photos to add pictures to Photos album.
• Tap Filters to add a filter effect to the video. • Tap Enhance to adjust the exposure, brightness, contrast, saturation, vibrance, warmth, tint, highlights, fade, grain, sharpness, and vignette of the video. • Tap Captions to add texts or credits. • Tap Soundtracks to adjust the volume levels and add background music or sound to the video. • Tap Aspect ratio to adjust the aspect ratio of the video. 7. Tap Save. Create a collage 1. Open Gallery. 2. Tap at the upper-right corner of the tablet. 3.
6. Tap Delete selected photos. 7. Tap Delete in the pop up window. Set album sort format 1. Go to Gallery > Albums. 2. Tap at the upper-right corner of the tablet. 3. Tap Sort. 4. Choose an album sort format. Set album view format 1. Go to Gallery > Albums. 2. Tap at the upper-right corner of the tablet. 3. Tap List view to view albums in list format. Note ! You can also go to Gallery > Albums > > Grid view to view albums in grid format.
Tip If you want to hide albums, you can see Hide albums for more information. Set the time for each slide 1. Open Gallery. 2. Tap at the upper-right corner of the tablet. 3. Tap Settings. 4. Tap Show each slide for to enter interval. 5. Tap OK. Loop all slides 1. Open Gallery. 2. Tap at the upper-right corner of the tablet. 3. Tap Settings. 4. Tap to enable Loop all slides. Set secure sharing 1. Open Gallery. 2. Tap at the upper-right corner of the tablet. 3. Tap Settings. 4. Tap Secure sharing. 5.
3. Tap Settings. 4. Tap to enable Convert HEIF before sending. The feature is usually enabled by default. Chapter 7 Personalize your tablet Date and time Set time automatically 1. Go to Settings > Additional settings > Date & time. 2. Tap to enable Set time automatically. Note ! If you disable Set time automatically, you can set the date and time manually. Set time zone automatically 1. Go to Settings > 2. Tap to enable Set time zone automatically. Additional settings > Date & time.
2. Tap to enable Dual clock. Note ! • You can tap Second clock to choose the region or time zone of the second clock. • Dual clock is displayed on the Lock screen, Home screen, and turned off screen. Languages and regions Set the language 1. Go to es. Settings > Additional settings > Languages & input > Languag- 2. Choose and set the language from language list. Set the region 1. Go to Settings > Additional settings > Region. 2. Choose and set the region from region list.
2. Tap to enable Wake Lock screen for notifications. Set Lock screen clock format 1. Go to Settings > Lock screen > Lock screen clock format. 2. Choose a lock screen layout. Note ! • You cannot change the format when Dual clock is on. • You cannot change the lock screen layout for the third party themes. Display charging animation after device is unlocked 1. Go to Settings > 2. Tap to enable Display charging animation after device is unlocked. Lock screen.
• Tap Custom. You can turn Dark mode on and off at scheduled time. Enable Automatic brightness 1. Go to Settings > Display > Brightness level. 2. Tap to enable Automatic brightness. Note ! Screen brightness is optimized according to ambient light. You can still make minor adjustments manually. Tip You can also swipe down from the upper-right corner of the tablet to enable on the Control center. Adjust screen brightness level manually 1. Go to Settings > Display > Brightness level. 2.
Enable Reading mode Reading mode adjusts colors and textures of the items on your screen to allow your eyes to relax. 1. Go to Settings > Display > Reading mode. 2. Tap to enable Reading mode. Note ! • You can switch the Classic and Paper mode when Reading mode is enabled. • You can enable Schedule to customize time to turn Reading mode on and off. Choose a color scheme 1. Go to Settings > Display > Color scheme. 2.
Tip If you want to lock the screen orientation, you can disable the Auto-rotate screen or swipe down from the upper-right corner of the tablet to enable Lock orientation on the Control center. Sound Change the ringtones of Notifications and Alarm 1. Go to Settings > Sound. 2. Tap Notifications or Alarm to enter the ringtone page. 3. Choose a ringtone. Note ! You can also tap Choose local ringtone to set your ringtone from local files. Adjust volume 1. Go to Settings > Sound. 2.
Tip You can also swipe down from the upper-right corner of the tablet to enable Mute in Control center. Enable Silence media in Silent mode You can silence games, music, videos, and other apps with Silence media in Silent mode enabled. 1. Go to Settings > Sound. 2. Tap to enable Silence media in Silent mode. Enable Do not disturb With the mode enabled, there are no reminders for incoming calls and notifications. 1. Go to Settings > Sound. 2. Tap to enable Do not disturb.
• Tap to enable Play sound when deleting items. • Tap to enable Play sound when charger is connected. • Tap to enable Play audio at startup. Set sound effects 1. Go to Settings > Sound > Sound effects. 2. Choose to set sound optimization and earphone controls. Notifications & Control center Enable Lock screen notifications 1. Go to Settings > Notifications & Control center. 2. Tap Lock screen in NOTIFICATIONS. 3. Tap beside an App to enable Lock screen notifications.
• Tap Android to apply Android notification style. Items shown on the Lock screen after swiping down 1. Go to Settings > Notifications & Control center > Items shown on the Lock screen after swiping down. 2. Tap to enable Notification shade. Note ! If you use the new version of Control center, you can tap and tap to enable Control center to enable Smart home. Show notification icons 1. Go to Settings > 2. Tap to enable Show notification icons. Notifications & Control center > Status bar.
Set App drawer 1. Go to Settings > Home screen. 2. Tap Home screen to choose App drawer. 3. Choose to set App drawer. to enable App suggestions to display most frequently used apps • Tap in the drawer. • Tap Manage app categories to categorize Apps in App drawer. • Tap Backgrounds to choose the background of App drawer and adjust the App drawer background transparency. • Tap Scroll bar to set scroll layout. • Tap to enable Place new apps on the Home screen. Set full screen gestures 1.
2. Tap to enable Lock Home screen layout. Blur app previews Select Apps for which previews will be blurred in Recents. 1. Go to Settings > Home screen > Blur app previews. 2. Select an App. 3. Tap beside the App to enable the feature. Wallpaper You can see Change the wallpaper for more information. Chapter 8 Security and safety Security status You can go to Settings > Security status to view the information about Find device, Security update, and Google Play Protect.
4. Draw the unlock pattern again and then tap Confirm. Note ! If you do not want to set other lock methods, tap Cancel. Set up a PIN lock 1. Go to Settings > Password & security > Screen lock. 2. Tap PIN. 3. Enter 4 to 16 digits. 4. Tap Continue and then tap OK to confirm your password. Note ! If you do not want to set other lock methods, tap Cancel. Set up a password lock 1. Go to Settings > Password & security > Screen lock. 2. Tap Password. 3. Enter 4 or more digits or letters. 4.
Note ! You need to set screen lock before you set up Unlock with Bluetooth device. You can see Set up Screen lock for more information. 1. Go to Settings > Password & security > Unlock with Bluetooth de- vice. 2. Tap to enable Unlock device. 3. Verify your identification with a screen unlock. 4. Tap Allow to turn on Bluetooth in the pop-up window. 5. Tap an available device to connect.
Safety & emergency Emergency information Medical information and emergency contacts can help first responders in an emergency. Add medical information 1. Go to Settings > Safety & emergency > Emergency information. 2. Tap Add information. 3. Tap Name , Address , Blood type , Allergies , Medications , Organ donor , or Medical notes to add medical information. Note ! You can also go to Settings > Safety & emergency > OPEN EMERGENCY INFOR- MATION to add medical information. Add an emergency contact 1.
2. Tap to enable Play countdown alarm. Note ! The tablet plays a loud sound when Emergency SOS is starting. Add a call for help 1. Go to Settings > Safety & emergency > Emergency SOS. 2. Tap Call for help. 3. Enter a phone number. 4. Tap Save. Note ! If you enter a non-emergency number, your tablet must be unlocked to use Emergency SOS and your call may not be answered.
Apps You can go to Settings > Dual apps, and set App lock. Apps to manage Apps and their permissions, set Manage apps Uninstall Apps 1. Go to Settings > Apps > Manage apps. 2. Tap Uninstall. 3. Choose one or more Apps. 4. Tap Uninstall at the bottom of the tablet. Set default Apps Set default Apps for basic usages such as dial, messages, and camera. 1. Go to Settings > Apps > Manage apps. 2. Tap at the upper-right corner of the tablet. 3. Tap Default apps. 4.
2. Tap Autostart. 3. Tap beside an App to enable autostart. Note ! Some Apps may incorrectly indicate that MIUI has prevented them from starting. You can check permissions that have been granted to individual Apps. Manage permissions 1. Go to Settings > Apps > Permissions. 2. Tap Permissions to enter Permission manager. Permissions such as Calendar, Camera, or Contacts are displayed in the form of a permission list. 3. Tap an item to check which Apps use the permission. 4.
5. Select Apps and tap Use App lock. Add Apps to App lock Use App lock to protect the data of individual apps and your privacy. Settings > 1. Go to Apps > App lock. 2. Enter the password to open App lock. 3. Choose an App and tap beside to lock the App. Note ! You can tap the search field at the top of the screen to search for Apps. Disable App lock 1. Go to 2. Tap Settings > Apps > App lock. at the upper-right corner of the tablet. 3. Tap to disable App lock. 4. Tap OK.
3. Tap Hide notification content. 4. Tap beside an App. You can see You have a new message instead of the actual content when you receive a notification. Unlock all apps at once Enter password once to unlock all protected Apps. Settings > 1. Go to Apps > App lock. 2. Tap at the upper-right corner of the tablet. 3. Tap to enable Unlock all apps at once. Lock all apps 1. Go to 2. Tap Settings > Apps > App lock. at the upper-right corner of the tablet. 3. Tap to enable Lock all apps.
2. Tap 3. Tap at the upper-right corner of the tablet. to enable Add Mi Account. Privacy protection You can go to Settings > Privacy protection to manage Apps that request sensitive permissions, monitor how Apps use sensitive permissions, and manage other privacy-related permissions. Privacy View Privacy dashboard You can view the time line of when Apps used a permission in the past 24 hours. 1. Go to Settings > Privacy. 2. Tap Privacy dashboard to view which permissions recently are used. 3.
Use Autofill with Google Autofill with Google saves and fills with passwords, credit cards, or addresses when needed. 1. Go to Settings > 2. Tap to enable Use Autofill with Google. Privacy > Autofill service from Google. Enable Google location history Note ! You need to add one Google account or use myaccount.google.com to manage some settings without an account. 1. Go to Settings > Privacy. 2. Tap Google location history to view Activity controls page. 3. Tap Turn on.
4. Tap OK. Enable Usage & diagnostics The feature shares data to help improve Android device experience. 1. Go to Settings > Privacy. 2. Tap Usage & diagnostics to view information about Usage & diagnostics. 3. Tap to enable Usage & diagnostics. Location Enable Location access Apps that have the location permission can get your location information. 1. Go to Settings > Location. 2. Tap to enable Location access.
2. Choose to enable take a screenshot shortcut. • Tap to enable Slide 3 fingers down. • Tap to enable Volume down + Power. You can now slide 3 fingers down on the screen or press the Volume down and Power buttons simultaneously to take a screenshot. Take a partial screenshot shortcut 1. Go to Settings > screenshot. 2. Tap Additional settings > Gesture shortcuts > Partial to enable Press and hold with 3 fingers. Launch camera shortcut 1.
• Tap Frame rate to select frame rates. Higher frame rates reduce motion blur. • Tap to enable Lock screen to end. • Tap to enable Show touch gestures. • Tap to enable Show button taps. General Enable Accessibility button You can quickly access accessibility features from any screen. 1. Go to Settings > Additional settings > Accessibility. 2. Tap Accessibility button in General page. 3. Tap to enable Accessibility button. Set up Accessibility button 1.
2. Tap to enable Shortcut from lock screen. Vision Use TalkBack TalkBack provides spoken feedback so that you can use the tablet without looking at the screen. TalkBack is intended for situations or people who have difficulty in seeing the screen. 1. Go to Settings > Additional settings > Accessibility. 2. Tap Vision page. 3. Tap TalkBack. 4. Tap to enable Use TalkBack. 5. Tap Allow and follow the onscreen instructions to perform actions.
Enable Select to Speak shortcut When Select to Speak is on, you can tap specific items on your screen to hear the words read aloud. 1. Go to Settings > Additional settings > Accessibility. 2. Tap Vision page. 3. Tap Select to Speak. 4. Tap to enable Select to Speak shortcut. 5. Tap Allow and follow the onscreen instructions to perform actions. Set up Select to Speak 1. Go to Settings > Additional settings > Accessibility. 2. Tap Vision page. 3. Go to Select to Speak > Settings. 4.
3. Choose to manage display. • Tap Display size to select the icon display size. • Tap Magnification to enable Magnification shortcut. Magnification shortcut enables you to quickly zoom in on the screen to make content larger. • Tap Color correction to correct colors that fit your eyes. • Tap Color inversion to turn light screens dark or turn dark screens light. • Tap to enable Remove animations.. Hearing Enable Mono audio The feature combines channels when playing audio. 1.
Physical Enable Switch Access Switch Access lets you interact with your Android device with one or more switches instead of the touch screen. Switch Access can be useful if you cannot interact directly with your tablet. Use switches to select items, scroll, type, and more. 1. Go to Settings > Additional settings > Accessibility. 2. Tap Physical page. 3. Tap Switch Access. 4. Tap to enable Use Switch Access. 5. Tap Allow and follow the onscreen instructions to perform actions.
• Tap Autoclick (dwell timing) to select a time for a mouse cursor to click automatically when the cursor stops moving for a certain amount of time. • Tap to enable Larger mouse pointer. Digital Wellbeing & parental controls Digital Wellbeing & parental controls can reduce interruptions from your tablet. You can add content restrictions and set other limits to help your child balance their screen time. View the screen time 1. Go to Settings > Digital Wellbeing & parental controls. 2.
Chapter 10 Special features Game Turbo Game Turbo boosts the connection stability for games by limiting the bandwidth of background downloads and reducing network delay. This feature clears memory reserved for the background processes to give more space for the game and prevents you from notification disturbances. Add games to Game Turbo 1. Go to Settings > Special features > Game Turbo. 2. Tap to view games. 3. Tap to add games to Game Turbo Open games with Game Turbo 1.
1. Go to Settings > Special features > Game Turbo > . 2. Tap Performance mode to set up Performance mode. • Tap Performance mode to choose to enable Wi-Fi optimization or Optimized touch controls. • Tap to enable Performance optimization to avoid overheating and hardware-related issues. • Tap Memory exceptions to add Apps to exceptions and prevent them from being optimized. • Tap to enable Mi WiFi speed boost to increase connection speed by 10% to 20% when the tablet is connected to Mi/Redmi routers.
Set up Touch-resistant area The feature reduces touch sensitivity near the edges to avoid triggering touch controls. 1. Go to Settings > Special features > Game Turbo > . 2. Tap Additional settings. 3. Choose an App. 4. Select None, Small, Medium, or Large in Touch-resistant area. Restore default settings 1. Go to Settings > Special features > Game Turbo > . 2. Tap Additional settings to choose Restore default settings. 3. Tap Restore. 4. Tap OK.
Manage video apps You can use video toolbox when you play videos in Apps. 1. Go to Settings > Special features > Video toolbox. 2. Tap Manage video apps. 3. Choose the Apps that you want to use video toolbox and return to the video toolbox page. Floating windows Note ! Floating windows works when in full screen gestures mode. Gestures for Floating windows You can go to Settings > Special features > Floating windows to learn how to open notifications in a floating window.
1. Open one App. 2. Swipe up from the bottom of the left or right part of the screen. The default Apps and recently-used Apps show in the sidebar. 3. Drag a second App from the sidebar to the center of the screen to open it in a floating window. Open a second App with Split screen You can open two Apps on a screen with Split screen. 1. Open one App. 2. Swipe up from the bottom of the left or right part of the screen. The default Apps and recently-used Apps show in the sidebar. 3.
File Manager File Manager is an easy and powerful file explorer. It helps you easily manage storage on your device, network-attached storage, and cloud storages. You can also find how many files and apps you have on your device at a glance immediately after opening the App. View recent files File Manager. 1. Open 2. Tap Recent to view recent files. Note ! You can tap to enter the names to quickly search files.
Manage files 1. Open File Manager. 2. Choose a file, then touch and hold the file. 3. Tap More to manage the file. • Tap Copy to copy the file to other folders. • Tap Make private to make the file private. • Tap Add to favorites to add the file to Favorites folder in More of Internal storage. • Tap Rename to rename the file. • Tap Open in another app to open the file with other Apps. • Tap Details to view the detailed information of the file. View private folders 1. Open File Manager. 2.
Tip You can tap Clear to clear up the trash files. Clear up files 1. Go to File Manager > . 2. Tap Clear up. The system automatically scans for trash files from Cache files, Obsolete files, Packages, Residuals, and Memory. 3. Choose the files that you want to clear. 4. Tap Clear up. Manage File manager 1. Go to File Manager > . 2. Tap Settings to manage File manager. • Tap to enable Encrypt private files. • Tap to enable Don't show Gallery items and screenshots among recent files.
Duo You can easily make one-to-one video calls with Duo. See support.google.com/duo for more information. Gmail Gmail enables you to send and receive an email with Google's web-based email service. See support.google.com/mail for more information. Google With Google, you can find online content that interests you, and turn on your personalized feed to receive customized content. See support.google.com/websearch for more information.
News News is a personalized news aggregator that organizes and highlights what's happening in the world so you can discover more about the stories that matter to you. See support.google.com/news/publisher-center for more information. Photos You can store and back up your photos and videos automatically to your Google Account with Photos. See support.google.com/photos for more information. Play Store You can find new apps, movies and TV shows, music, books, magazines, and Play Store.
Useful features in side panels When you play a video, you can use useful features to add more effects to your video. Icons Function Icons Function Lock the screen. Take a screenshot. Loop the video. Stretch the video. View the video in notification shade. Rotate the screen. More features Share the video. Cast the video. Select audio track. Adjust subtitles. Mute the video. Browse the playlist. Activate background playback. Adjust play speed.
Manage videos 1. Open Mi video. 2. Choose a video, then touch and hold the video. 3. Manage videos. • Tap Share to share the video to different platforms. • Tap Rename to rename the video. • Tap Properties to view the detailed information of the video. • Tap Hide to make the video private. • Tap Delete to delete the video. Mi Browser Mi Browser is a fast and secure full-featured web browser for mobile devices.
3. Tap a game to play. View Bookmarks and History 1. Go to 2. Tap Mi browser > . to view bookmarks and history. Enable Incognito mode Incognito mode allows you to browse the web safely and privately without leaving any search or browsing history. 1. Go to 2. Tap Mi browser > . to enable Incognito mode in Tools. Tip You can also turn on or off aggregated data-sharing under this mode. Enable Dark mode The dark color scheme can boost visual experience. 1. Go to 2. Tap Mi browser > .
Tip • You can add audio, images, sketches, checklists, and other items in a note. • You can also apply a heading style, bold or italic font, a bulleted or numbered list, and more items to change the formattings. Take a handwritten note 1. Open 2. Tap Notes. in page. 3. Draw or write a handwritten note. 4. Tap to save the note. Tip You can change the paint color, choose the paint types, and use ruler and other tools. Delete a note 1. Open Notes. 2. Touch and hold the note in . 3. Tap Delete.
5. Tap the note that you want to restore. 6. Tap OK. Create a new folder 1. Open Notes. 2. Tap on the start page. 3. Tap to open the Folders page. 4. Tap New folder to create a new folder. 5. Enter the folder name. 6. Tap OK. Search notes Notes. 1. Open 2. Tap the search bar in page to enter keywords of the note. 3. Choose to locate the note. View hidden notes 1. Open Notes. 2. Swipe down from the upper left part of the screen and then release. 3. Enter the privacy password. 4.
Security Security to clean up tablet storage, manage Apps and permisYou can use sions, filter and block spam calls and messages, and protect your tablet from hidden viruses or malicious Apps. App lock App lock helps protect your privacy. See App lock for more information. Battery Use Battery to test the power consumption and optimize battery-related items. See Chapter 3 Battery and maintenance for more information. Boost speed Use Boost speed to helps your tablet work faster.
4. Set trash size limit and schedule alerts frequency. Deep clean Delete the redundant photo Use Deep clean to detect duplicate photos and poor-quality images in your Gallery. You can choose to delete redundant items. Uninstall the unused app Use Deep clean to delete the rarely used Apps to free up space. Delete App data Use Deep clean to clear unimportant data for each App. Delete the big file Use Deep clean to delete the unimportant big files.
Open hidded Apps 1. Spread two fingers apart on the Home screen. A folder with hidden Apps shows. 2. Tap a hidded App. Note ! If you enabled App lock, you need to enter the password when you open the hidden folder. Manage Hide apps 1. Go to 2. Tap Security > Hide apps. at the upper-right corner of the tablet. 3. Manage Hide apps. • Tap to enable Hide notifications to not show the notifications from hidden Apps. • Tap to enable App lock to protect private files.
Note ! If you find some problems, you can tap Submit to report issues or suggestions in Service & feedback. Test network Find and solve network-related issues Use Test network to run a network test when you encounter problems with network. You can follow the onscreen instructions to resolve the current network problems after you see the test results. Close connected Apps All Apps currently connected to the internet are shown in the test results. You can tap an App to force to stop it.
4. Set the ringtone, repeat frequency, and other items. 5. Tap . Add custom clock You can add clocks in different countries and regions to compare the time. 1. Open Clock. 2. Tap . 3. Tap . 4. Search for country or city. 5. Tap the location to add a custom clock to the start page. Use stopwatch Clock. 1. Open 2. Tap . 3. Tap to start. 4. Tap to pause the stopwatch. Note to mark different time segments, tap ! You can tap to continue, or tap to reset the stopwatch.
Downloads Add a new download job 1. Open 2. Tap Downloads. at the lower-right corner. 3. Enter an HTTP or HTTPS link in the box. 4. Tap Download. Tip You can swipe left from the start page to view the completed download jobs. Recorder Record audio 1. Open Recorder. 2. Tap to start. 3. Tap to stop recording. 4. Tap OK to save the recording. Tip • The recording name is generated by default. You can edit the name to a new one.
• Tap to enable Home screen indicator to show a blue indicator on the Home screen while recording. • Tap to enable Name recording manually. • Tap Recording format to select AAC, MP3, or WAV. • Tap Delete synced recordings to delete synced recordings. • Tap Recently deleted items to manage deleted items. Deleted items can be stored in the trash for up to 30 days. • Tap Clear data to delete cached items, App data, and customized settings.
Weather View weather info Open Weather to view the current and the 5-day forecast weather information of your location. Note ! 24-hour forecast, wind speed and direction, real feel, UV index, and pressure are also displayed on the start page. Add a city 1. Open 2. Tap Weather. at the upper-left corner of the start page. 3. Search for city. 4. Tap Add to start page to add the city to the start page. Delete a city 1. Open 2. Tap Weather. at the upper-left corner of the start page. 3.
Chapter 12 About device and accounts About the tablet You can go to Settings > About tablet to view the information such as MIUI version information, important safety information, the certification information, and other information. Update MIUI version Update the MIUI system to the latest MIUI version to use the newest features. Note ! The system informs you of the latest MIUI version update information. You can choose whether to update or not. 1. Go to Settings > About tablet. 2.
System apps updater You can go to Settings > System apps updater to view the update information of Apps and update history. Manage System apps updater 1. Go to Settings > System apps updater > > Settings. 2. Manage System apps updater. to enable Show update notifications. • Tap • Tap Auto updates to choose Don't update, Updates using Wi-Fi, or Updates using Wi-Fi and mobile data. Memory extension You can go to Settings > Additional settings > Memory extension to add 2.
4. Tap Sync in the pop up window. Note ! You can also tap Sync now at the bottom of the tablet to sync data manually. Services & feedback You can go to Settings > Services & feedback to search for issues and send feedback. See Services & Feedback for more information. Chapter 13 Legal information WEEE Special precautions must be taken to safely dispose of this product. This marking indicates that this product may not be discarded with other household waste in the EU.
• Use of unauthorized cables, power adapters, or batteries can cause fire, explosion, or pose other risks. • This device's operating temperature range is 0°C to 40°C. Using this device in an environment outside of this temperature range may damage the device. • If your device is provided with a built-in battery, to avoid damaging the battery or the device, do not attempt to replace the battery yourself. • Charge this device only with the included or authorized cable and power adapter.
• Connect other devices according to their instruction manuals. Do not connect incompatible devices to this device. • For AC/DC adapters, the socket-outlet shall be installed near the equipment and shall be easily accessible. Safety Precautions • Observe all applicable laws and rules restricting use of tablet in specific situations and environments.
• Do not use your tablet in places with high humidity, such as bathrooms. Doing so may result in electric shock, injury, fire, and charger damage. Security Statement Please update your tablet's operating system using the built-in software update feature, or visit any of our authorized service outlets. Updating software through other means may damage the device or result in data loss, security issues, and other risks. EU Regulations RED Declaration of Conformity Xiaomi Communications Co., Ltd.
This device is restricted to indoor use only when operating in the 5250 to 5350 MHz frequency range in following countries: AT BE BG HR CY CZ DK EE FI FR DE EL HU IE IT LV LT LU MT NL PL PT RO SK SI ES SE UK(NI) IS LI NO CH TR Restrictions in the 2.4 GHz band: Norway: This subsection does not apply for the geographical area within a radius of 20 km from the center of Ny-Ålesund. Ensure the power adapter used meets the requirements of Clause 6.4.
However, there is no guarantee that interference will not occur in a particular installation. If this equipment does cause harmful interference to radio or television reception, which can be determined by turning the equipment off and on, the user is encouraged to try to correct the interference by one or more of the following measures: • Reorient or relocate the receiving antenna. • Increase the separation between the equipment and receiver.
Disclaimer This user guide is published by Xiaomi or its local affiliated company. Improvements and changes to this user guide necessitated by typographical errors, inaccuracies of current information, or improvements to programs and/or equipment, may be made by Xiaomi at any time and without notice. Such changes will, however, be incorporated into new online editions of the user guide (please see details at www.mi.com/global/service/userguide).