
Instructions / Assembly


4. EXTENSION CORD: Use an extension cord of sufcient thickness and rated capacity. The extension
cord should be kept as short as possible.
5. FEEDING OIL: Prior to using the power tool, remove the oil gauge. This product contains only a small
amount of oil when shipped from the factory.
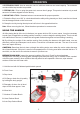
6. MOUNTING A TOOL: Standard tools are recommended for proper operation.
1. Rotate the Stop Lever 180° in a clockwise direction while pulling toward you. Next, insert the tool shank
into the hexagonal hole on the front cover.
2. Clamp the tool by turning the stop lever half a turn in the opposite direction.
Note: When removing the tool, follow the above procedure in reverse order.
1. After placing the tip of the tool in the base, turn power witch to ON. In some cases, it may be necessary
to push up a bit against the crushing position forcefully in order to begin the striking stroke. This is not due
to a malfunction of the tool, it means the safe-guard mechanism against no-load striking is working.
USING THE HAMMER
2. By utilizing the weight of the machine and by rmly holding the hammer with both hands, one can
effectively control the subsequent recoil motion. Proceed at a moderate work rate. The use of too much
force can impair efciency.
CAUTION: Sometime the tool does not begin the striking stroke even when the motor rotates because
the oil has thickened. If this tool is used in low temperatures or if it being used after extended idle time. To
avoid this, run the tool for ve minutes to warm it up before use.
BEFORE EACH USE: Inspect the general condition of the tool. Check for loose hardware,
misalignment or binding of moving parts, damaged cord/electrical wiring, dull or cracked Chisel, cracked
or broken parts, and any other condition that may affect its safe operation. After use, wipe external
surfaces of the tool with clean cloth
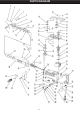
1. Hold the tool with it’s attened part directed upward.
2. Front Cover
3. Stop Lever
4. Oil Gauge, check the oil quantity
by holding the body upright.
5. Resupply oil when the oil level
drops to less than approx. 3mm
6. Wear limit
7. Number of Carbon Brush
8. Usual Carbon Brush
9. Auto-Stop Carbon Brush
5
OPERATION