
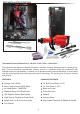
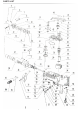
Replacement Part List


6
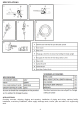
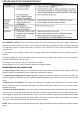
TROUBLESHOOTING AND MAINTENANCE
OIL FEEDING: Caution: Prior to oil feeding, always disconnect to plug from the power supple. Since an oil
chamber is built into this tool it can be used for approximately 20 days without needing to supply lubricating
oil, assuming the tool is used continuously 3-4 hours a day. Feed oil into the oil tank as described below
using this tool.
1. Just before oil is no longer visible in the oil gauge window when holding this device upright, be sure to
rell oil.
2. Before feeding oil, use the provided wrench to remove the oil gauge. Be careful not to lose the rubber
packing attached below the oil gauge.
3. Check the oil level once daily to conrm the oil is lled.
4. After lling the oil, be sure to securely clamp the oil gauge closed.
MAINTENANCE AND INSPECTION
1. Inspecting the Tool: Use of a dull attachment can cause motor malfunction and degrade efciency.
Replace with a new attachment when abrasions or dullness is noticed.
2. Inspecting the Mounting Screws: Regularly inspect all mounting screws and ensure that they are
properly tightened. Retighten any loose screws immediately before use. Failure to do so can cause serious
injury.
3. Maintenance of the Motor: The motor unit winding is an integral part of the power tool. Exercise care to
ensure the motor does not become damaged or in contact with water. Failure to do so can cause serious
damage and injury.
4. Inspecting Carbon Brushes: The motor employs carbon brushes which can become worn over time and
can result in motor trouble. When the auto-stop carbon brush is activated the motor will automatically stop.
If this happens, replace worn carbon brushes with new ones. In addition, always keep carbon brushes clean
and ensure they slide freely within the brush holders. The carbon brushes can be removed by removing the
cap cover. Cap rubber and brush cap in that order at the interior.
NOTE: Due to continued research and development, the specications herein are subject to change without
notice.