
Installation Guide
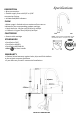

Pull out Kitchen Faucet Installation
6. Attach flexible hose to water
supply.
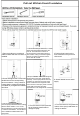
1. Remove locking-nut, metal and
rubber washer and hose connector if
installed.
2. Install faucet through center hole, re-install
rubber and metal washer followed by the
lock-nut. Re-install hose connector if
removed insuring small rubber washer is
also installed. Using a screwdriver tighten
the lock-nut screws so that the faucet is
secure and will not twist.
3.Push pull-out hose in to the
hose connector until you hear a
click sound.
4.Screw and tighten the hot and cold
flexible lines to the corresponding
faucet connectors. Using a wrench
ensure that the copper faucets lines
are stable as you tighten the braided
feed lines.
5.Proper installation of the hose weight kit
will ensure that the spray head retracts
smoothly. On the spray side of the hose,
measure 15" down from the body of the
faucet. Install the hose weight kit at this
point. Pull out on the spray head. It should
move easily and retract smoothly.
Reposition the hose weight kit as necessary.
7.Hold on to the spray-head hose,
unscrew spray head and remove it along
with the rubber washer. Turn on the
faucet to flush the hose and feed line for
1-minute to flush debris. Turn off faucet
and re-install the rubber washer and
spray head.
8.Turn the faucet on and press the
top of the spray head button to
change to Spray.
9. Turn the faucet on and press the
bottom of the spray head button to
change to stream.