
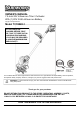
Product Manual

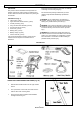

AUXILIARY HANDLE (Fig. 3C)
• Position the auxiliary handle so that the holes are in align-
ment with the holes in the handle support bracket.
• Insert the M6X50 hex head bolt into the hex shaped bolt
hole of the bracket.
• Secure by tightening the wing nut onto the bolt.
• Loosen the wing nut and adjust the angle and height of the
handle to a safe and comfortable position. Secure into
place by tightening the wing nut onto the bolt.
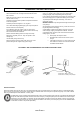
BATTERY INSTALLATION AND REMOVAL
Hold the tool and the battery firmly when installing or removing
battery.
Failure to hold the tool and the battery firmly may cause them to
slip from your hands and may result in damage to the tool and/
or battery and a personal injury.
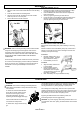
To remove:
• Depress release button (A) on
the back of battery cartridge
(B) to release the battery.
• Pull the battery out of tool.
To install:
• Align the battery with the cavi-
ty in the handle.
• Insert the battery into the
handle until the battery re-
lease button locks into place.
You should hear a “click” once
the battery is installed.
• Note: The battery can only be installed one way.
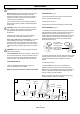
OPERATING
To switch ON, hold the tiller/cultivator
firmly with two hands, make sure the
tines are not touching any surface.
Press the safety button (A) while
squeezing the On/Off trigger switch (B).
Once the tiller/cultivator is started, you
can release the safety button.
To switch OFF, simply release the trig-
ger.
ASSEMBLY
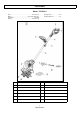
LOWER HANDLE WITH TILLING HEAD (Fig. 3B)
• Align the notch on the lower handle with the rib on the tilling
head.
• Push the lower handle into the tilling head.
• Align the side cover with the holes on the lower handle
shaft and push the cover into place.
• Secure with the two ST3.9x16 screws.
WARNING: When connecting the tilling head and lower handle
using the two self-tapping screws supplied, make sure the
screws are securely tightened. Screw heads should be re-
cessed below the surface. DO NOT START THE UNIT UNTIL
TILLING HEAD AND LOWER HANDLE ARE SECURELY
CONNECTED.
Once the tilling head and lower handle are securely connected,
do not remove the self-tapping screws or attempt to disassem-
ble for any purpose. The self-tapping screws will lose their ef-
fectiveness of securing the assembly if removed and re-
installed.
STARTING:
WARNING: The tines start rotating immediately after the
tiller/cultivator is switched on. Keep hands and feet away
from the tines.
Use the tiller/cultivator for breaking sod, preparing seed beds, and
for cultivating gardens and flower beds. The tiller/cultivator can
also dig small holes for planting saplings or potted plants.
For breaking sod or deep tilling, allow the tines to pull the tiller/
cultivator forward to the end of your arm’s reach, then firmly pull it
back toward yourself. You will achieve the best results by repeat-
edly allowing it to move forward and pulling it back.
By pulling the tiller/cultivator back towards yourself, the
tines will dig deeper and more aggressively.
CAUTION: To prevent tripping, take extra precautions when mov-
ing backwards and when pulling the tiller/cultivator back toward
yourself.
5
Model TC70020-1