
User manual


DESIGN
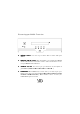
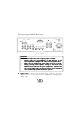
Right and Left speaker output:
Right and Left speaker output: Right and Left speaker output:
Right and Left speaker output: Connect your speakers here. Be
sure to respect the polarity: the + of your speaker must be con-
nected to the + of the WA202. Connect your RIGHT speaker to the R
(red) output of your WA202 and the LEFT speaker to the L (black)
output of your WA202. We recommend the use of banana plugs to
prevent short-circuit. This device was designed to be used with 8 or
4 ohms speakers. It was not designed to handle speakers with a less
than 4 ohms impedance.
AM and FM antenna
AM and FM antenna AM and FM antenna
AM and FM antenna connectors: Connect here an AM and a FM (75
) antennas or roof aerial to enjoy AM and FM radio.
RCA Audio inputs:
RCA Audio inputs: RCA Audio inputs:
RCA Audio inputs: Connect the RCA outputs of your source to the
RCA inputs of your WA202. Be sure to connect the RIGHT output of
your source to the R input (red) of your amplifier and the LEFT out-
put to the L input (white) of your amplifier. Note:
Note: Note:
Note: Your WA202 allows
the connection of 4 external, line level sources. If you want to con-
nect a turntable, you may need to use a phono MM (or MC according
to your cartridge model) to line transformer before you can connect
it to your WA202.
PRE 0UT
PRE 0UTPRE 0UT
PRE 0UT: Pre-amplified output. If you want to use a subwoofer, a
separate power amplifier or some active speakers, connect them
here.
iPod POWER USB connector:
iPod POWER USB connector: iPod POWER USB connector:
iPod POWER USB connector: This USB type B port allow you to