
MVC Series- Installation Guide
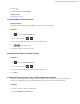
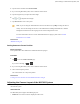

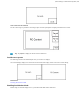
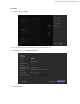


Table Of Contents
- Contents
- Introduction
- Deployment and Connection
- Initial Setup
- Setting up Yealink MVC900/MVC800/MVC500/MVC300
- Basic Settings of Teams Room Systems
- Basic Features for Microsoft Teams Rooms App
- Switching Between Skype User Account And Administrator Account
- Logging into Yealink Management Cloud Service/Yealink Device Management Platform
- Troubleshooting
- Upgrading System Software
- Firmware for Each Device
- General Issues
- Does the MVC900/MVC500/MVC800/MVC300 Come with All the Necessary Software Pre-installed?
- The Room Is Not Enabled for Teams Meetings
- There Is No Content Displayed on the Second Display
- Why Can not Click Finish After Completing the Setup Wizard?
- Any Anti-virus Software Needed to Be Installed on the Mini-PC?
- Restarting the Device
- Checking the Status of Your Device
- Appendix

| Basic Settings of Teams Room Systems | 32
3.
Tap the camera and then select Preset Position.
4.
If you are using MVC900 system, select a desired UVC80 camera.
5.
Tap the navigation keys to adjust the camera angle.
6.
Tap or to adjust the focal length.
7.
Tap New Preset to create a new preset.
Note: If you are using the Yealink Room Connect for the first time, tap Skip to manage the devices
locally. You can also manage the devices on the Yealink Device Management Platform or Yealink
Management Cloud Service after signing into the remote management account.
For more information on how to use the Yealink RoomConnect plug-in, please refer to Yealink
RoomConnect User Guide.
Related tasks
Administrator Sign-in
Setting Camera to Preset Position
Before you begin
Preset positions have been added in the Yealink RoomConnect plug-in.
Procedure
1.
Tap to enter the Camera Control page.
If you are in a meeting, tap > .
2.
If you are using MVC900 system, select a desired UVC80 camera.
3.
Select a desired preset position.
The camera will be set to the preset position.
Related tasks
Creating the Preset Position on the Yealink RoomConnect Plug-in
Adjusting the Camera Layout of the MVC900 System
After enabling the camera layout for Camera-Hub on the Yealink RoomConnect, you can adjust the camera layout of
the MVC900 system.
About this task
The MVC900 system supports the following layouts:
• Fullscreen: the selected camera is displayed in full screen.