
MVC Series- Installation Guide

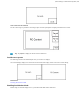


Table Of Contents
- Contents
- Introduction
- Deployment and Connection
- Initial Setup
- Setting up Yealink MVC900/MVC800/MVC500/MVC300
- Basic Settings of Teams Room Systems
- Basic Features for Microsoft Teams Rooms App
- Switching Between Skype User Account And Administrator Account
- Logging into Yealink Management Cloud Service/Yealink Device Management Platform
- Troubleshooting
- Upgrading System Software
- Firmware for Each Device
- General Issues
- Does the MVC900/MVC500/MVC800/MVC300 Come with All the Necessary Software Pre-installed?
- The Room Is Not Enabled for Teams Meetings
- There Is No Content Displayed on the Second Display
- Why Can not Click Finish After Completing the Setup Wizard?
- Any Anti-virus Software Needed to Be Installed on the Mini-PC?
- Restarting the Device
- Checking the Status of Your Device
- Appendix

| Basic Settings of Teams Room Systems | 33
• Division: every camera is given equal prominence in equal-sized panes.
• Surround: the assigned camera is given prominence in the largest pane, and other cameras are displayed in a strip
beside the assigned camera.
For more information on how to enable the camera layout feature for Camera-Hub on Yealink RoomConnect, please
refer to Yealink RoomConnect Userguide.
•
Adjusting the Camera Layout When the System is Idle
Adjusting the Camera Layout When the System is Idle
Procedure
1.
Tap on the idle screen.
If you are in a meeting, tap > .
2.
Tap Camera Layout.
3.
Select the desired layout and make the following settings:
• Fullscreen: Drag the camera from the camera list into the left picture to switch the camera displayed in full
screen.
• Division: Drag the camera in the division mode to swap the camera display positions.
• Surround:
Select the desired mode from the drop-down menu to the right of the surround mode.
Drag the camera in surround mode to the specified position.
4.
Tap Apply.
Single and Dual External Display
To fully enjoy video and content sharing in the meeting, at least one external display is recommended to be connected
to the mini-PC. If you connect two external displays, the second screen will display the shared content in full screen.
Note: If you want to use two external displays, make sure the dual monitor mode is enabled.
•
Single Screen Layouts
•
Dual Screen Layouts
•
Enabling Dual Monitor Mode
Single Screen Layouts
The following introduces the default layout when you connect one display screen.
Only Video Calls