
MVC Series- Installation Guide

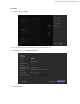


Table Of Contents
- Contents
- Introduction
- Deployment and Connection
- Initial Setup
- Setting up Yealink MVC900/MVC800/MVC500/MVC300
- Basic Settings of Teams Room Systems
- Basic Features for Microsoft Teams Rooms App
- Switching Between Skype User Account And Administrator Account
- Logging into Yealink Management Cloud Service/Yealink Device Management Platform
- Troubleshooting
- Upgrading System Software
- Firmware for Each Device
- General Issues
- Does the MVC900/MVC500/MVC800/MVC300 Come with All the Necessary Software Pre-installed?
- The Room Is Not Enabled for Teams Meetings
- There Is No Content Displayed on the Second Display
- Why Can not Click Finish After Completing the Setup Wizard?
- Any Anti-virus Software Needed to Be Installed on the Mini-PC?
- Restarting the Device
- Checking the Status of Your Device
- Appendix

| Logging into Yealink Management Cloud Service/Yealink Device Management Platform | 40
3.
Tap Sign in.
Administrator Sign-in
You can sign in as an administrator, and the administrator account provides the system administration capabilities to
manage the device.
Procedure
1.
Navigate to More > Settings.
2.
Enter the administrator password (default: sfb) to access the Setup screen.
3.
Navigate to Windows Settings.
4.
Select Administrator from the bottom-left corner.
5.
Enter the administrator password (default: sfb) and then sign in.
Logging into Yealink Management Cloud Service/Yealink
Device Management Platform
The Yealink RoomConnect plugin running under Windows automatically detect all devices in the MVC system.
After logging to the Yealink Management Cloud Service or Yealink Device Management Platform via Yealink
RoomConnect, you can manage all devices in the MVC system, including the unified upgrade, as well as diagnosis
and alarm.