
MVC Series- Installation Guide

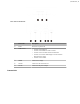
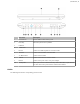
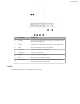
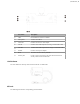
Table Of Contents
- Contents
- Introduction
- Deployment and Connection
- Initial Setup
- Setting up Yealink MVC900/MVC800/MVC500/MVC300
- Basic Settings of Teams Room Systems
- Basic Features for Microsoft Teams Rooms App
- Switching Between Skype User Account And Administrator Account
- Logging into Yealink Management Cloud Service/Yealink Device Management Platform
- Troubleshooting
- Upgrading System Software
- Firmware for Each Device
- General Issues
- Does the MVC900/MVC500/MVC800/MVC300 Come with All the Necessary Software Pre-installed?
- The Room Is Not Enabled for Teams Meetings
- There Is No Content Displayed on the Second Display
- Why Can not Click Finish After Completing the Setup Wizard?
- Any Anti-virus Software Needed to Be Installed on the Mini-PC?
- Restarting the Device
- Checking the Status of Your Device
- Appendix

| Introduction | 6
Port Name Description
1 LED Indicator Indicate different status of the system.
2 Reset Key
Reset the system to factory defaults.
3 USB Port /
4 Camera Port /
5 RCA In Connect to an audio input device via a RCA cable.
6 RCA Out Connect to the Soundbar via a RCAcable.
7 VC Hub/Camera Connect to the VCM34.
8 Internet Connect to the switch to connect UVC80s.
9 DC48V Connect to the power source via a power adapter.
10 Security Slot Allow you to connect a universal security cable to the codec, so you can lock
the codec down. The system cannot be removed when locked.
UVC80
The following describes the corresponding ports of UVC80: