TM OWNER’S MANUAL 3 TON SUPER-DUTY JACK Item: 56647 Questions, problems, missing parts? Before returning to your retailer, call our customer service department at 1-888-44-TORIN (1-888-448-6746), 8 a.m.- 5 p.m., PST, Monday-Friday. Read carefully and understand all ASSEMBLY AND OPERATION INSTRUCTIONS before operating. Failure to follow the safety rules and other basic safety precautions may result in serious personal injury.
IMPORTANT Before You Begin Register This Product. For future reference, record the model name, model number, date of manufacture and purchase date of this product. You can find this information on the product. Model Name ____________________________ Model Number ____________________________ Date of Manufacture ____________________________ Date of Purchase ____________________________ OWNER / USER RESPONSIBILITY DO NOT OPERATE OR REPAIR THIS PRODUCT WITHOUT READING THIS MANUAL.
GENERAL SAFETY RULES WARNING: Read and understand all instructions. Failure to follow all instructions listed below may result in serious injury. CAUTION: Do not allow persons to operate or assemble this jack until they have read this manual and have developed a thorough understanding of how the jack works. WARNING: The warnings, cautions, and instructions discussed in this instruction manual cannot cover all possible conditions or situations that could occur.
SAFETY Always follow safety precautions when installing and operating this jack. Keep all decals on the unit clean and visible. Before proceeding ensure that you fully understand and comprehend the full contents of this manual. Failure to operate this equipment as directed may cause injury or death. The distributor is not responsible for any damages or injury caused by improper use or neglect. THIS IS A LIFTING DEVICE ONLY! • This jack is designed only for lifting part of the total vehicle.
GENERAL SAFETY INSTRUCTIONS Position the Jack Position the jack to only lift on the areas of the vehicle as specified by the vehicle manufacturer. Always Use Jack Stands After lifting the vehicle always support the load with appropriately rated vehicle Jacks stands before working on the vehicle. Do Not Overload Jack Do not overload this jack beyond its rated capacity. Overloading this jack beyond its rated capacity can cause damage to or failure of the jack.
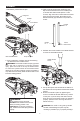
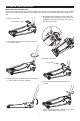
ASSEMBLY 1. Familiarize yourself with the jack. 3. Refer to handle image when performing this step. Press Quick Disconnect on handle piece 2, this will allow slide handle pieces 1 and 2 connect, align the holes on both sections to allow quick disconnect to trigger. Quick disconnect will automatically pop out when hole position is correct. Lifting Arm Saddle Front Wheel Handle Pc. 2 Handle Pc. 1 Quick Disconnect 4. Unfasten the screw located in the Handle Socket to insert the assembled handle.
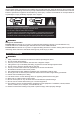
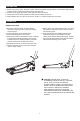
SYSTEM AIR PURGE PROCEDURE IMPORTANT: BEFORE FIRST USE Perform the following Air Purge Procedure to remove any air that may have been introduced into the hydraulic system as a result of product shipment and handling. This step is to be completed without any weight on the jack. 4. With a flat blade screwdriver, unscrew the oil fill plug slightly to purge trapped air from system. (For 1. Remove cover plate. RUBBER OIL PLUGS Use caution not to tear or Cover plate puncture the oil plug.) 2.
BEFORE USE 1. Before using this product, read the owner's manual completely and familiarize yourself thoroughly with the product and the hazards associated with its improper use. 2. Perform the air purge procedure. (See System Purge Procedure.) 3. Check and that the pump operates smoothly before putting into service. 4. Inspect before each use. Do not use if bent, broken or cracked components are noted. OPERATION RAISING THE JACK 1. Block the vehicle’s wheels for lifting stability.
LOWERING THE JACK 1. Raise load high enough to allow clearance for the jack stands to be removed, then carefully remove jack stands. 2. Remove support stands. 3. Grasp the handle firmly with both hands. Securely hold on to the jack handle so your hands do not slip and ensure the release valve does not rapidly lower. 4. Carefully open the Release Valve by slowly turning the handle counter-clockwise. (Do not allow bystanders around the jack or under the load when lowering the jack. 5.
MAINTENANCE INSTRUCTIONS If you use and maintain your equipment properly, it will give you many years of service. Follow the maintenance instructions carefully to keep your equipment in good working condition. Never perform any maintenance on the equipment while it is under a load. Inspection You should inspect the product for damage, wear, broken or missing parts (e.g.: pins) and that all components function before each use. Follow lubrication and storage instructions for optimum product performance.
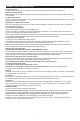
5. Replace oil plug. TO ADD JACK OIL 1. Position the jack on level ground and lower the saddle. 2. Remove cover plate. 6.Replace coverplate and perform the Air Purge Procedure. Cover plate Cover plate 3. Remove the oil plug. TO REPLACE JACK OIL 1. Position the jack on level ground and lower the saddle. 4. Fill the oil case until oil level is just beneath the lower rim of the oil fill hole. 2. Open release valve by turning handle counterclockwise.
3. Remove cover plate. 7. Replace oil plug. Cover plate 8.Replace coverplate and perform the Air Purge Procedure. 4. Remove the oil fill plug. Cover plate ADDITIONAL WARNINGS: 5. Turn the jack on its side to drain old oil from the oil fill hole. • DO NOT USE MOTOR OIL IN THE JACK. • ONLY USE ANTI-FOAMING JACK OIL. • ALWAYS USE A GOOD GRADE HYDRAULIC JACK OIL. • DO NOT USE HYDRAULIC BRAKE FLUID, ALCOHOL, GLYCERINE, DETERGENT, MOTOR OIL OR DIRTY OIL.
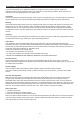
ASSEMBLY DIAGRAM 13
REF# PART# DESCRIPTION QTY 1 T830008.5 Power unit assembly 1 2 T830008.5.1(ASM) Universal joint assembly 1 3 GB308-6 Steel ball bearing Ø6mm 1 4 T815016L.3-13(ASM) Oil plug 1 5 Cotter pin Ø4X60mm 1 6 Coupling connector 1 7 C-clip Ø30mm 2 8 GB1152-M6 Oil cup M6 5 9 T830021-3 Saddle pad 1 10 T83508-10 Pin for saddle 1 11 T830008-7 Saddle 1 Lifting arm assembly 1 C-clip Ø18mm 2 Frame assembly 1 12 13 GB894.1-18 14 15 T830008-8 Front wheel 2 16 GB97.
TROUBLESHOOTING JACK WILL NOT LIFT LOAD X JACK WILL NOT HOLD LOAD JACK WILL NOT LOWER POOR JACK LIFTING X WILL NOT LIFT TO FULL EXTENSION CAUSES AND SOLUTIONS Release valve is not completely closed (Turn handle clockwise). X Weight Capacity Exceeded. X X X Air is in the hydraulics. Purge air from system. X X X Low oil level. Add oil as required. X Oil reservoir is overfilled. Drain excessive oil. Lubricate moving parts.
TORIN ONE YEAR LIMITED WARRANTY Torin Inc.® has been producing quality automotive repair and maintenance products since 1968. All products sold are felt to be of the highest quality and are covered by the following warranty: With proof of purchase for a period of one year from the date of that purchase, the manufacturer will repair or replace, at its discretion, without charge, any of its products or parts thereof which fail due to a defect in material or workmanship.
TM Contact Torin® Customer Service directly by telephone at: 1-888-44-TORIN (1-888-448-6746) 8:00am – 5:00pm Pacific Time, Monday – Friday Torin Inc. 4355 E. Brickell Street Ontario, CA USA www.torin-usa.