
Product Manual A


10
MAINTENANCE INSTRUCTIONS
If you use and maintain your equipment properly, it will give you many years of service. Follow the
maintenance instructions carefully to keep your equipment in good working condition. Never perform any
maintenance on the equipment while it is under a load.
Inspection
You should inspect the product for damage, wear, broken or missing parts (e.g.: pins) and that all components
function before each use. Follow lubrication and storage instructions for optimum product performance.
Binding
If the product binds while under a load, use equipment with equal or a larger load capacity to lower the load
safely to the ground. After un-binding; clean, lubricate and test that equipment is working properly. Rusty
components, dirt, or worn parts can be causes of binding Clean and lubricate the equipment as indicated in
the lubrication section. Test the equipment by lifting without a load. If the binding continues contact Customer
Service.
Cleaning
If the moving parts of the equipment are obstructed, use cleaning solvent or another good degreaser to clean
the equipment. Remove any existing rust, with a penetrating lubricant.
Lubrication
This equipment will not operate safely without proper lubrication. Using the equipment without proper
lubrication will result in poor performance and damage to the equipment. Some parts in this equipment are not
self-lubricating inspect the equipment before use and lubricate when necessary. After cleaning, lubricate the
equipment using light penetrating oil, lubricating spray.
• Use a good lubricant on all moving parts.
• For light duty use lubrication once a month.
• For heavy and constant use lubrication recommended every week.
• NEVER USE SANDPAPER OR ABRASIVE MATERIAL ON THESE SURFACES!
Rust Prevention:
Check rams and pump plungers on the power unit assemblies daily for any signs of rust or corrosion.
Without a load lift the equipment as high as it goes and look under and behind the lifting points. If signs of rust
are visible clean as needed.
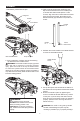
Grease Fittings
Some models contain grease ttings the will regularly need to be greased and lubricated.
This jack includes (5) Zerk ttings in total. (1) Each front wheel; (1) On the lift arm; (2) On the rear handle
socket.
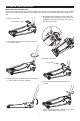
How the Jack Operates
With release valve closed, an upward stroke of the jack handle draws oil from the reservoir tank into the
plunger cavity. Hydraulic pressure holds the valve closed, which keeps the oil in the plunger cavity. A
downward stroke of the jack handle releases oil into the cylinder, which forces the ram out. This raises the
saddle. When the ram reaches maximum extension, oil is bypassed back into the reservoir to prevent an over
extended ram stroke and possible damage to the jack. Opening the release valve allows oil to ow back into
reservoir. This releases hydraulic pressure on the ram, which results in lowering the saddle.
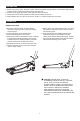
Storing the Jack
1. Lower the Lifting Arm.
2. Place the handle in the upright position.
3. Store in a dry location, recommended indoors.
Note: If the jack is stored outdoors, be sure to lubricate all parts before and after use to ensure the jack stays
in good working condition. Always store jack in the fully retracted postion when stored in outdoor or caustic
enviroments that can cause corrosion and/or rust.