3 O O O MAG CROSSTRAINER EXERCISES & INSTRUCTION MANUAL 11 / 2002 TWN Product may vary slightly from the item pictured.
YORK 3000 MAG. CROSSTRAINER SAFETY GUIDELINES: Please read and follow the following safety guidelines: Before beginning any exercise program, you should consult with your doctor. It is recommended , that you undergo a complete physical examination. Read this owner s manual and follow the instructions. Assemble and operate the YORK 3000 MAG. CROSSTRAINER on a solid, level surface. Keep the area behind the YORK 3000 MAG. CROSSTRAINER clear. Always use your YORK 3000 MAG. CROSSTRAINER in adequate space e.g.
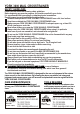
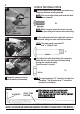
GENERAL REMOVE ALL THE PARTS OF YOUR MAG. CROSSTRAINER 3000 FROM THE CARTON AND PLACE THEM ON THE FLOOR CAREFULLY. ASSEMBLING YOUR MAG. CROSSTRAINER 3000 IS SIMPLE. FOLLOW THESE INSTRUCTIONS CAREFULLY AND IT SHOULD TAKE YOU AROUND 15~20 MINUTES. ASSEMBLY INSTRUCTION 1. A ATTACH THE STABILIZERS Fix the front stabilizer with moving wheels to the main frame and secure, using two carriage bolts, washers and locknuts.
2. A ATTACH THE FRONT POST Rest the front post on the main frame carefully as shown. FRONT POST Connect the sensor wire plug to the middle wire socket. Check middle wire runs up the front post and out the top - later this will connect to the computer. MAIN FRAME Insert the front post to the main frame in position and secure, using four hex head bolts, spring washers and washers as shown.
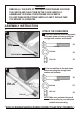
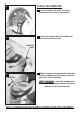
3. A ATTACH THE PEDAL POSTS Attach the pedal to the right pedal post and secure, using two machine screws as shown. PEDAL NOTE: The curved edge of the pedal must be fixed faces outwards. X2 CURVED EDGE OF PEDAL FACES OUTWARDS RIGHT PEDAL POST 8502-60N NOTE: Make sure you fasten the screws securely for your safety and comfort when exercising. Fix the right pedal post to the right side crank arm and secure, using one allen head bolt as shown.
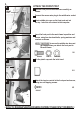
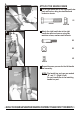
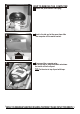
5. A ATTACH THE COMPUTER Insert two batteries (AA size 1.5V) into the compartment in the back of the computer Connect the computer wire to the middle wire that runs inside the front post. B COMPUTER WIRE MIDDLE WIRE Slide the computer wire down the front post then slide the computer onto the bracket on the front post until it click into position. C COMPUTER NOTE: TAKE CARE to ensure the computer wire does not get trapped when you attach the computer to the front post bracket.
4. A ATTACH THE HANDLE BARS Fix the right pedal post to the right handle bar post and secure, using hex head bolt and locknut as shown. RIGHT HANDLE BAR POST X1 RIGHT PEDAL POST 8502-63 8502-14N Attach the right handle bar to the right handle bar post and secure, using two machine screws, washers and locknuts. B RIGHT HANDLE BAR X2 8502-64N X2 8502-61 RIGHT HANDLE BAR POST X2 8502-05 Repeat the same process for the left handle bar assembly.
6. A ATTACH THE CENTRE BAR CENTRE BAR Attach the centre bar to the front post and secure, using four hex head bolts, washers & nylock nuts as shown. NOTE: Make sure you fasten the nuts & bolts securely for your safety and comfort when exercising. FRONT POST B X4 8502-4N 8502-40N 8502-14N HAND PULSE SENSOR X4 NOTE: TAKE CARE to ensure the hand pulse sensor wires does not get trapped when you attach the centre bar to the front post.
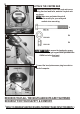
HOW TO REMOVE THE COMPUTER A Detach the pulse sensor cable plug. PULSE SENSOR CABLE PLUG Push in the tab and at the same time slide the computer off the metal bracket. B C Disconnect the computer wire. Be careful not to drop the middle wire down the inside of the front post. TIP: Fix the wire to top of post with tape. COMPUTER FRONT POST * SHOULD YOU REQUIRE ANY ASSISTANCE REGARDING THIS PRODUCT PLEASE CONTACT YORK DIRECTLY.
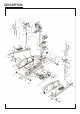
DESCRIPTION N
PARTS LIST KEY NO. 1 2 2C 3N 4N 5 6 7 8 9 10 11 12 13 14N 15 16 17 18 19 20 21 22 23N 24N 25N 26 27 28 29 30 31 32 33 34N 35 36N 37N 38 39 40N PART NO.
KEY NO. 41 42 43 44 45 46 47 48 49 50 51 52N 53N 54 55 56 57 58 59 60N 61 62N 63 64 65 67 68 69 70 71N 72N 73N PART NO.
STRETCHING EXERCISES PECTORALS Lace fingers and with abdominals pulled firmly in and knees slightly bent ease arms away from you. Hold for 8-10 seconds or until muscle eases. QUADRICEPS STRETCH HAMSTRING STRETCH TRICEP STRETCH DELTOID STRETCH CALF STRETCH GLUTEALS CAT STRETCH ABDOMINAL STRETCH INNER THIGH & LOWER BACK STRETCH With one hand, hold lace of shoe, knees together, stand tall with abdominals engaged. Squeeze hips slightly forward to increase the stretch.
BEFORE EXERCISING CHECK: You have adequate space ie. at least 2ft. (60cm) clearance on each side. Check all bolts and locking pins are secured and not protruding. In particular check all the bolts and pins for wear, replace doubtful parts before using the equipment. Always use your elliptical trainer on a flat, level, solid surface. Always work within your exercise level, do not work to exhaustion. If you feel pain or unwell STOP YOUR WORKOUT IMMEDIATELY.
EXERCISE GUIDE cont.i Product may vary slightly from pictured. FORWARD & REVERSE ELLIPTICAL MOTION WORKOUT Select a lead foot and press down in a forward motion. Keep your knees slightly bent. Make 2 full cycles slowly then quickly. Pause - then make 2 full cycles slowly then quickly in a reverse motion. Maintain a secure grip on the handlebars. ROUTINE: 2 FORWARD SLOW 2 FORWARD QUICK 2 REVERSE SLOW 2 REVERSE QUICK FORWARD SQUAT/KNEE BEND WORKOUT Select a lead foot and press down in a forward motion.
YORK ELLIPTICAL CROSSTRAINER 3000 COMPUTER INSTRUCTION INTRODUCTION Your computer is ideal for monitoring your performance and setting yourself targets. By measuring your pulse rate you can ensure you exercise within your range. At the same time you can monitor closely your improving condition and cardiovascular fitness. 3OOO MAG TRAINER STOP SCAN RPM SPEED TIME DISTANCE KM CALORIES PULSE SPEED TIME DIST. CAL. PULSE RECOVERY MODE SET RESET TO START/ Press SET button to activate unit.
RECOVERY: The time it takes you to recover after exercise is an,,indication of your fitness ,, level. The computer is equipped with RECOVERY to measure your heart rate recovery time, you can use this feature to compare your recovery rate over a period of time e.g. When you first start to train and again after a few weeks training. To make an accurate comparison you should really exercise at the same speed and load, and for the same amount of time, e.g.,10 minutes at load 3.
HAND PULSE SENSORS RIGHT HAND PULSE SENSOR LEFT HAND PULSE SENSOR To obtain a pulse reading you must have your left and right hand holding the sensors at the same time. Grip the hand sensors normally (NOT TOO TIGHT) during exercise and after a few seconds the computer will display your pulse reading. Some people will not be able to obtain an accurate hand pulse reading e.g.due to hand, skin or variations in circulation. If you have a problem contact our YORK HELPLINE.
EXERCISE GUIDE FITNESS Many things contribute to fitness and well being but the most important factor is the condition of your heart and lungs and how efficient they are in delivering oxygen via your blood to your muscles. Your muscles use this oxygen to provide enough energy for daily activity. This is called aerobic activity (with oxygen). When you are fit your heart and lungs work well and efficiently. This means your heart will not have to work so hard.
TARGET ZONE MAXIMUM PULSE RATE PULSE RATE 85% OF MAX. EXERCISE SO THAT YOUR PULSE STAYS IN THIS RATE FOR AT LEAST 15-20 MINUTES 70% OF MAX. 55% OF MAX. COOL DOWN LEVEL RESET PULSE TIME COOL DOWN WARM UP THIS IS HOW YOUR PULSE SHOULD BEHAVE DURING GENERAL FITNESS EXERCISE. REMEMBER TO WARM UP AND COOL DOWN FOR A FEW MINUTES.
HOW TO MONITOR YOUR HEART RATE DURING EXERCISE , , Now that you know where your training zone is, you ll I have to monitor yourself to be sure you re in it. , , , Here s a simple rule, if you can t hold a conversation without gasping for breath you re probably above your training zone. , , To know precisely where you re working - making sure you re getting all the benefits We recommend you check your heart rate periodically throughout your workout.
HOW LONG TO EXERCISE? To qualify as a true aerobic exercise with all the benefits we're mentioned, you must maintain your heart rate within your training zone for at least 12 uninterrupted minutes. If you exercise longer than 60 minutes the benefits are reduced and the risk of injury is increased. If you're just starting out on a new exercise program we'recommend you stay at the 12 minute minimum for at least a week. When you feel you're ready to go longer, increase your time no more than 10% a week.
LIMITED WARRANTY WARRANTY YORK BARBELL LTD. warrants this product to be free from defects in workmanship and material, under normal use and conditions, for a period of one year on all steel parts, thirty days on all vinyl and upholstery, and ninety days on all other parts. This warranty extends to the original purchaser only. It is recommended that the original receipt be kept with the manual. YORK BARBELL LTD. will provide a replacement part free of charge when a defect is found during the warranty period.
PARTS ORDER FORM Enclose a check or money order with this form for replacement parts. Date of purchase Name of location where purchased Model number of item purchased Last name, First name Telephone number Address Part No. Q'ty City Part Description State Zip Unit Price Total of order $ Send your order to: YORK BARBELL (AUST.) LTD. UNIT 1, LOT 2, SWAFFHAM ROAD, MINTO N.S.W. 2566 AUSTRALIA YORK BARBELL (U.K.) LTD.