User Manual Tumble Dryer ZDC 47100 W
Welcome to the world of Electrolux Thank you for choosing a first class product from Electrolux, which hopefully will provide you with lots of pleasure in the future. The Electrolux ambition is to offer a wide variety of quality products that make your life more comfortable. You find some examples on the cover in this manual. Please take a few minutes to study this manual so that you can take advantage of the benefits of your new machine.
Important safety information In the interest of your safety and to ensure the correct use, before installing and first using the appliance, read this user manual carefully, including its hints and warnings. To avoid unnecessary mistakes and accidents, it is important to ensure that all people using the appliance are thoroughly familiar with its operation and safety features.
Installation • This appliance is heavy. Care should be taken when moving it. • When unpacking the appliance, check that it is not damaged. If in doubt, do not use it and contact the Service Centre. • All packaging must be removed before use. Serious damage can occur to the product and to property if this is not adhered to. See relevant section in the user manual.
Controls panel and their functions 2 1 SELECTOR DIAL 5 1.Select programme. 2. Press the DELICATE button.The relevant light will light up. 3. Press the START/PAUSE button. The relevant light will stop flashing. DELICATE is only suitable for use with loads of up to 3kg! When the programme has finished the pilot lights End is on. 3 TEXTILE button 4 4 Allows you to select electronically controlled or time controlled drying. Turn the dial to the required programme or time.
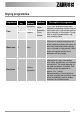
Description of the appliance 1 1 Control panel 2 Fluff filters 3 Rating Plate 4 Condenser Unit 5 Water reservoir 6 Adjustable feet 2 3 4 5 6 Drying programmes Programme Max load Type of kg laundry Extra 7 Cottons Cupboard 7 Cottons Extra 3 Synthetics Cupboard 6 3 Synthetics Options Textile -Cotton Textile -Cotton Textile -Synthetics Textile -Synthetics Description of programme Drying thick or multi-layered textiles, e.g.
Drying programmes Programme Time Max load kg Type of laundry 3 Synthetics 7 Cottons Options Textile -Synthetics -Cotton Delicate Wool care Easy Iron 1 1 Description of programme If the TIME programme has been selected, programme duration time of 30 minutes up to 140 minutes can be set by intervals of 10 minutes. Drying thick or multi-layered textiles, e.g. terry towelling items.
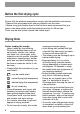
Before the first drying cycle Ensure that the electrical connections comply with the installation instructions. • Remove the polystyrene block and any material from the drum. • Before using your tumble dryer for the first time, were recommend that you place a few damp cloths inside the appliance and dry for 30 minutes. There may be dust inside a brand new tumble dryer.
laundry or a fabric conditioner specifically for tumble dryers. • Remove the laundry when the dryer has finished drying. • If individual items are still damp after drying, set a brief post-drying time, but at least 30 minutes. This will be necessary particularly for multilayered items (e.g. collars, pockets, etc.). Make sure that no metal objects are left in the laundry (e.g. hair clips, safety pins, pins). Button up pillowcases, close zip fasteners, hooks and poppers. Tie any belts or long tapes.
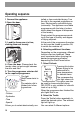
Operating sequence 1 Connect the appliance. 2.Open the door. 3. Load the items one at a time, shaking them out loosely. 4. Close the door. Please check the laundry does not get caught between the door and filter. 5. Turn the programme selector dial to the required programme. The light Start/Pause starts to flash. The selector dial is divided into following sections: -Cottons -Synthetics -Time -Special Allows you to select electronically con10 trolled or time controlled drying.
Cotton Cycle: to be used for cotton, where as in the programmes When the programme has finished the pilot lights End is on. Synthetics to be used for synthetic or delicate items. When the programme has finished the pilot lights End is on. 9. Select the Start/Pause Press this button to start the dryer after having selected the programme and the options. The relevant light will stop flashing.
cleaned. 11. At the end of the programme All drying programmes end with a 10 minute cooling phase. You may remove the laundry after this phase. The lights Filter and Empty Tank, illuminate. If the laundry is not removed at the end of the cycle, the dryer performs an anti-creasing phase (duration: 30 minutes maximum). If you do not remove the laundry, the dryer will stop automatically at the end of the anti-creasing phase. The Lights Filter and The Empty Tank remain lit and the buzzer sounds for 2 minutes.
Care and cleaning You must DISCONNECT the appliance from the electricity supply, before you can carry out any cleaning or maintenance work. External cleaning Use only soap and water and then dry thoroughly. Cleaning the door Important: do not use methylated spirit, diluents or similar product. Open the door. Cleaning the filters Clean periodically the interior part of the door to remove any fluff from the seals around the filter. Accurate cleaning ensures correct drying.
Cleaning the condenser unit 2. To pull out the condenser, 1.Clean the condenser when light Condenser comes on. first turn the two red stops downwards. The condenser is situated at the lower part of the cabinet behind a small door. To open the door, push the catch as per picture. During the drying cycle or at the end, it is normal for water to be present on the surface of the condenser insertion. Important: 4.
1 2 1.Open the small door at the 2. Turn the yellow stop upwards. lower part of the cabinet. 3. Pull out the reservoir. Important: 1 2 Push it until it clicks and 4. Open the small cover and 5. turn the yellow stop downlet water flow down. wards ensure it is firmly • Close the small cover and locked. re-insert the reservoir cor- 6. Close the small door and rectly. press the START/PAUSE button again to allow the programme to continue. The reservoir must be reinserted correctly.
Something not working Certain problems are due to lack of simple maintenance or oversights, which can be solved easily without calling out an engineer. Before contacting your local Service Centre, please carry out the checks listed below. During machine operation it is possible that the red Start/Pause pilot light flashes to indicate that the machine is not working. Once the problem has been eliminated, press the Start/Pause button to restart the programme.
Malfunction When pressing a button, the corresponding button flashes several times. Possible cause Solution • Washing protection. After the start of the programme, the option can no longer be set. • Turn the programme knob to OFF. Set the programme again Drying cycle ends • Not enough washing shortly after programme loaded starts. END or washing loaded is too light illuminated. dry for selected programme. • Select time programme or Programme inactive, Condenser light illuminated.
Technical data Dimensions Electrical connection Voltage Overall power - Fuse Width 60 cm Height 85 cm Depth 58 cm Information on the electrical connection is given on the rating plate on the inner edge of the appliance door 109 cm Depth with loading door open Maximum Load Cotton 7 kg Synthetics 3 kg Use Domestic + 5°C + 35°C This appliance conforms with the following EU Directives: – 73/23/EEC dated 19.02.1973 Low Voltage Directive – 89/336/EEC dated 03.05.
Environment concerns Packaging materials The materials marked with the symbol are recyclable. >PE<=polyethylene >PS<=polystyrene >PP<=polypropylene This means that they can be recycled by disposing of them properly in appropriate collection containers. Old machine Use authorised disposal sites for your old appliance. Help to keep your country tidy! The symbol on the product or on its packaging indicates that this product may not be treated as household waste.
Installation It is dangerous to alter the specifications or attempt to modify this product in any way. Care must be taken to ensure that the appliance does not stand on the electrical supply cable. Any electrical work required to install this appliance should be carried out by a qualified electrician or competent person. Important: The appliance must not bulit-in..
depth between 48 and 60 cm. Read carefully the instructions supplied with the kit. Door reversal To make it easier to load or unload the laundry the door can be reversed. Reversing the door is not possible if after this operation the appliance result installed behind a door with a hinge on the opposite side to that of the appliance. Important: Should the appliance power supply cable need to be replaced, this must be .carried out by our Service Center.
Guarantee Conditions Standard guarantee conditions We, Zanussi-Electrolux , undertake that if within 12 months of the date of the purchase this Zanussi- Electrolux appliance or any part thereof is proved to be defective by reason only of faulty workmanship or materials, we will, at our option repair or replace the same FREE OF CHARGE for labour, materials or carriage on condition that: • The appliance has been correctly installed and used only on the electricity supply stated on the rating plate.
Customer Care For general enquiries concerning your Electrolux appliance, or for further information on Electrolux products please contact our Customer Care Department by letter or telephone at the address below or visit our website at www.electrolux.co.uk Customer Care Department Electrolux Major Appliances Addington Way Luton Bedfordshire, LU4 9QQ Tel: 08705 727 727 (*) (*) Calls may be recorded for training purposes.
European guarantee This appliance is guaranteed by Electrolux, in each of the countries listed in the following page, for the period specified in the appliance guarantee or otherwise by law.
Hellas +30 23 10 56 19 70 4 Limnou Str., 54627 Thessaloniki Hrvatska +385 1 63 23 338 Slavonska avenija 3, 10000 Zagreb Ireland +353 1 40 90 753 Long Mile Road Dublin 12 +39 (0) 434 558500 C.so Lino Zanussi, 26 33080 Porcia (PN) Latvija +37 17 84 59 34 Kr.
www.electrtolux.