ELECTRIC OVENS BMF 849 BMS 841 INSTRUCTION BOOKLET IL
English Important Safety Information These warnings are provided in the interest of safety. You MUST read them carefully before installing or using the appliance. Installation It is mandatory that all operations required for the installation are carried out by a qualified or competent person, in accordance with existing rules and regulations. It is dangerous to alter the specification in any way.
Contents For the User For the Installer Important Safety Information 2 Technical Data 14 Guide to Use the instructions 3 Installation 14 Description of the Oven 3 Electrical connection 15 When the oven is first installed 5 Using the Oven 5 Electronic programmer 6 Using the oven 8 Cooking Tables 9 Cleaning and maintenance 11 Technical Assistance 13 Something not working...
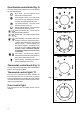
Oven function control knob (Fig. 2) Model BMF 849 The oven function control knob can have the following symbols and functions: Oven Light - The oven light will be on without any cooking function Conventional cooking - The heat comes from both the top and bottom element, ensuring even heating inside the oven. Top heating element - The heat comes from the top of the oven only. Bottom heating element - The heat comes from the bottom of the oven only.
When the oven is first installed F Before cooking for the first time, carefully wash the oven accessories. The oven will work only if the time of day has been set with the electronic programmer. Once the oven has been installed: a) set the thermostat knob to MAX (250); b) switch the oven function control knob to conventional ); cooking ( c) allow the oven to run empty for approximately 45 minutes; d) open a window for ventilation. During this time, an unpleasant odour may be emitted.
Electronic programmer 1. Push button for selecting a function 4 2. Decreasing control button 5 6 7 8 3. Increasing control button 4. Display 5. Cooking Duration pilot lamp 6. End of cooking pilot lamp 7. Minute minder pilot lamp Fig. 7 2 1 3 FO 2571 8. Time of day pilot lamp The oven will work only if the time of day has been set. Moreover, the oven can also be operated without any programme.
End of cooking function Thanks to this function, you can set the oven to switch off automatically when a programmed end of cooking time is over. Place food in the oven, select a cooking function and adjust the cooking temperature. Press button repeatedly to select the End of cooking function. The relevant pilot lamp will start flashing. Then, proceed as follows: To set the End of cooking time: 1. press button or . 2.
Using the oven Always cook with the oven door closed Conventional cooking Turn the oven function control knob to the relevant symbol ( ) and set the thermostat knob on the required temperature. If you need more heat from the top or the bottom of the oven, turn the oven function control knob to (top heating element only) or (bottom heating element only). Fan cooking Turn the oven function control knob to the relevant symbol ( ) and set the thermostat knob on the required temperature.
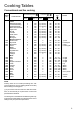
Cooking Tables Conventional and fan cooking WEIGHT (GR.
Cooking Tables Grilling TYPE OF DISH 4 3 2 1 PIECES WEIGHT Level Steaks Chops Sausages Chicken (cut in pieces) Kebabs Chicken (breast) Tomatoes Fish (fillets) Sandwiches Toast 4 4 8 6 4 4 8 4 4 4 800 600 500 800 700 400 500 400 Cooking time (minutes) Grilling Quantity 4 4 4 3 4 4 4 4 4 4 temp.
Cleaning and maintenance General Cleaning Before carrying out any cleaning or manteinance work, always disconnect the appliance from the electrical supply, and allow it to cool down. When using spray cleaning products, be careful not to spread them on the heating elements or on the thermostat sensor. Never use harsh abrasives, steel wool or cleaners with bleach, as they could damage the enamel and the oven door glass.
Replacing the Oven Light Ensure the electricity supply is switched off before carrying out this operation. The oven bulb has to comply to these features: a) resistant to temperatures of 300 °C; b) electric rate: 230 V - 50 Hz; c) electric power rate: 25 W; d) connection type: E 14. To replace the bulb, proceed as follows (Fig. 11): a) push in and turn the glass lid anticlockwise; b) remove tha faulty bulb; c) replace it with a new one; d) refit the glass lid; e) switch on the electricity supply. Fig.
Something not working... If the appliance is not working correctly, please carry out the following checks, before contacting your local Service Centre. SYMPTOM SOLUTION n The oven does not come on uCheck that both a cooking function and a temperature have been selected or uCheck the appliance is wired in properly, and the socket switch or the switch from the mains supply to the oven are ON.
Technical Data Recess dimensions Heating elements ratings in-column 58,0 cm Bottom heating element undertop 59,1 cm Top heating element Width 56,0 cm Full Oven (Top+Bottom) (1000 + 800) 1800 W Depth 55,0 cm Simple Grill heating element 1750 W Double Grill heating element 2550 W Oven rear heating element 2000 W Height Oven cavity dimensions Height 32,5 cm Width 42,0 cm Depth 39,0 cm Volume 53 l Installation 1000 W 800 W Convection fan 30 W Cooling fan 25 W Oven lamp 25 W
Securing the oven to the cabinet - Fit the appliance into the cabinet recess. Open the oven door and secure the oven to the kitchen cabinet with four wood screws, which fit the holes provided in the oven frame (Fig.17). When installing an electric plate hob over the oven, the hob's electrical connection and the oven's one have to be carried out separately, for security reasons and to let the oven be taken off the unit easier, if necessary. Fig. 17 FO 0039 Fig.
35668-7104 07/01 Grafiche MDM - Forlì