
User manual

5
OPERATION
Before using
Remove all securing tapes. Wash inside the
appliance with lukewarm water and bicarbonate of
soda (5 ml to 0.5 litre of water).
Do not use soap or detergent as the smell may
linger. Dry thoroughly.
The freezer compartment
The four-star freezer compartment is suitable for
storage of commercially frozen food and for freezing
fresh foods.
Freezing fresh food
It is not necessary to adjust the thermostat setting
when freezing fresh food.
In any 24 hours you can freeze up to 6 kg. of fresh
food.
Place food to be frozen in the bottom drawer of the
freezer as this is the coldest part.
Important
In the event of a power cut, do not open the door.
The food in the freezer will not be affected if the
power cut is short and if the freezer is full. Should
the food begin to thaw, it must be consumed quickly
and must not be re-frozen (see Hints & Tips).
Frozen food storage
When first starting-up or after a period of non use,
before putting the products in the compartment let
the appliance run for at least two hours on the
coldest setting, then turn the thermostat knob to the
normal opertion position.
Do not exceed the storage period indicated by the
manufacturer.
Finally, do not open the door frequently or leave it
open longer than is absolutely necessary.
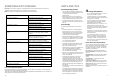
Setting the temperature
The temperature inside the refrigerator is regulated
by a thermostat with 6 temperature positions and
one «OFF» (O) position.
Position 1 = minimum coldness
Position 6 = maximum coldness
Turn the thermostat dial to the required position.
The intermediate position is usually the most
suitable (3-4).
The thermostat setting can vary as the temperature
inside the refrigeration compartment depends on the
following factors:
– room temperature
– how often the door is opened
– how much food is stored
– position of the appliance
Important
During prolonged periods of abnormally hot weather,
if the thermostat is set on too high a number, the
cooling system may operate continuously and the
fridge cooling plate may not defrost. Turning the
knob to a lower number will cause the automatic
defrosting to resume.
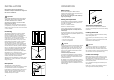
Low Room Temperature Switch
To ensure that the appliance is working efficiently
when the room temperature drops below 16°C, the
switch (A) mounted next to the thermostat control
should be switched on.
No damage can be caused by leaving the switch in
this position for any period of time (see page 12 Low
room temperature operation).However should the
temperature rise above 16°C remember to turn the
switch off
again.
D710
A
16
INSTALLATION
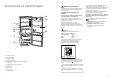
Positioning
This appliance is designed to operate in ambient
temperatures between 10°C (50°F) and 38°C
(100°F). It should be located in a dry atmosphere,
out of direct sunlight and away from extreme
temperature e.g. not next to a boiler or radiator, or in
a very cold room e.g. an outhouse, where the
temperatures may fall below 10°C (50°F). If these
temperatures are exceeded i.e. colder or warmer,
then the appliance may not operate correctly.
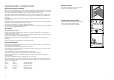
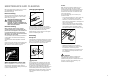
You should also ensure that air can circulate freely
around the back and the top of the cabinet. There
must also be at least 100 mm (4”) distance between
the top of the cabinet and any overhanging kitchen
furniture (A). Ideally, the appliance should not be
positioned beneath overhanging furniture (B).
There should also be a gap of 25 mm either side of
the appliance. Do not obstruct the space
underneath. The back of the cabinet may be placed
close to the wall but must not touch it. DO NOT
install in places with restricted ventilation.
Adjust the level of the appliance by screwing out the
adjustable foot, or feet, at the bottom of the cabinet
using your fingers.
D200
NP002
100 mm10 mm
10 mm
A
B
Important
IF YOU ARE DISCARDING AN OLD APPLIANCE
THAT HAS A LOCK OR CATCH ON THE DOOR,
YOU MUST ENSURE THAT IT IS MADE
UNUSABLE TO PREVENT YOUNG CHILDREN
BEING TRAPPED INSIDE.
Depending upon the position which you choose for
your appliance, you may wish to reverse the way in
which the door opens. To do this, refer to instructions
on “Door reversal”.
Please ensure that when the appliance is
installed it is easily accessible for the engineer in
the event of a breakdown.
PR60
A
45°
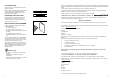
Rear spacers
The plastic bag containing all relevant
documentation also contains two spacers to be fitted
into special holes in the back of the appliance.
Fit the spacers into the holes, taking care to ensure
that the arrow (A) is positioned as shown in the
diagram. Then turn them through 45° (arrow (A)
vertical) until they lock into place.