EN User manual Washer Dryer ZKH 2145
Contents Safety information _ _ _ _ _ _ _ _ _ _ _ _ _ _ _ _ _ _ 2 Product description _ _ _ _ _ _ _ _ _ _ _ _ _ _ _ _ _ 4 Control panel _ _ _ _ _ _ _ _ _ _ _ _ _ _ _ _ _ _ _ _ 5 Washing Programmes _ _ _ _ _ _ _ _ _ _ _ _ _ _ _ _ 7 Automatic Drying programmes _ _ _ _ _ _ _ _ _ _ _ 10 Timed Drying Programmes _ _ _ _ _ _ _ _ _ _ _ _ _ 10 Helpful hints and tips _ _ _ _ _ _ _ _ _ _ _ _ _ _ _ 10 Drying Hints _ _ _ _ _ _ _ _ _ _ _ _ _ _ _ _ _ _ _ _ 11 First use _ _ _ _ _ _ _ _ _ _ _ _ _ _ _ _ _ _ _ _ _ _ 12 Person
• After having installed the appliance, check that it is not standing on the inlet and drain hose and the worktop is not pressing the electrical supply cable against the wall. • If the machine is situated on a carpeted floor, please adjust the feet in order to allow air to circulate freely under the appliance. • Always be sure, that there is no water leakage from hoses and their connections after the installation.
Product description 1 2 3 4 5 6 Detergent dispenser drawer Control panel Door opening handle Rating plate Drain pump Adjustable feet 1 2 3 4 5 6 Detergent dispenser drawer Compartment for detergent used for prewash and soak phase or for stain remover used during the stain action phase (if available). The prewash and soak detergent is added at the beginning of the wash programme. The stain remover is added during the stain action phase. Compartment for powder or liquid detergent used for main wash.
Control panel On the following page there is a picture of the control panel. It shows the programme selector dial as well as the buttons, pilot lights and the display. These are presented by relevant numbers on the following pages.
= Iron Dry 1-8 Programme selector dial, spin speed button, drying level and time, and available options Programme Selector Dial It allows you to switch the appliance on/off and/or to select a programme. Spin By pressing this button you can change the spin speed of the selected programme or to select Rinse Hold option. Rinse hold By selecting this function the water of the last rinse is not emptied out to prevent the fabrics from creasing.
• Delayed start The Selected delay set by pressing the relevant button appears on the display for a few seconds, then the duration of the selected programme is displayed again. The delay time value decreases by one unit every hour and then, when 1 hour remains, every minute. • Alarm codes In the event of operating problems, some alarm codes (see paragraph can be displayed, for example «What to do if...»).
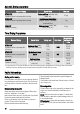
Programme - Maximum and Minimum Temperature - Cycle Description - Maximum Spin Speed - Maximum Fabrics Load Type of Laundry Options Synthetics 60° - 30° Main wash - Rinses Maximum spin speed at 900 rpm Max. load 3 kg - Reduced load 1,5 kg1) Synthetic or mixed fabrics: underwear, coloured garments, nonshrink shirts, blouses. SPIN RINSE HOLD SUPER QUICK EXTRA RINSE Easy iron 40° Main wash - Rinses Maximum spin speed at 900 rpm Max.
Programme - Maximum and Minimum Temperature - Cycle Description - Maximum Spin Speed - Maximum Fabrics Load Type of Laundry Options Sport Intensive 40° Prewash - Main wash - Rinses Maximum spin speed at 900 rpm Max. load 2,5 kg This programme is suitable for washing heavily soiled sport items. The appliance will add automatically a prewash phase before the main wash to eliminate mud stains. SPIN RINSE HOLD Rinses Maximum spin speed at 1400 rpm Max.
Automatic Drying programmes Type of Fabric Max Load STORE DRY Suitable for items to put away without ironing Degree of Drying Cotton and linen (bathrobes, bath towels, etc) 3,5 kg STORE DRY Suitable for items to put away without ironing Synthetics and mixed fabrics (jumpers, blouses, underwear, household linen) 2 kg IRON DRY Suitable for ironing Cotton and linen (sheets, tablecloths, shirts, etc.
Dried grease stains: moisten with turpentine, lay the garment on a soft surface and dab the stain with the fingertips and a cotton cloth. Rust: oxalic acid dissolved in hot water or a rust removing product used cold. Be careful with rust stains which are not recent since the cellulose structure will already have been damaged and the fabric tends to hole. Mould stains: treat with bleach, rinse well (whites and fast coloureds only). Grass: soap lightly and treat with bleach (whites and fast coloureds only).
ers, quilts, sleeping bags and duvets must not be machine dried. • Avoid drying dark clothes with light coloured fluffy items such as towels as these can attract the fluff. • Remove the laundry when the appliance has finished drying. • To avoid a static charge when drying is completed, use either a fabric softener when you are washing the laundry or a fabric conditioner specifically for tumble dryers.
There are two different ways to set this option: 1. Before pressing button 7: it will be impossible to start the machine. 2. After pressing button 7: it will be impossible to change any other programme or option. To enable or disable this option press simultaneously for about 6 seconds buttons 2 and 3 until on the display, the appears or disappears. icon Daily Use Load the laundry Open the door by carefully pulling the door handle outwards.
Select the Delay Start by pressing button 8 The washing water in the tub will be not emptied out. Before you start the programme, if you wish to delay the start, press this button to select the desired delay. The selected delay time value will appear on the display for a few seconds, then the duration of the programme will appear again. You must select this option after you have set the programme and before you start the programme.
brightness of the display is reduced. By pressing any button the appliance will come out of the energy saving status. Use - Drying Drying only Caution! The recommended load size is 3,5 kg for cottons and linen and 2 kg for synthetic items. 6. 7. By pressing Drying Time button it is also possible to dry up to 5 kg of cotton items (see the «Drying Programme » table). Caution! The water tap must be open and the drain hose must be positioned in the sink or connected to the drain pipe. 1. Load the laundry. 2.
5. 6. 7. For cottons and synthetic the lowest value you can select is 900 r.p.m. Set the dryness degree by pressing button 3. The display shows the whole duration of the washing and the set drying cycle. Start the programme by pressing button 7. The time remaining is updated every minute on the display. At the end of the programme turn the selector dial to position to switch the machine off. Remove the the laundry. 2. 3.
Cleaning the drawer recess Pull out the emergency emptying cap from the pump cover, using pliers. Having removed the drawer, use a small brush to clean the recess, ensuring that all washing powder residue is removed from the upper and lower part of the recess. Replace the drawer and run the rinse programme without any clothes in the drum.
Replace the filter into the pump by inserting it correctly into the special guides. Screw the pump cover firmly by turning it clockwise. • Screw the hose back onto the tap. Make sure the connection is tight. Replace the emergency emptying cap into the pump cover and fix it firmly. Close the pump door. • Unscrew the hose from the machine. Keep a rag nearby because some water may flow. • Clean the filter in the valve with a stiff brush or with the piece of cloth.
• open the pump door; • place a bowl on the floor. Remove the emergency emptying cap from the filter. The water should drain by gravity into the bowl. When the bowl is full, refit the emergency emptying cap into the filter. Empty the bowl. Repeat the procedure until water stops flowing out; • clean the pump if necessary as previously described; • screw the pump cover again and close the door.
Problem Possible cause/Solution The machine does not fill: The water tap is closed. • Open the water tap. The inlet hose is squashed or kinked. • Check the inlet hose connection. The filter in the inlet hose or the inlet valve filter are blocked. • Clean the water inlet filters. (See "Cleaning the water inlet filters" for more details). The door is not properly closed. • Close the door firmly. The machine does not empty and/or does not spin: The drain hose is squashed or kinked.
Problem Possible cause/Solution The door will not open: The programme is still running. • Wait the end of washing cycle. The door lock has not been released. • Wait until the pilot light 9 goes off. There is water in the drum. • Select drain or spin programme to empty out the water. The machine vibrates is noisy: The transit bolts and packing have not been removed. • Check the correct installation of the appliance. The support feet have not been adjusted • Check the correct levelling of the appliance.
Mod Prod . ... . No. ... ... ... ... .. Ser. No. ... ... ... If you are unable to identify or solve the problem, contact our service centre. Before telephoning, make a note of the model, serial number and purchase date of your machine: the Service Centre will require this information. Mod. ... ... ... Prod. No. ... ... ... Ser. No. ... ... ...
Installation Unpacking Positioning All transit bolts and packing must be removed before using the appliance. You are advised to keep all transit devices so that they can be refitted if the machine ever has to be transported again. Install the machine on a flat hard floor. Make sure that air circulation around the machine is not impeded by carpets, rugs etc. Check that the machine does not touch the wall or other kitchen units. Level the washing machine by raising or lowering the feet.
Water drainage The end of the drain hose can be positioned in three ways: 35° 45° Open the porthole and extract the inlet hose. Connect the hose with the angled connection to the machine. Do not place the inlet hose downwards. Angle the hose to the left or right depending on the position of your water tap. Set the hose correctly by loosening the ring nut. Connect the hose to a tap with a 3/4” thread. • After positioning the inlet hose, be sure to tighten the ring nuts again to prevent leaks.
Electrical connection Information on the electrical connection is given on the rating plate on the inner edge of the appliance door. Check that your domestic electrical installation can take the maximum load required, also taking into account any other appliances in use. Caution! Connect the machine to an earthed socket. Caution! The power supply cable must be easily accessible after installing the machine.
132936570-A-122011 www.zanussi.