Installation Model and Operating Numbers I P42W34, Guide P42W34H I PLASMATV zenith
Warning f CAUTION WA R N IN G" TO REDUCE THE SERVICEABLE RISK OF ELECTRIC PARTS INSIDE. SHOCK REFER DO NOT REMOVE TO QUALIFIED COVER SERVICE (OR BACK). NO USER PERSONNEL. the presence of uninsu_ated "dangerous voffage _ wffhin the product's enclosure that may be of suffi= The lightning flash with arrowhead symbol, within an equi_atera_ triangle, is intended to aierf the user to cier_ magnffude to constit_e a dsk of electnc shock to persons.
Safety Instru;_ions Im_rtant safeguards for you and your new product Your product has been manufactured and tested with your safety [n mind However, improper use can result in pctential electrical shock or fire hazards, To avoid defeating the safeguards that have been built into your new product, please read and observe the fo{iowing safety points when installing and using your new product, and save them for future reference.
Safety Instructions Safety Instructions: continued f 14, Outdoor ff an outside Antenna antenna Grounding or cable system 19, _rvicing is connected te the product:, be sure the antenna or cable system is grounded so as to provide some pretection against voltage surges and buiLtoup static charges, Cede (U,SA.
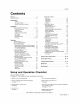
Contents Warnings ............................ Safety tnstrudions ....................... Introduction Controls 2 3"_4 ............................. Specia_ Menu Options Key Lock ISM Method ......................... Low power Caption!Text 7 Connection Options ...................... Remote Control Key Fun_ions ............ 8 9 VCR Setup 13 14 DVD Setup ............................. DTV Setup ......................... Monitor Out Setup ................... 14 14 15 PC Setup Operation Turning ....
Introduction What is a Plasma Display Panel (PDP)? if voltage instan_ is applied to gas within g_ass panels _ight is emitted, 160 ° - Wide angle A Plasma range Display ultraviolet flat Display and fused with a fluoreccent substance, At that using this phenomenon, of vision Your flat panel plasma screen offers an exceptionaJly dear and visible to viewers anywhere in the room. Wide rays are produced is a next generation broad viewing angle °= over 160 degrees.
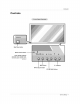
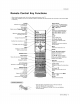
Introduction Main Power Button Remote Control _nsor Power Standby Indicator _l[uminates red in standby mode, Illuminates green when the TV is turned on MENU INPUT SELECT Button V, & Buttons Button VOLUME (<,l_) Buttons Owner's Manual 7
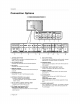
Introduction 3 4 5 R°°°°°° ooooi _a U_ m 8 1. AI'_ENNA INPUT 2, AV (EXPANDED) Connection 9 PORT or terrestrial antenna your INPUT Connection for a second 11 RGB OUTPUT out from external equipment, TV or monitor. control to the remote 5, EXPANDED OUTPUT Connect the TV to the TV w_h the tuner controt port 12. REMOTE SPEAKER (8 ohm output) 8 Plasma TV connector JACKS jacks.
Introduction Remote - When Control using the remote Under certain as necessary: control conditions aim it at the remote such as if the remote POWER Switches Key Functions -. the TV between ON _"\_ and STANDBY. "-, control sensor on tile TV. JR signa_ is interrupted, the remote control may not function. INPUT Press the key again SELECT Video _p_) % MULTIMEDIA.
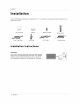
Instaflation Instal Ensure that the following purchased accessories are included witl_ your TV tf an acces_ry is missing, p_ease contact the _er where the produd.
Installation • The TV can _ instailed • The TV i:s designed in various to be mounted ways such as on a wall, or on a desktop horizontally. Tile speakers etc. shown are optionat For proper ve_i[ation, aJlow a clearance of 4 '_on each side and 2 _ from the wall Detailed installation instructions are included in the optional Wa_l Mounting Installation and Setup Guide see your dealer, Bracket For proper ventilation allow a clearance of 4" on each side and the top 2.
Instaflation Externa! Antenna Equipment or Cabte Service For optimum without picture quality, adiust a Cable antenna Connections Box Connections direction if needed f Multi-family , DweltingsiApartments ss_ ............... ,_,%_(C°nnect to wall antenna socket) RF Coaxial i _ Wire (75 ohm) _ _ __ l I t Turn clock a_ise to tighten. U F F Antenna VNF Antenna B_onze Wi_e Outdoor Antenna Be careful connecting not to bend the bronze wire when the antenna.
Insla/lation NOTE: Not all;cables shown are included with the TV. - To avoid picture noise (interference) leave an adequate distance between the VCR and TV, Use the ISM Me{hod feature to avoid having a fixed image remain on the screen for a long period of time picture from a VCR, if the 4:3 picture format is used the fixed image may remain visible on tile screen, Connection a frozen still 1 _t VCR switch number. Connection to 3 or 4 and then tune TV to the same channel 2 ® 1.
Installation How to connect Connect the e_udioand video ceJNes from the external equipment's output jacks to the TV input jacks, as sbown in the figure+ When connecting the TV to external equipment ma_ch the iack colors = yellow+ Audio How Left = white, and Audio (Video _ O O O ® e oee O O O oee O e Right = red) to use 1. Use the _NPUT SELECT 2. Operate the corresponding operating guide. button on the remote external control equipment. to select Video (Exp.).
Inslalla#on The TV has a spec_ai signal output capability to hook up a second TV or monitor. Connect the second TV or monitor which allows to the TV' AV OUTPUT.
Installation Monitor Display Specifications (RGB-PC/DVI-PC Resolution Horizontal Frequency(KHz) Vertical Frequency(Hz) Mode) Resolution Horizontal Frequency(KHz) Vertical Frequency(Hz) 31.468 70.09 35.156 56.25 37.861 85.08 37.879 60.31 31.469 70.08 48.077 72.18 37.927 85.03 46.875 75.00 31.469 59.94 53.674 85.06 35.000 66.66 49.725 74.55 37.861 72.80 48.363 60.00 37.500 75.00 56.476 70.06 43.269 85.00 60.023 75.02 31.500 60.00 54.348 60.05 35.00 70.00 63.
Operation Turning 1_ Connect on the TV power cord correctly. 2, Press the (_) ON/OFF SELECT, A iV Number button button on time TV, At this moment 1. If the TV was turned off with the • Press the O ON/OFF button 2, If the TV was turned oft • the TV is switched button on the _,./or press the POWER, INPUT on time remote controt to switch the TV on.
Operation C hanne ! Me nu Auto Programming is used to memorize aiI the active channeis in your area before you can use the TV. _ere are two ways of storing channels in the Tuner's memory. You can use either. One is called AUTO PROGRAM and the other is ca_ied MANUAL PROGRAM. In AUTO channels - PROGRAM mode, the TV will memonze the channels in ascending numerical order.
Operation Menu Options - Picture menu adjustment sour_ as preferred we unique to each input source. , RGB (PC) / DVI (PC) , RGB (DTV) / DVl (DTV) / Component , Video/SWideo / Component (480i) (480p 720p repeatedly Picture menu settings color, to selec_ tile picture sharpness appearance and tint) manually, setup option * _, - OptLrtlum_ You can adjust you prefer. picture 1. Press the MENU 2.
Operation Me nu 0 pt io ns - DASP lets you enjoy the best sound wffhout any special adjustment sound option based on the program content, o When adjusting sound options (treble, bass, and balance) manually, 1. Press the DASP button repeatedly to select the appropriate because DASP sound the TV has time appropnate automatically setup as shown changes to !]set.
Operation Timer - Menu The time is set automatically from the PBS broadcast signal The PBS channel signaJ includes information for the correct time _d 1 Press the MENU button and then use & / V b_on to select the _E1R 2. Press the i1_ button and then use A/V button to select Cle.'J{. 3. Press the I_ button and then use A zV button to select Auto. 4 saving time menu. Press the I_ button and then use A/V button to select your viewing area time zone. "four choices are: ES.
Operation Timer Menu Options If there is no input signal minutes. 1. Press the MENU button continued Auto off can be set to turn the TV off autom_ical_y and then use A/V button to select the T_ER 2_ Press the I_ bulton and then use A / V button to sew AutooZf 3. Press the I_ butten and then use A / V bt_on On or Off 4 Press the ENTER button button repeatedly to select followed by the following 10, 20, 30 60 90, 120, 180, and 240 minutes 2.
Operation Menu Options - The TV can be set up so that it can only be used w_th the remote control - This feature can be used to prevent unauthorized viewing by locking out the front pane_ controls_ o This TV is programmed to remember which option it was last set to even if you turn the TV off, 1. Press the MENtJ bu_ton and then 2.
Operation Special Menu Options Closed Captions continued C_osed captioning is a process which converts the audio portion of a television program into written words wi_ich then appear titles on the television screen Closed captions allow viewers to read tile dialogue and n_ration of television progr_s. as sub- Using Closed Captions Captions are the subtffles of the dialogue and narration of television programs, For prerecorded programs, program diatogue can be arranged into captions in advance.
Operation 1, Press the MENU button 2, Press the I_ button and then use A / V and then use A tV b_on button to select the SPECIAL menu, to setect Caption/Text 3, Press the I_ button and then use A _V button to setect your caption selection.
Operation Screen - Menu Options RGB (PC) mode only; This function doesn't work for RGB-DTV mode. Automatically adjusts picture position and minimizes image shaking After adjustment if the image is sti_[ not correct, your TV is functioning Auto ¢edrJlg, and _u_cerd_, are not active in DVI mode. 1. Press the MENU button and tllen use A _V button to select propedy the _ but needs further adjustment menu. 2. Press the I_ button and then use & / V button to select Auto cotl_lg,.
Operation ° This function works in the fo_[owing mode: RGB-PC RGB-DTV (480p,720p 1080i) COMPONENT 1. Press the MENU button and then use & / T button (480p,720p to select 1080i). the SC]_N 2. Press the I_ button and then use A i V bt_lton to select 3. Press the I_ b_ton and then use A ,'V _4,1_ll_button to adjust the position. 4. Press the ENTER - button the screen 1, Press the MENU after auto adjustme_ size, adjust button Position, to save.
Opera#on Screen continued Menu Options Use YNR to reduce 1, Press the MENU the picture button 2. Press the I_ button noise that may @pear and then use _i, _II' and then use ,I, _V button on the screen, button to select the _i!_ menu. to select YNR & Press the I_ button and tllen use A _V button to select On or 4. Press the ENTER To see a normal button picture, 1. Press the MENU button to save.
Operation PIP: (Picture-In-Picture)Feature - PIP Jets you view 2 different - the other source will show a smaller inset image_ PIP is not avail_e if the lock on/off option in LOCK menu is set to On You can atso adjust the PiP features in the PJP!DW menu (Except Swap function). Press the PIP button inputs repeatedly pictures (sources) on your monitor screen at the same Press the SWAP tures to turn PIP on or off, button Main Picture Press the WIN.
Operation Double Window Setup Options As the name suggests_ this mode splits tile screen into 2_ allowing time. Each source is given half the screen Double Window is not available if the lock on/off option in LOCK Press the DW button Press repeatedly the WIN,SIZE to select one of ti_e Double Window 2 picture _urces to be shown on the TV screen at the same menu is set to On, options.
Operation Lock Menu Options Parenta_ Controt can be used to block specific channels, ratings and other viewing The password will be required to gain access to Parental Control sources. Ttle Parental Control Function (V-Chip) is used to block program viewing ba_d on the ratings sent by tile broadcasting station.
Operation Lock Menu Options Se_ed TV, Video (ExF) 1. Press the MENU Then, Video, button continued or S-video and then input source to use this function. use ,i,/T button to se[ed the Lock menu, press the I_ button, • if Lock is already set, enter the password then requested. • The TV is set wffh the instal password "0_0-0-0 '_ 2. S_ting lock on/off: Press the A V button to select Press the I_ button _ on/oil and then use A _V button to sel_ on or off 3. Set password: Press the A .
EXternal Control Device Setup External Contro! Device Setup - Conn_t the RS-232C input jack to an externaE control device (such as a computer or an A/V controJ system) and control the TV's functions externally, ° Connect the ser_aJ port of the controm device to the RS-232C jack on the TV back panel - RS_232C conn_ion _bles are not supplied with the TV e • e@e eeo e __/ PC No Pin name 1 1 2 No connection RXD (Receive 4 DTR (DTE 5 GND 5 data) side ready) @ 6 7 3 RTS send) TXD (Ready
Externa! Contro! Device Setup Use this function to specify a TV _D number. Refer to 'Rea_ Data Mapping 1 '. See page 35 1. Press the MENU button and then use A ,'V button to sele_ 2. Press the I_ button and then use A / V button to select _ 3. Press the I1_button and then use _1._I_ button TV _D number. The adjustment to adjust button to save. • Baud rate : 115200 bps (UART) the desired code : ASCii code cable.
External Control Device Setup 01. • Power (Command2:a) To control Power On/Off 04. of the TV. • Transmission Screen Mute To select screen Transmission [[kl[a][ ][Set Ig][ Data 0 :Power ][gata][Cr] ] Off [[k][d][ 1 • Power On Data ][Set Ig][ ][OK][gata][x] To show Data ][gata][Cr] ] mute off (Picture mute on (Picture on) off) ][Set ID][ ][OK][Data][x] ] Power On/Off.
External Control Device Setup 08. Brightness • (Command2:h) To adjust screen 13. Remote brightness. • You can also adjust brightness in the Video menu. Transmission [[k][h][ Data Control Lock Mode (Command2:m) To lock the remote control and the front panel the TV. controls on Transmission ][Set Ig][ ][gata][Cr] ] [[k][m][ ][Set Ig][ ][gata][Cr] Data 0: Lock off 1 '. See page 35.
External 17. PIP Position (Command2:q) 21. Color Temperature Control I_ To adjust color temperature. You can also adjust ACC in the Video Transmission [[k][u][ ][Set ID][ Data 0: Normal Data ][Set ID][ ][Data][Cr] J Setup (Command2:u) I_ To select sub picture position for PIP. You can also adjust the sub picture position using WIN.POSITION on the remote control or in the PIPIDW menu. [[k][q][ Device menu.
External Control Device Setup 25. PIP Input Select (Command2:y) 29. • • To select input source for sub picture in PIP mode. Data Time ][Set Ig][ ][Data][Cr] ] _][r][ 0 :RGB 4 :DVI 1 2 3 " Component : Video : S-Video 5 " TV 6 : Video [[y][ ][Set ID][ ][Set Data (Exp.) Ig][ State • an abnormal To recognize Acknowledgement ][Set Ig][ Pixel Setting (Command2:s) Transmission state.
IR Code IR Code I_ I_ _nr_ect O_p_ your wired remote control to the Remote control port on the TV, wavefo_m Sir_gle pun_, modulated with 37.
IR Code IR Code continued Code (Hexa) OOH 01H 02H 03H 08H C4H Function . . POWER MUTE i0H I1H 12H 13H i4H i5H I6H i7H 18H 19H 0BH 98H D5H C6H BFH 5AH Number Key 0 Number Key 1 Number Key 2 Number Key 3 Number Key 4 Number Key 5 Number Key 6 Number Key 7 Number Key' 8 Number Key 9 INPUT SELECT MULTIMEDIA RGB DW Com_nent Video D0H 0EH 44H 43H 52H 4DH Plasma UP (1) DOWN (T) VOL+ (I,.) VOL- i<) POWER ON/OFF POWER ON C5H 09H . . , . D8H D6H 40 Note . , . OFF R/C R/C R!C R!C .
Troubleshooting Checkfist Troubleshooting Checklist " Check / | / NO picture & whether the TV is turned on. " Powercord insertedinto wall outlet? NO sound. Test the wa]_ power where the TV's outlet power p_ug other * Check to see if there is any object causing doesn't work in, between the TV and the remote J control obstruction, • Are batteries instaJled (Refer to p.9) • product's power cord into the wall out_et cord was plugged Insta]t new batteries.
Troubleshooting Checklist Troubleshooting 42 Plasma TV Checklist continued
Maintenance Earty malfunctions can be preventS, Careful and regular cJeaning can extend the amount of time you wile have your new "FV, _ sure to turn the power off and unplug the power cord before you begin any cleaning. 1, Here's a great way' to keep the dust off your screen for a wMe Wet a soft cloth in a mixture of tukewarm water and a little fabric softener or dish washing detergent. Wring the cloth until it's a_most dry, and tl_en use it to wipe the screen 2.
Specification Product Specifications Width (inches / mm) 48.9 / 1241 Height (inches / mm) 31.6 / 801.5 Depth (inches / ram) 4_4 / 111.7 Weight (pounds / kg) 77.2 / 35 Power requirement AC100 240V ~ 50/60Hz Television System NTSC Program Coverage VHF 2-. 13, UHF 14 ~ 69, CATV 1 ~ 125 Resolution 852 x 480 (DOt) Color 16,770_000 (256 steps of each R, G and B) Operating Temperature Range 32 ~ 104°F (0 ~ 40_.
Zenith will repair under normal consumer/end effective only or replace your product, at Zenith's option, use, during the warranty period ("Warranty user purchase. This warranty is good only when used in the United States. WARRANTY if it proves to be defective Period") listed to the original HOW SERVICE PERIOD: in material below, effective consumer/end IS HANDLED: LABOR: ONE YEAR from the Date of Purchase. In Home PARTS: ONE YEAR from the Date of Purchase.
BEFORE CALLING FOR SERVICE: • Please • Please check your operating guide - you have your product model number, original installation • If a replacement available. unit is required, under may avoid a service call. serial number and the date some circumstances you may of purchase or the be asked to provide reserve deposit to Zenith against a credit card number as surety for advanced shipment. card will not be charged if you return the defective unit within 10 working days.