
User Manual

4
Operation
Break-In
No specific break-in is required. The engine is gradually broken in as it is
used, and the output power increases gradually as the engine breaks in.
Starting the Engine—Aircraft
Before attempting to start the engine, read through all the steps for starting
the engine as outlined below:
Zenoah engines are equipped with the ultra compact C.D.I. type flywheel
magneto ignition system and should be started according to the following
procedure.
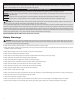
IMPORTANT: The magneto system is timed in such a way that when the
compression stroke starts (refer to Figure 1-A) sparks are never produced
on the spark plug, no matter how fast the propeller is flipped. The correct
starting procedure is to quickly flip the propeller when the edge of the mag-
net on the rotor is approaching the coil (Figure 1-B). This means the propel-
ler should be quickly flipped at about 90 degrees in crank angle before the
compression stroke is about to start.
Fig 1-A
Coil
Magnet
Fig 1-B
1. Make sure the spark (glow) plug(s) is installed and tightened. Check the
condition of the plug cap for cracks or breaks.
2. Secure the propeller.
3. Make sure the fuel tank line(s) is properly connected. The main line should
be connected to the carburetor spray bar.
4. Install the muffler(s).
5. Fill the fuel tank.
6. Choke the engine and turn the propeller a few times until fuel appears at
the carburetor.
7. Set the throttle valve at the idle position or at the position slightly open
from idle.
8. Quickly flip the propeller in a counterclockwise direction. The engine
should start after a few flips of the propeller.
9. Open the choke when the initial firing of the engine is heard.
10. When the choke is opened, close the throttle valve to a position near idle
before attempting to flip the propeller again.
CAUTION: Do not attempt to start the engine with the throttle fully
open. If started wide open, a great thrusting force could be generated,
leading to personal injury and/or property damage.
11. If you do not use a chicken stick to start the engine, wear a thick glove
when flipping the propeller. Always use all fingers (except the thumb when
attempting the flipping operation).
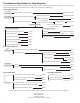
12. Do not over-rev the engine. These engines are designed to develop maxi-
mum output with the standard muffler and the recommended propeller
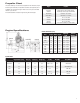
size. Please refer to the propeller chart on page 10 to confirm the proper
propeller for the applicable Zenoah engine.
Starting the Engine—Helicopter and Boat
1. Fill the tank with fuel.
2. Push the priming bulb located on the carburetor until fuel appears in the
priming bulb (for helicopter).
3. Choke the engine and open the throttle valve approximately 1/3–1/2 of
the full open position.
4. Quickly pull the starter cord until the initial firing of the engine is heard.
5. When the initial firing is heard, open the choke, set the throttle valve at the
idle position or at the position slightly open from the idle position. Quickly
pull the starter cord a few more times until the engine starts.
6. For helicopter operation, you should
adjust the rotor-pitch to obtain a
9,000 to 10,000 rpm of the engine
at full throttle operation.
Stopping the Engine
The ability to shut down the engine in
an emergency is extremely important.
For stopping the engine, the black lead
wire from the coil should be grounded
to the engine body, or the throttle valve should be closed completely.
Installation of a stop or kill switch is recommended.
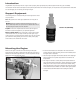
We recommend the Zenoah Kill Switch
(ZEN20000). Refer to the example
shown in the following diagram.
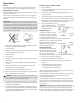
Carburetor Adjustment
The carburetor is provided with three
adjustment screws, which are factory
set to the best (approximate) positions.
They may need minor adjustment,
depending upon the temperature, humidity, atmospheric pressure (altitude),
etc., of the area where the engine is being used.
1. Start the engine without making any adjustments.
2. Make adjustments only when the engine shows signs of inefficient
operation.
3. Standard settings of each needle is as follows:
a. Low-Speed Needle: 11/8 plus/minus ¼
b. High-Speed Needle: 13/8 plus/minus ¼
Idle Screw: Turning this screw clockwise increases the idling rpm. Turning it
counterclockwise decreases the idling rpm.
Low-Speed Needle: This is the fuel-adjust screw (not the air screw). Turning
this needle clockwise makes the gas mixture leaner, and turning it
counterclockwise makes it richer.
High-Speed Needle: Turning this needle clockwise makes the gas mixture
leaner, and turning it counterclockwise makes it richer. Set this needle at a
position which is ¼ open from the maximum rpm position while the aircraft
is on the ground.
IMPORTANT: Do not tighten the high-and low-speed needles too tightly.
When the engine has just started and is not warm enough, there may be
insufficient acceleration and the engine may die. Be sure to allow the engine
to warm up at idle for a few minutes before conducting normal operation.
High-Speed Needle
Low-Speed
Needle
Idle Screw
Red Lead
Black Lead
Kill Switch
Engine Body
Ground