
User Manual

5
Engine Care and Maintenance
Recommendations
To extend the life of your Zenoah engine, the following is recommended:
1. Use an Evolution quality 2-stroke oil mixed at 32:1
2. Use the recommended spark plugs.
3. Use the proper propeller size and balance the propeller prior to use.
4. Always adjust the engine to a slightly rich setting.
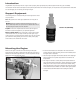
5. For long-term storage, make sure there is no fuel left in the tank or the engine.
Remove the spark plug(s) and apply several drops of high-quality oil (e.g.,
Marvel Air Tool Oil) to the top of the engine and into the spark plug hole. Rotate
the crankshaft several times. Store the engine in the box it came in or on the
airplane with the nose down in order to keep oil in the bearings.
Servicing the Engine
x Required Tools
Regular screwdriver Phillips screwdriver Hexagonal wrench (4mm/5/32 in)
Open wrench (19mm/3/4 in) Plastic hammer Thickness gauge
Tapered round rod Liquid gasket (Permatex or equivalent) Threadlock (Blue Threadlock Z-42 or equivalent)
Lithium grease Engine oil Washing gasoline
Brush Scraper Cloth
The engine can be disassembled or reassembled without any specific difficulties, but note the following:
For disassembling, the special tools shown in the parts list are required (stopper, puller assembly), in addition to general tools. Be sure to use a new gasket
when the crankcase and cylinder have been disassembled.
NOTICE: Do not disassemble, hit or twist the end of the crankshaft assembly.
Disassembly (Applies to All Engine Types)
1. Dismount the engine from the model.
2. Remove the carburetor and insulator carefully without damaging the
gasket.
3. Remove the muffler.
4. Remove the spark plug and ignition module.
5. Remove the propeller hub.
6. Remove the rotor (flywheel). If it cannot be detached, use a plastic
hammer and tap the part lightly.
a. Screw the stopper in place of the spark plug, then turn the rotor
counterclockwise until the piston touches the stopper. Take care, as it
can cause damage to the piston or connecting rod if the stopper is not
screwed into the bottom.
b. Loosen and remove the rotor securing nut.
c. Remove the rotor by using the puller. Do not hit the crankshaft with
the plastic hammer, as this can increase the runout of the shaft.
7. Remove the mounting plate.
8. Remove the four bolts from the crankcase.
9. Tap around the case fitting side gently with the plastic hammer and slowly
separate the crankcase from the cylinder block.
10. Pull out the crankshaft with the piston, bearings, and other parts attached.
11. Remove the Woodruff key from the crankshaft.
12. Remove the oil seal, snap ring and bearings.
13. Remove the circlip and pull out the piston pin.
14. Remove the thrust washers and needle bearing from the smaller end of
the connecting rod (G38).
15. Remove the piston ring.
16. Wash each part. Check for abrasion and damage, and replace any part
that is defective.