
User Manual

6
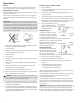
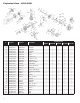
Assembly (Applies to All Engine Types)
1. Apply engine oil (SAE #30) to the inside of the cylinder and the needle
bearings on the larger end of the connecting rod.
2. Fit the piston ring to the piston.
3. Mount the needle bearing and thrust washer (with its oil slot facing inside)
to the smaller end of the connecting rod and apply engine oil (SAE #30).
4. With the arrow on the top of the piston facing the straight side (opposite
side to the propeller) of the crankshaft, fit the piston to the top of the
connecting rod and insert the piston pin with its blank end to the exhaust
port side.
5. Fit the circlip.
6. Fit the bearings, snap ring and oil seal to the crankshaft. Apply lithium
grease to the lip area of the oil seal and fit it, paying attention to its direction.
7. Wipe the contact surfaces of the cylinder block and crankcase, and apply
liquid gasket (Permatex or equivalent).
8. Put the piston in the cylinder, with the piston’s arrow facing in the exhaust
port direction. Set the crankshaft to the cylinder block, then fit the oil seal
to the cylinder block. The snap ring joint should be set vertically to the
cylinder.
9. Fit the crankcase to the cylinder block and tighten the bolts.
10. Check that the crankshaft can be smoothly turned by hand.
11. Put back the Woodruff key.
12. Replace the rotor (flywheel), fitting it to the Woodruff key. Tighten the hub
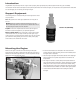
nut after having applied threadlock (Blue Threadlock Z-42 or equivalent)
to the threads.
13. Apply threadlock (Blue Threadlock Z-42) to the muffler bolts and mount
the muffler.
14. Apply threadlock (Blue Threadlock Z-42) to the ignition module setscrews
and fix the coil temporarily.
15. Set the rotor (flywheel) so the magnet is located on the opposite side of
the module (G38). Place a thickness gauge between the core of the mod-
ule and rotor (flywheel) and adjust the clearance to 0.25 ^ 0.35mm (0.01
^ 0.014 in), then tighten the setscrews after having applied threadlock
(Blue Threadlock Z-42) to them.
16. Using a new gasket, fix the insulator with screws to which threadlock
(Blue Threadlock Z-42) has been applied.
17. Using a new gasket, mount the carburetor with screws, paying attention to
its mounting direction.
18. Tighten the mounting plate, using screws with threadlock
(Blue Threadlock Z-42) applied.
19. Install the spark plug.
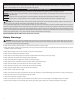
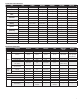
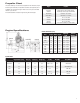
Maintenance Chart
Items Action Before First Use Every 25 Hours Every 100 Hours Note
Leakage, Damage/Crack Check
P P P
Losing Speed Check/Adjust
P P P
Air Cleaner (PUH) Check/Cleaning
P P P
Replace if necessary
Spark Plug (gap) Check/Adjust
P P ì
Cylinder (barrel) Check/Cleaning
P P ì
Piston, Ring Check/Cleaning
P P ì
Muffler & Bolt Check/Cleaning
P P P ì
Bearings Check/Cleaning
P P ì
Crankshaft Check/Alignment
P P ì
Rotor Check
P P ì
Propeller Hub (PU) Check/Alignment
P P ì
Water Jacket (PUM) Check/Leakage
P P P ì