
Owner`s manual


INSTALLATION
Lamp Housing Installation
Glass breakage hazard. Do not push off
from the poolside against the light.
Installation of a 12 Volt transformer is required when
installing the 12 Volt model of this light. The transformer
must be located:
• at least 10’ from the pool wall,
• installed near a grounded, 3-prong, 120V, GFCI pro-
tected outlet. If you do not have a GFCI protected out-
let, have a qualified electrician install one.
Do not use a 3-prong adapter. The adapter voids the
grounding of the system.
Do not cut the grounding pin.
Do not use an extension cord! Purchase a light with a
longer cord.
Sunglow
™
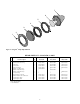
Lamp Housing Installation
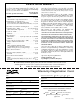
(Refer to Figure 1)
1. Be sure the power is off.
2. Place lamp housing on the deck above the niche.
Feed the cord into the niche and through the conduit
until the cord reaches the junction box. Make sure
that there is enough cord to allow the fixture to be
placed on the deck for re-lamping.
3. Make connections in the junction box (be sure to fol-
low code requirements!). Connect the supply circuit
grounding wire (green, green and yellow, or bare cop-
per) to the green ground conductor from the light fix-
ture. Connect the line supply wire (the black or ’hot’
wire) to the black wire from the light fixture. Connect
the neutral (white) supply wire to the neutral (white)
wire from the light fixture.
4. Wrap the cord around the lamp housing and place the
lamp housing in the niche. Be sure that the locator
tab on the bottom of the lamp housing is in the notch
at the bottom of the niche.
5. Fasten the lamp housing into the niche with the cap-
tive screw at the top of the fixture (use a No. 2 Phillips
screwdriver).
4
Fixture
Fixture removed
for relamping
4 FT. Min.
Max. water
level
8" Min.
18" Min.
8" Min.
Pool wall
To
service
To service
To fixture
Junction box
Low level
probe
Brass conduit
Sufficient cord to allow fixture to
be put on the deck for relamping
Figure 1: Lamp Housing Installation