
Operating instructions


Page 7 of 16 Zip Hydroboil Electronic - Installation & Operating Instructions - 89956 - Feb 2013 v1.07
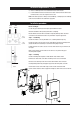
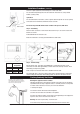
Visible TundishVent line
Inlet Water
Temperature
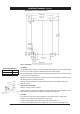
Model 15°C 10°C
15 Litre 40 min 43 min
25 Litre 47 min 50 min
40 Litre 60 min 64 min
more than 3 right angle bends, and discharges to a waste water drain.
For concealed vent plumbing, direct the vent outlet from the heater rear, using a visible
tundish. (see diag at left)
c) Electrical
For concealed electrical connection, connect a power cable through the rear access opening
of the heater to the terminal block within the heater as shown.
Do not turn the power ON until the heater is filled to the tap level, with water.
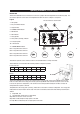
Step 4 – Assembling
Place the heater case back on to the heater and secure the top 2 case screws. Secure two
bottom case screws.
Insert Outlet Nozzle into the heater case.
Ensure the outlet tube is correctly positioned within the outlet nozzle.
Step 5 - Commissioning
Check previous steps. Turn water supply ON. Water is now flowing into heater, check
connections for leaks. Wait approximately 5 minutes and check outlet tap for water. This is
achieved by pressing the tap paddle.
Power is only to be turned on when water is available from this outlet.
Turn power ON. After a short period, boiling water will be available and will be maintained
close to boiling point thereafter. Initial heating periods are shown in the table on the left.
Warning: this appliance must be earthed.
Following remedial service the earthing continuity of the heater must be checked by
a qualified technician using an appliance tester, or continuity tester of accuracy Class
5 or better. Class 5 denotes an accuracy of 5% full scale deflection.
1. Isolate power supply.
2. Set meter to 0 ohm with leads connected together.
3. Connect one test lead to the earth wire on the product.
4. Connect the other test lead to a bare patch of metal (preferably on the edge) of the
top of the cover, then to the front cover of the unit.
Warning- the water may be boiling - show extra care.
5. Test that in every instance the electrical resistance does not exceed 1 ohm.
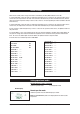
Earthing Continuity Verification
If required, an earth continuity test can be
performed by testing between the earth wire
on the product’s lead and a exposed piece of
metal on the case and the tap body.
Installation Procedures (continued)