
Installation Sheet
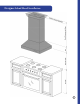
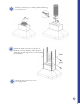
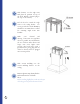
Table Of Contents

1
Locate the center above the stove where the hood is to be installed. There are 2 brackets,
the Crown Molding Bracket and the Chimney Mounting Bracket. Install the Crown
Molding Bracket directly on the ceiling with the curved sides facing towards the
ground (the crown will slide on at the end). Install the Chimney Mounting Bracket
underneath the Crown Mounting Bracket. Ensure that the brackets will be secured to
solid wood backing so it can hold the load. Attach brackets to the ceiling.
*The recommended height to install your hood is 30˝ minimum and 36"maximum
above the cooktop.
*For Outdoor (Copper and 304 Series) hood installation, the unit must be installed
at a minimum of 36˝ above the grill.
Designer Island Hood Installation
2
How to measure your chimney: Make note above stove top where the base of the hood
will be after installed (30-36in above stove). From this point, measure to the point
where the Chimney Mountain Bracket rests (this bracket ends 2.5in from the ceiling,
the chimney will terminate here, not flush with the ceiling). If you measure to the
ceiling, subtract 2.5 inches for correct chimney height. Once you have the total height,
subtract the height of the base of the hood to where the chimney begins and you will
have the correct height of the chimney. Cut the chimney to fit.
*Make sure to include 2.5 inches of space above the chimney to the ceiling (the crown
molding will cover this).
2