
Installation Guide


for damage.
3. Test unit after reassembly for proper operation (see "Testing
Procedures").
SERVICING CHECK VALVES
1. Close inlet and outlet shut-off valves.
2. Open No. 2, No. 3 and No. 4 test cocks to release pressure
from valve.
3. Unscrew 4 screws holding body down lift valve body upward.
4. Twist and remove sleeve from body. Using nger or blunt
object, push in outlet end of body, both checks should slide
out the body inlet. A short object like a socket can be placed
on a at surface. Place body over object so it pushes into
valve outlet and push down on body.
5. Twist spring retainers counter-clockwise to remove
from seat and access poppets.
6. Inspect the rubber seal ring for cuts or embedded debris.
To remove seal ring, remove screw and seal ring retainer.
ZURN WILKINS
1747 Commerce Way, Paso Robles, CA 93446 Phone:855-663-9876 Fax:805-238-5766
All Model 375 Reduced Pressure Principle Backow Preventers
must be inspected and maintained by licensed personnel at
least once a year or more frequently as specied by local codes.
Replacement of worn or damaged parts must only be made with
genuine "ZURN WILKINS" parts. The ZURN WILKINS Certicate
of Limited Warranty provides that failure to do so "...releases ZURN
WILKINS of any liability that it might otherwise have with respect
to that device." Such failure could also result in an improperly
functioning device.
The Model 375 Reduced Pressure Principle Assemblies should
be thoroughly ushed after backow conditions occur to prevent
any type of corrosive deterioration to its components. Failure to
do so could result in malfunction of the device.
GENERAL MAINTENANCE
1. Clean all parts thoroughly with water after disassembly.
2. Carefully inspect rubber seal rings, diaphragms and o-rings
MODEL 375 REDUCED PRESSURE PRINCIPLE
ASSEMBLY
Equipment Required: Differential pressure gauge test kit.
TEST NO. 1
Purpose:
Test #2 check valve for tightness against reverse ow.
Requirement:
The valve must close tight against reverse ow under all pressure
differentials.
Procedure:
1. Attach the "HIGH" hose to test cock #2 and the "LOW"
hose to test cock #3.
2. Close #2 shut-off valve.
3. Open test cocks #2 and #3.
4. Open by-pass valves "C" and "A" and bleed to atmosphere
until all air is expelled.
5. Close by-pass valve "A". Open by-pass valve "B" and
bleed to atmosphere until all air is expelled. Close by-pass
valves "B" and "C".
6. Attach the "VENT" hose to test cock #4.
7. Slowly open by-pass valves "A" and "C" and keep by-pass
valve "B" closed.
8. Open test cock #4.
9. Indicated pressure differential will drop slightly. If pressure
differential does not continue to decrease, the #2 check
valve is considered tight.
TEST NO. 2
Purpose:
Test #1 check valve for tightness and record pressure drop across
#1 check valve.
Requirement:
The static pressure drop across #1 check valve shall be greater than
the relief valve opening point (test #3), and at least 5.0 psid.
Procedure:
1. Close by-pass valve "A"
2. Close test cock #4, and disconnect "VENT" hose from test
cock #4.
3. Open by-pass valves "B" and "C" bleeding to atmosphere,
then close by-pass valve "B" restoring the system to
normal static condition.
4. Observe the pressure differential gauge and note this as
the #1 check valve PSID.
Testing Procedures
TEST NO. 3
Purpose:
To test operation of the differential relief valve.
Requirement:
The pressure differential relief valve must operate to maintain the
"ZONE" between the two check valves at least 2 PSID less than
the supply pressure.
Procedure:
1. Close by-pass valve "C" and open by-pass valve "A".
2. Open by-pass valve "B" very slowly until differential gauge
needle starts to drop. Hold the valve at this position and
observe the gauge reading at the moment the rst dis-
charge is noted from the relief valve. Record this as the
opening differential pressure of the relief valve.
Maintenance Instructions
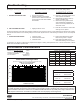
FLOW
FLOW
#1 TEST COCK
#2 TEST COCK
#3 TEST COCK
#4 TEST COCK
VENT HOSE
LOW SIDE HOSE
HIGH SIDE HOSE
BY-PASS
VALVE "B"
BY-PASS
VALVE "C"
BY-PASS
VALVE "A"
375 RP
2
175 PSIG 180˚ F
WILKINS
ZURN
/
#2 SHUT-OFF
VALVE
#1 SHUT-OFF
VALVE
2
®
www.zurn.com