
Installation Guide

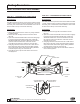

O-RING
BOLT
SLEEVE
BOLT
O-RING
TEST COCKS
O-RING
HOUSING
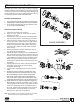
Maintenance Instructions
CHECK ASSEMBLY
O-RING
SEAT, #2
BOLT
SEAL
RETAINER
SEAL
WASHER
POPPET
SPRING
SPRING
RETAINER, #2
O-RING
SEAT, #1
BOLT
SEAL
RETAINER
SEAL
WASHER
POPPET
SPRING
RETAINER, #1
SPRING
All Model 350 Double Check Valve Backow Preventers
must be inspected and maintained by licensed personnel
at least once a year or more frequently as specied by local
codes. Replacement of worn or damaged parts must only
be made with genuine “ZURN WILKINS” parts.
GENERAL MAINTENANCE
1. Clean all parts thoroughly with water after disassembly.
2. Carefully inspect rubber seal rings and o-rings for damage.
3. Test unit after reassembly for proper operation (refer
to “TESTING PROCEDURES”).
SERVICING CHECK VALVES
1. Close inlet and outlet shut-off valves.
2. Open No. 2, No. 3 and No. 4 test cocks to release
pressure from valve.
3. Unscrew the 4 bolts (1/4-20 UNC Hex Flange) hold-
ing the housing in place. Lift housing up to remove.
4. Twist and remove sleeve from body. Using nger or
blunt object, push in outlet end of body, both checks
should slide out the body inlet. A short object like a
socket can be placed on a at surface. Place body
over object so it pushes into valve outlet and push
down on body.
5. Twist spring retainers counter-clockwise to remove
from seats and access poppets.
6. Inspect the rubber seal ring for cuts or embedded de-
bris. To remove seal ring, remove screw and seal ring
retainer. If the reverse side of the seal ring is unused,
it is possible to invert the seal ring. This will be consi-
dered a temporary solution to xing a fouled check
and should be replaced with a new seal ring as soon
as possible.
7. Inspect seat surface for nicks or dings and replace if
necessary. Use ngernail to check for dings.
Re-grease seat o-rings.
8. Inspect seat o-ring sealing areas in body and wipe
clean.
9. Reverse the above procedures to reinstall check valve
assembly. Drop #2 check assembly in body. Then drop
#1 check assembly in and turn until #1 spring retainer
lines up with #2 seat. Then push both assemblies into
body. Insert sleeve against checks. (Place sleeve down
against at surface and push on body with rocking motion.)
10. Lightly grease face of o-rings on housing and reinstall into
body following the above procedures in revers order.
Rock body side to side to help o-rings slide in. If it does
not drop in completely, do not use screws to force it.
An overly greased o-ring might slide out of groove at
top of ball valve. Use a screw driver to push o-ring
back in groove, then push body down in.
Note: When installing housing, match slight taper on the outlet
of the housing with corresponding taper in body.
3
ZURN WILKINS
1747 Commerce Way, Paso Robles, CA 93446 Phone:855-663-9876 Fax:805-238-5766
®
www.zurn.com