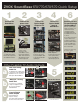
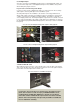
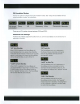
® ® ZVOX SoundBase 870/770/670/570 Quick Setup 1 2 3 Position the SoundBase. Connect the power cord. Connect to Optical Audio Output of TV. 1 OFF 4 Connect to Optical Audio Input of SoundBase. Back of SoundBase “TV base” position 2 Back of TV Back of SoundBase AC Power Receptacle Shelf position Place the SoundBase on stable, flat surface. Ensure all components are stable and secure. Connect the AC power cord to the back of the SoundBase. Leave the Power Switch in “Off”.
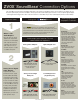
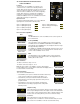
® ® ZVOX SoundBase Connection Options Your SoundBase has both analog and digital audio inputs. The majority of SoundBase owners connect between the optical jack on a TV and the optical input jack on the SoundBase. This page describes audio output types found on a TV or Set Top Box (optical digital, coaxial digital and analog) and the cable needed to connect to a SoundBase. Any of these audio outputs provides excellent fidelity.
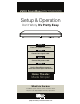
ZVOX SoundBase 870/770/670/570 ® Setup & Operation Don’t Worry It’s Pretty Easy. STEP 1 Place the system on furniture. STEP 2 Connect one signal cable. STEP 3 Connect the power cable. STEP 4 Use the SoundBase remote to select the correct input and volume. Home Theater Made Simple! What’s in the box SoundBase system • Remote control • Instruction sheets AC power cord • Optical digital and Analog signal cables ® (866) 367-9869 | info@zvoxaudio.
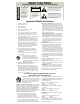
READ THIS FIRST WARNING Important Safety Instructions For ZVOX System TO PREVENT FIRE OR SHOCK HAZARD, DO NOT EXPOSE THIS APPLIANCE TO RAIN OR MOISTURE. THIS APPLIANCE SHALL NOT BE EXPOSED TO DRIPPING OR SPLASHING WATER AND NO OBJECT FILLED WITH LIQUIDS SUCH AS VASES SHALL BE PLACED ON APPARATUS. CAUTION RISK OF ELECTRICAL SHOCK, DO NOT OPEN Warning: To reduce the risk of electrical shock, do not remove cover (or back) – no serviceable parts inside. Refer servicing to qualified service personnel.
Simple Setup – Just Four Steps 12 3 4 Place the SoundBase. Connect the SoundBase to your TV and/or audio devices. Learn the features and controls of the ZVOX system. “Teach” the SoundBase to respond to your preferred remote controls commands (Volume/Mute/Power). 1. Speaker placement You can place the SoundBase on any flat, stable surface near your TV. If the TV base is small enough, you can place the SoundBase system on a piece of furniture and then place the TV on top of the SoundBase.
Coaxial Digital Output A few TVs, set top boxes and DVD/Blu-ray players have a coaxial digital audio output. You can connect this output to the coaxial digital audio input on the SoundBase using a cable with an RCA phono plug at each end. Program Sources with an Analog Audio Output If your TV set does not have a digital audio output, you could connect the TV set’s analog audio output to an analog audio input on the SoundBase system.
4a. Infrared Remote Control Features of the SoundBase Learning: You can “teach” the SoundBase to respond to your current TV remote control for the following functions: Volume, Mute (on/off) and Power (on/off). See the separate sheet for instructions. After this “learning” process, you will not need the SoundBase remote control for adjusting Volume, Mute and Power. Teaching the SoundBase to respond to your preferred remote does not affect the included SoundBase remote.
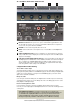
4b. SoundBase Front Panel and Rear Panel 1 2 3 SoundBase Front Panel Controls and Input 4 5 SoundBase Back Panel Inputs and Outputs 1 MUTE/Power button. If the system is on, a press of this button toggles MUTE on and off. Also while the system is on, if you press and hold the MUTE button for longer than four seconds, the system will enter STANDBY. 2 VOLUME -/+. The volume range indication is 01 to 30. 3 INPUT. Selects between the seven input choices on a SoundBase. See 4a Input in first column.
This guide applies to the SoundBase models 350, 450, 570, 670, 770 and 870. It does not apply to the SoundBase 220, 320, 420, 555 and 580 and earlier ZVOX Audio products. The PS Menu Adjusting the PS Menu The SoundBase has a variety of function and sound adjustments that could prove useful depending on the SoundBase owner's installation and usage preference. The list of adjustments is called the PS Menu.
PS Emulation Modes The first six options in the PS menu are emulation modes. See "Using the SoundBase remote control emulation modes" for instructions. -- No brand Sony emulation LG Samsung Vizio Panasonic Marantz There are no PS number choices between PS 6 and PS1 0.
Using the SoundBase remote control emulation modes PS 1 through PS 6: Most SoundBase users teach the SoundBase to respond to their preferred remote control using the SounBase built-in "learning" function. Should this approach not work with your preferred remote control, there is an alternate method that can allow your preferred remote to control the sound level heard from the SoundBase.
Master Reset A master reset restores a SoundBase to the factory default behavior. It erases any "learned" remote control response. It sets the SURROUND mode to Surround "2" sets OUTPUT LEVEUNG and DIALOG , EMPHASIS to OFF and sets BASS and TREBLE to no boost or cut in bass or treble output. It sets the INPUT to Optical Input 1. To perform the Master Reset, first put the SoundBase in Standby mode by pressing the POWER button on the SoundBase remote control.
Using Bluetooth wireless audio with your ZVOX Sound Base system. Your ZVOX Sound Base®system is equipped with a Bluetooth® receiver that allows it to play music wirelessly from your smart phone, tablet, laptop computer or other Bluetooth equipped audio devices. • To start the Bluetooth connection process, use the INPUT button on your remote control (or the control module on the front of the Sound Base) to select the Bluetooth input (rllll).
Your Current TV Remote Can Control Your SoundBase® System. After following the steps outlined in this guide, your cable remote will adjust the volume output from your SoundBase system. Please Note: If you have a DirecTV remote control, use the DirecTV remote guide included along with this instruction sheet. remote control. To insure accuracy, the learning routine records each button’s commands twice, then confirms a successful recording.
For USA SoundBase® Owners: Alternative Adjustment Guide For So me Remote Controls Issued by USA Cable and Satellite TV Providers. This guide applies to specific remote controls from DirecTV, Dish, Verizon FIOS, Comcast and AT&T that have an AUX or AUDIO button.
The SoundBase "learn your remote" feature does not work with many DirecTV remotes. The following instructions should be used to adjust a DirecTV remote to control a 'NO X Audio Sound Base. DirecTV remote RC65, RC66 and similar DirecTV remotes: Configure the ZVOX Audio speaker: On the front panel of the ZVOX Audio speaker: a) Press and hold down both the Mute/Power button and the Volume Up button until you see "PS" on the display. b) Release the buttons.
Dish Network Remote 20.1 IR or 21 .0 IR: These instructions describe how to configure your Dish Network remote to control the volume from your ZVOX Audio system and not from your TV. The following instructions apply to any TV brand except Panasonic. If you have a Panasonic TV, use the alternate instructions below. For any TV brand except Panasonic: Part 1: Configure the ZVOX system 1. Power on your ZVOX system . 2.
Dish Network Remote 20.1 IR or 21.0 IR: FOR PANASONIC TVs: Part 1: Configure the Sound Base system 1. Power on your ZVOX system. 2. On the ZVOX system front panel, press and hold down both MUTE and VOLUME UP until PS-0 appears on the display (about 5-6 seconds). Release the buttons. The PS-0 display continues flashing for about 5 seconds. 3. While PS-0 is flashing, repeatedly press VOLUME UP until it reads "PS-3". Wait for the display to stop flashing.
Comcast Custom DVR 3-Device Universal Remote Control These instructions describe how to configure your Comcast cable remote to control the volume from your ZVOX Audio system and not from your TV. The following instructions apply to any TV brand except Panasonic. If you have a Panasonic TV, use the alternate instructions below. FOR ANY TV BRAND EXCEPT PANASONIC: Part 1: Configure the ZVOX system 1. Power on your ZVOX system. 2.
Comcast DVR 3-Device Universal Remote Control These instructions describe how to configure your Comcast cable remote to control the volume from your ZVOX Audio system and not from your TV. The following instructions apply to any TV brand except Panasonic. If you have a Panasonic TV, use the alternate instructions below. FOR ANY TV BRAND EXCEPT PANASONIC: Part 1: Configure the ZVOX system 1. Power on your ZVOX system. 2.
Instructions for programming your 4-device FIOS remote to work with a ZVOX SoundBase (RC1445302) Please note: This page describes the FIOS 4-device remote (with DVD, AUX, TV and STB buttons at the top). The newer, two-device FIOS remote (STB and TV only) cannot be configured to control a separate audio system. If you have a ZVOX Audio system and the 2-device FIOS remote, ZVOX Audio encourages you to replace the 2-device remote with a 4-device FIOS remote.
How to configure your AT&T U-Verse black remote to control the volume output of a recent ZVOX Audio SoundBase• AT&T U-verse 510-52 Remote Control These instructions describe how to configure your AT&T U-verse remote to control the volume from your ZVOX Audio system and not from your TV. These instructions apply to ZVOX Audio 5oundBase systems with a four character LED display. The instructions apply to any TV. Part 1: Configure your AT&T remote Assign code to the AUX button 1.
AT&T U-Verse Silver Remote AT&T I STB KEY How to configure your AT&T U-Verse SILVER remote to control the volume output of a recent ZVOX Audio system. OVERVIEW: You set the AUX device of the U-Verse remote control to a brand the ZVOX can learn. You teach the ZVOX system to respond to the Volume, Mute (and Power, if desired). You adjust the U-Verse remote so that the volume buttons always control the ZVOX, no matter what device is selected on the U-Verse remote.
1-Year Limited Warranty, ZVOX Audio SoundBase Systems To the original purchaser of a ZVOX Audio system in the United States of America, ZVOX Audio warrants the ZVOX Audio system to be free of defects in material and workmanship for a period of one ( 1) year from date of purchase. To obtain a warranty repair of a ZVOX Audio system, a Return Authorization must be obtained from ZVOX Audio.