
User Manual

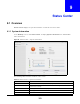
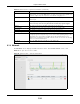

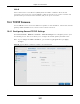
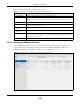
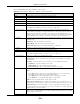
Table Of Contents
- Cloud Storage
- Web Desktop at a Glance
- Web Configurator
- Storage Manager
- Status Center
- Control Panel
- Videos, Photos, Music, & File Browser
- Administrator
- Managing Packages
- Tutorials
- 14.1 Overview
- 14.2 Windows 7 Network
- 14.3 Windows 7 Network Map
- 14.4 Playing Media Files in Windows 7
- 14.5 Windows 7 Devices and Printers
- 14.6 File Sharing Tutorials
- 14.7 Download Service Tutorial
- 14.8 Printer Server Tutorial
- 14.9 Copy and Flickr Auto Upload Tutorial
- 14.10 FTP Uploadr Tutorial
- 14.11 Web Configurator’s Security Sessions
- 14.12 Using FTPES to Connect to the NAS
- 14.13 Using a Mac to Access the NAS
- 14.14 How to Use the BackupPlanner
- Technical Reference
- Status Screen
- System Setting
- Applications
- Packages
- Auto Upload
- Dropbox
- Using Time Machine with the NAS
- Users
- Groups
- Shares
- WebDAV
- Maintenance Screens
- Protect
- Troubleshooting
- 28.1 Troubleshooting Overview
- 28.2 Power, Hardware, Connections, and LEDs
- 28.3 NAS Starter Utility
- 28.4 NAS Login and Access
- 28.5 I Cannot Access The NAS
- 28.6 Users Cannot Access the NAS
- 28.7 External USB Drives
- 28.8 Storage
- 28.9 Firmware
- 28.10 File Transfer
- 28.11 Networking
- 28.12 Some Features’ Screens Do Not Display
- 28.13 Media Server Functions
- 28.14 Download Service Functions
- 28.15 Web Publishing
- 28.16 Auto Upload
- 28.17 Package Management
- 28.18 Backups
- 28.19 Google Drive
- Product Specifications
- Customer Support
- Legal Information
- Index

Chapter 10 Control Panel
Cloud Storage User’s Guide
108
The following table describes t he labels in this screen
10.4.2 Configuring Network Interface
Use t he N e t w or k I nt erfa ce screen to edit t he I Pv4 or I Pv6 set tings of LAN 1 and LAN 2, set up
port t runking, and configure PPPoE sett ings. Click Cont r ol Pa ne l > N etw or k > TCP/ I P >
N et w ork I nt e rfa ce in t he navigat ion panel t o open the following screen.
Figure 61 Cont rol Panel > Net work > TCP/ I P > Net work I nt erface
Table 39 Cont rol Panel > Net work > TCP/ I P > General Sett ings
LABEL DESCRIPTION
Default Gat eway Select t he LAN int erface to use as the default gat eway.
DNS Server DNS ( Dom ain Nam e System ) is for m apping a dom ain nam e t o it s corr esponding I P
address and vice versa. I f you have the I P address(es) of t he DNS server( s), ent er
them .
Autom atically Select t he option t o have t he NAS get a DNS server address aut om at ically.
Manually Select this option t o choose a stat ic DNS server address. Type t he DNS server I P
address( es) into the fields below.
Prim ary DNS
Server
Type a prim ary DNS server I P address.
Secondary DNS
Server
Type a secondary DNS server I P address.
Apply Click t his t o save your TCP/ I P configurat ions. Aft er you click Apply, t he NAS rest art s.
Wait unt il you see the Login screen or until the NAS fully boots and t hen use the NAS
St ar ter Ut ility t o rediscover it .
Reset Click t his to rest ore your previously saved set tings.