
User Manual
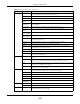
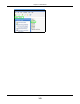

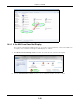
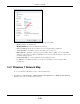
Table Of Contents
- Cloud Storage
- Web Desktop at a Glance
- Web Configurator
- Storage Manager
- Status Center
- Control Panel
- Videos, Photos, Music, & File Browser
- Administrator
- Managing Packages
- Tutorials
- 14.1 Overview
- 14.2 Windows 7 Network
- 14.3 Windows 7 Network Map
- 14.4 Playing Media Files in Windows 7
- 14.5 Windows 7 Devices and Printers
- 14.6 File Sharing Tutorials
- 14.7 Download Service Tutorial
- 14.8 Printer Server Tutorial
- 14.9 Copy and Flickr Auto Upload Tutorial
- 14.10 FTP Uploadr Tutorial
- 14.11 Web Configurator’s Security Sessions
- 14.12 Using FTPES to Connect to the NAS
- 14.13 Using a Mac to Access the NAS
- 14.14 How to Use the BackupPlanner
- Technical Reference
- Status Screen
- System Setting
- Applications
- Packages
- Auto Upload
- Dropbox
- Using Time Machine with the NAS
- Users
- Groups
- Shares
- WebDAV
- Maintenance Screens
- Protect
- Troubleshooting
- 28.1 Troubleshooting Overview
- 28.2 Power, Hardware, Connections, and LEDs
- 28.3 NAS Starter Utility
- 28.4 NAS Login and Access
- 28.5 I Cannot Access The NAS
- 28.6 Users Cannot Access the NAS
- 28.7 External USB Drives
- 28.8 Storage
- 28.9 Firmware
- 28.10 File Transfer
- 28.11 Networking
- 28.12 Some Features’ Screens Do Not Display
- 28.13 Media Server Functions
- 28.14 Download Service Functions
- 28.15 Web Publishing
- 28.16 Auto Upload
- 28.17 Package Management
- 28.18 Backups
- 28.19 Google Drive
- Product Specifications
- Customer Support
- Legal Information
- Index

Chapter 12 Administrator
Cloud Storage User’s Guide
142
12.2.3 Main Window
The m ain window ( 3 ) shows t he screen you select in the navigat ion panel. I t is discussed in the
rest of this docum ent .
12.2.4 Status Messages
The M essa ge t ext box at the bottom of the screen (4 ) displays status m essages as you configure
the NAS.
12.2.5 Common Administrator Screen Icons
The following t able explains som e icons t hat appear in several adm inistrat or configurat ion screens.
12.2.6 Session Example (Windows)
Open Windows Explorer and type t wo back slashes followed by t he NAS nam e or I P address.
I nit ially you can only read and write t o t he Pu blic, Video, M usic, and Phot o folders unt il you
creat e ot her shares on t he NAS. This session is t hen displayed as shown in t he following figure.
Table 60 Com m on Adm inistrator Screen I cons
ICON DESCRIPTION
Edit
Click this t o go to a screen where you can change t he configuration settings of an entry.
Delet e
Click t his t o delete an ent ry fr om t he list .
Edit
Click this t o j um p to relat ed it em ’s configuration screen.
Re fr esh
Click t his t o refresh the dat a for t he field or value with which it is associat ed.
User
See t he chapt er on user accounts for detailed inform ation on variant s of this icon.
Shar e
See t he chapt er on shares for detailed inform ation on variant s of t his icon.
He alt hy
This represents a healthy volum e.
Dow n
This represents a down volum e.
Sca n Disk
Click t his t o scan a hard disk for file system errors.
Note: It is recommended to scan the volume every three months or 32 reboots.
Ej ect
Click t his befor e you rem ove an ext ernal hard drive so t hat you do not lose dat a that is being
transferred t o or from that hard drive.