
User Manual


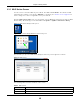
Table Of Contents
- Cloud Storage
- Web Desktop at a Glance
- Web Configurator
- Storage Manager
- Status Center
- Control Panel
- Videos, Photos, Music, & File Browser
- Administrator
- Managing Packages
- Tutorials
- 14.1 Overview
- 14.2 Windows 7 Network
- 14.3 Windows 7 Network Map
- 14.4 Playing Media Files in Windows 7
- 14.5 Windows 7 Devices and Printers
- 14.6 File Sharing Tutorials
- 14.7 Download Service Tutorial
- 14.8 Printer Server Tutorial
- 14.9 Copy and Flickr Auto Upload Tutorial
- 14.10 FTP Uploadr Tutorial
- 14.11 Web Configurator’s Security Sessions
- 14.12 Using FTPES to Connect to the NAS
- 14.13 Using a Mac to Access the NAS
- 14.14 How to Use the BackupPlanner
- Technical Reference
- Status Screen
- System Setting
- Applications
- Packages
- Auto Upload
- Dropbox
- Using Time Machine with the NAS
- Users
- Groups
- Shares
- WebDAV
- Maintenance Screens
- Protect
- Troubleshooting
- 28.1 Troubleshooting Overview
- 28.2 Power, Hardware, Connections, and LEDs
- 28.3 NAS Starter Utility
- 28.4 NAS Login and Access
- 28.5 I Cannot Access The NAS
- 28.6 Users Cannot Access the NAS
- 28.7 External USB Drives
- 28.8 Storage
- 28.9 Firmware
- 28.10 File Transfer
- 28.11 Networking
- 28.12 Some Features’ Screens Do Not Display
- 28.13 Media Server Functions
- 28.14 Download Service Functions
- 28.15 Web Publishing
- 28.16 Auto Upload
- 28.17 Package Management
- 28.18 Backups
- 28.19 Google Drive
- Product Specifications
- Customer Support
- Legal Information
- Index

Chapter 1 Getting to Know Your NAS
Cloud Storage User’s Guide
15
Figure 1 Exam ple of the NAS in a Hom e Net work
Above is t he NAS in a hom e network. Users back up and share data on t he NAS. The m edia player
plays the NAS’s m edia files on the TV. A USB hard drive provides ext ra st orage space and files are
copied directly from the USB m ass st orage device t o the NAS.
Place t he NAS behind a firewall and/ or I DP ( I ntrusion Det ect ion and Prevent ion) device t o protect it
from at tacks from the I nt ernet.
Refer t o the Quick St art Guide for hardware connections and how t o install and rem ove hard drives
from t he disk t rays.
Note: Turn off and disconnect t he NAS before you install or rem ove the int ernal hard disk
or disks.
1.2 LEDs
This t able describes t he NAS’s LEDs.
NAS
Table 1 LEDs
LED COLOR STATUS DESCRIPTION
POWER Whit e On The NAS is turned on and receiving power.
Off The NAS is turned off.
SYSTEM Whit e On The NAS has fully start ed and is operating norm ally.
Blinking The NAS is start ing up or upgrading t he firm ware.
Note: Do not turn off the NAS while it is upgrading the firmware or you may
render it unusable.
Red On The NAS has a syst em error.