
User Manual


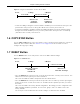
Table Of Contents
- Cloud Storage
- Web Desktop at a Glance
- Web Configurator
- Storage Manager
- Status Center
- Control Panel
- Videos, Photos, Music, & File Browser
- Administrator
- Managing Packages
- Tutorials
- 14.1 Overview
- 14.2 Windows 7 Network
- 14.3 Windows 7 Network Map
- 14.4 Playing Media Files in Windows 7
- 14.5 Windows 7 Devices and Printers
- 14.6 File Sharing Tutorials
- 14.7 Download Service Tutorial
- 14.8 Printer Server Tutorial
- 14.9 Copy and Flickr Auto Upload Tutorial
- 14.10 FTP Uploadr Tutorial
- 14.11 Web Configurator’s Security Sessions
- 14.12 Using FTPES to Connect to the NAS
- 14.13 Using a Mac to Access the NAS
- 14.14 How to Use the BackupPlanner
- Technical Reference
- Status Screen
- System Setting
- Applications
- Packages
- Auto Upload
- Dropbox
- Using Time Machine with the NAS
- Users
- Groups
- Shares
- WebDAV
- Maintenance Screens
- Protect
- Troubleshooting
- 28.1 Troubleshooting Overview
- 28.2 Power, Hardware, Connections, and LEDs
- 28.3 NAS Starter Utility
- 28.4 NAS Login and Access
- 28.5 I Cannot Access The NAS
- 28.6 Users Cannot Access the NAS
- 28.7 External USB Drives
- 28.8 Storage
- 28.9 Firmware
- 28.10 File Transfer
- 28.11 Networking
- 28.12 Some Features’ Screens Do Not Display
- 28.13 Media Server Functions
- 28.14 Download Service Functions
- 28.15 Web Publishing
- 28.16 Auto Upload
- 28.17 Package Management
- 28.18 Backups
- 28.19 Google Drive
- Product Specifications
- Customer Support
- Legal Information
- Index

Chapter 1 Getting to Know Your NAS
Cloud Storage User’s Guide
16
1.3 Hard Disks
The NAS has int ernal hard disk bays. I nstall SATA ( Serial Advanced Technology At tachm ent ) hard
disks. Not e t hat t he SATA hard disks are t reat ed as int ernal or SATA volum es. Any hard disk
connect ed t o a USB port is considered an ext ernal or USB volum e.
1.4 SD Card
Use up t o a 128 GB SDXC card wit h the front panel SD card slot . The SD card slot works with t he
COPY/ SYN C but t on ( see Section 1.6 on page 17 for details).
1.5 Power Button
Use t he power button on the front panel to t urn the NAS on or off.
• Press the power button for one second to t urn on the NAS.
HDD Whit e On The hard disk drive is connected properly t o the NAS. This LED stays on
white when t he hard disk drive is in hibernat ion if you do not enable sleeping
HDD LED blinking.
Blinking The NAS is saving dat a to t he hard disk drive.
Slow
Blinking
Sleeping HDD LED blinking is enabled and t he hard disk drive is in
hibernat ion.
Red On The NAS detect ed an error on t he hard disk drive ( like a bad sector for
exam ple) . The NAS autom at ically tries to recover a bad sector, but t he LED
st ays red until t he NAS restart s.
Off The NAS cannot detect a hard disk in the disk bay or the LED is disabled.
COPY White On A USB device is connected t o t he NAS and t he NAS is ready t o copy.
Blinking The NAS is copying or synchronizing files.
Red On Copying or synchronizing files t o or from t he USB or SD failed.
Off No USB device is connect ed.
LAN1 /
LAN2
Green On The NAS has a successful 10/ 100 Mbps Ethernet connect ion.
Blinking The 100M LAN is sending or r eceiving packets.
Off The NAS does not have a 10/ 100 Mbps Ethernet connect ion.
Am ber On The NAS has a successful 1000 Mbps Ethernet connect ion.
Blinking The 1000 M LAN is sending or receiving packets.
Off The NAS does not have a 1000 Mbps Et hernet connection.
Table 1 LEDs (cont inued)
LED COLOR STATUS DESCRIPTION