
User Manual
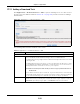
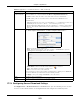


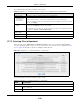
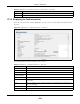
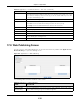
Table Of Contents
- Cloud Storage
- Web Desktop at a Glance
- Web Configurator
- Storage Manager
- Status Center
- Control Panel
- Videos, Photos, Music, & File Browser
- Administrator
- Managing Packages
- Tutorials
- 14.1 Overview
- 14.2 Windows 7 Network
- 14.3 Windows 7 Network Map
- 14.4 Playing Media Files in Windows 7
- 14.5 Windows 7 Devices and Printers
- 14.6 File Sharing Tutorials
- 14.7 Download Service Tutorial
- 14.8 Printer Server Tutorial
- 14.9 Copy and Flickr Auto Upload Tutorial
- 14.10 FTP Uploadr Tutorial
- 14.11 Web Configurator’s Security Sessions
- 14.12 Using FTPES to Connect to the NAS
- 14.13 Using a Mac to Access the NAS
- 14.14 How to Use the BackupPlanner
- Technical Reference
- Status Screen
- System Setting
- Applications
- Packages
- Auto Upload
- Dropbox
- Using Time Machine with the NAS
- Users
- Groups
- Shares
- WebDAV
- Maintenance Screens
- Protect
- Troubleshooting
- 28.1 Troubleshooting Overview
- 28.2 Power, Hardware, Connections, and LEDs
- 28.3 NAS Starter Utility
- 28.4 NAS Login and Access
- 28.5 I Cannot Access The NAS
- 28.6 Users Cannot Access the NAS
- 28.7 External USB Drives
- 28.8 Storage
- 28.9 Firmware
- 28.10 File Transfer
- 28.11 Networking
- 28.12 Some Features’ Screens Do Not Display
- 28.13 Media Server Functions
- 28.14 Download Service Functions
- 28.15 Web Publishing
- 28.16 Auto Upload
- 28.17 Package Management
- 28.18 Backups
- 28.19 Google Drive
- Product Specifications
- Customer Support
- Legal Information
- Index

Chapter 17 Applications
Cloud Storage User’s Guide
228
The following table describes t he labels in this screen.
17.7.5 Selecting Files to Download
Select an it em in t he Applica tions > D ow nloa d Ser vice screen’s list and click Select File s t o
open t he following screen. Use t his screen t o select which of the t orrent ’s files t o download.
Section
14.7 on page 162 provides a t ut orial on adding a download t ask.
Figure 128 Applications > Download Service > Select Files
The following table describes t he labels in this screen.
Table 76 Applications > Download Service > Preferences > P2P download > Edit I P Filt er
LABEL DESCRIPTION
Enable I P Filter Click this t o enable or disable I P filt er ing for P2P downloads.
Update I P Filter
Table File from
the I nt er net
Every Week
Select t his option and enter a URL t o use an online I P filt er table. You can find an online
I P filt er table in websites such as htt p: / / www.bluetack.co.uk/ config/ level1.gz.
When you change t he URL of t he online I P filter table, t he NAS also perform s an updat e
aft er you click Apply.
Upload I P Filter
Ta b l e
Select t his opt ion t o upload your own I P filter table. Use the Brow se butt on t o locat e
the file and click Upload to save it on t he NAS.
The NAS supports .txt , .dat , .gz, .t gz, and .tar.gz file ext ensions. The NAS saves t he I P
filt er table as / a dm in/ dow nloa d/ ipfilt er .da t .
Download Current
I P Filter Table
Click t his t o save a copy of t he I P filter t able on your com put er.
Apply Click Apply t o updat e t he I P filt er t able from t he specified URL.
Cancel Click this t o return t o t he previous screen w it hout saving.
Table 77 Applications > Download Service > Select Files
LABEL DESCRIPTION
Select Files
File Nam e This is the nam e of a file specified in the t orrent file. Select the check boxes of the files you
want t o download.
Size This is the size of t he file to be downloaded.