
User Manual
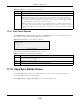

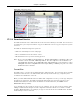
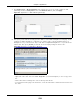
Table Of Contents
- Cloud Storage
- Web Desktop at a Glance
- Web Configurator
- Storage Manager
- Status Center
- Control Panel
- Videos, Photos, Music, & File Browser
- Administrator
- Managing Packages
- Tutorials
- 14.1 Overview
- 14.2 Windows 7 Network
- 14.3 Windows 7 Network Map
- 14.4 Playing Media Files in Windows 7
- 14.5 Windows 7 Devices and Printers
- 14.6 File Sharing Tutorials
- 14.7 Download Service Tutorial
- 14.8 Printer Server Tutorial
- 14.9 Copy and Flickr Auto Upload Tutorial
- 14.10 FTP Uploadr Tutorial
- 14.11 Web Configurator’s Security Sessions
- 14.12 Using FTPES to Connect to the NAS
- 14.13 Using a Mac to Access the NAS
- 14.14 How to Use the BackupPlanner
- Technical Reference
- Status Screen
- System Setting
- Applications
- Packages
- Auto Upload
- Dropbox
- Using Time Machine with the NAS
- Users
- Groups
- Shares
- WebDAV
- Maintenance Screens
- Protect
- Troubleshooting
- 28.1 Troubleshooting Overview
- 28.2 Power, Hardware, Connections, and LEDs
- 28.3 NAS Starter Utility
- 28.4 NAS Login and Access
- 28.5 I Cannot Access The NAS
- 28.6 Users Cannot Access the NAS
- 28.7 External USB Drives
- 28.8 Storage
- 28.9 Firmware
- 28.10 File Transfer
- 28.11 Networking
- 28.12 Some Features’ Screens Do Not Display
- 28.13 Media Server Functions
- 28.14 Download Service Functions
- 28.15 Web Publishing
- 28.16 Auto Upload
- 28.17 Package Management
- 28.18 Backups
- 28.19 Google Drive
- Product Specifications
- Customer Support
- Legal Information
- Index

Chapter 17 Applications
Cloud Storage User’s Guide
232
17.9.1 Print Server Rename
Click Applications > Pr int Ser ve r and a print er’s Re na m e icon t o open t he following screen. Use
this screen t o change t he nam e t he NAS uses for t he print er.
Figure 132 Applications > Print Server > Renam e
The following table describes t he labels in this screen.
17.10 Copy/Sync Button Screen
The Copy/ Sync button on the front panel allows you t o copy or synchronize files between a
connected USB or SD device and t he NAS.
Click Applica t ions > Copy/ Sync But t on t o open the following screen.
Nam e This ident ifies t he print er. Each print er connect ed t o t he NAS m ust use a unique nam e.
Act ions Re na m e: Click this to change t he nam e t he NAS uses for the pr int er.
Can cel Job: Click this to rem ove all print jobs from the NAS queue for a part icular print er.
However, since t he NAS sends print j obs to the printer as soon as it can, t his butt on m ay only
have an effect if there are very large or m any print j obs in t he queue. To st op a pr int j ob t hat
has already start ed, you m ay have t o t urn off the print er.
De lete : Click t his t o rem ove a printer from t he NAS’s printer list . To add the printer back int o
the list , disconnect the print er from the NAS’s USB port and reconnect it . I f t hat does not work,
disconnect the USB port and turn off the print er ’s power. Then r econnect the pr inter and turn it
back on.
Table 80 Applications > Print Server ( cont inued)
LABEL DESCRIPTION
Table 81 Applications > Print Server > Renam e
LABEL DESCRIPTION
Nam e Type a new nam e t o ident ify the print er. The nam e m ust be unique from all the ot her nam es of
print ers connect ed t o t he NAS.
Apply Click t his t o save your changes.
Cancel Click t his to return t o t he previous screen w ithout saving.