
User Manual
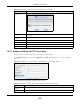
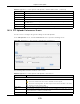
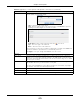
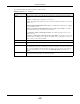

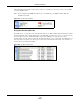


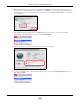
Table Of Contents
- Cloud Storage
- Web Desktop at a Glance
- Web Configurator
- Storage Manager
- Status Center
- Control Panel
- Videos, Photos, Music, & File Browser
- Administrator
- Managing Packages
- Tutorials
- 14.1 Overview
- 14.2 Windows 7 Network
- 14.3 Windows 7 Network Map
- 14.4 Playing Media Files in Windows 7
- 14.5 Windows 7 Devices and Printers
- 14.6 File Sharing Tutorials
- 14.7 Download Service Tutorial
- 14.8 Printer Server Tutorial
- 14.9 Copy and Flickr Auto Upload Tutorial
- 14.10 FTP Uploadr Tutorial
- 14.11 Web Configurator’s Security Sessions
- 14.12 Using FTPES to Connect to the NAS
- 14.13 Using a Mac to Access the NAS
- 14.14 How to Use the BackupPlanner
- Technical Reference
- Status Screen
- System Setting
- Applications
- Packages
- Auto Upload
- Dropbox
- Using Time Machine with the NAS
- Users
- Groups
- Shares
- WebDAV
- Maintenance Screens
- Protect
- Troubleshooting
- 28.1 Troubleshooting Overview
- 28.2 Power, Hardware, Connections, and LEDs
- 28.3 NAS Starter Utility
- 28.4 NAS Login and Access
- 28.5 I Cannot Access The NAS
- 28.6 Users Cannot Access the NAS
- 28.7 External USB Drives
- 28.8 Storage
- 28.9 Firmware
- 28.10 File Transfer
- 28.11 Networking
- 28.12 Some Features’ Screens Do Not Display
- 28.13 Media Server Functions
- 28.14 Download Service Functions
- 28.15 Web Publishing
- 28.16 Auto Upload
- 28.17 Package Management
- 28.18 Backups
- 28.19 Google Drive
- Product Specifications
- Customer Support
- Legal Information
- Index

Chapter 19 Auto Upload
Cloud Storage User’s Guide
273
Add Click this t o open t he following screen where you can set a folder t hat cont ains files you
want t he NAS t o aut om atically upload.
• Sha re - Select the share from t he list.
• Pa th - Type t he folder location in the share direct ly or click Brow se to open the
following screen and navigate t o t he folder’s location.
• Cur r ent Locat ion - This is t he locat ion of t he selected folder.
• Folder N am e - Ent er a new folder nam e and click t o creat e it .
• Type - This is t he t ype of the folder/ file.
• N am e - This is t he nam e of t he folder/ file.
Select a folder. I f y ou don’t select a folder, a forward slash ( / ) displays in t he Pa th field.
All cont ent s w ithin t he specified share are aut om atically select ed.
Click Apply t o save your sett ings and Can cel t o close t he screen.
Sett ings
Grace Period Specify how long t he NAS should wait when you add a new file for auto upload. For
exam ple, if you set the grace period t o 5 m inut es, the NAS uploads a new file aft er it
has been in a watched folder for 5 m inut es. You can choose from a range of 1 t o 10080
m inut es ( up to one week) .
Bandwidth Lim it Ent er t he m axim um upload rate for aut o upload. You can choose from a range of 0 t o
100,000 KB/ s. Ent er 0 if you do not want t o set any lim it.
Use t his t o leave bandwidt h on your netw ork connection for ot her t raffic, especially if
your I nt ernet connect ion has rest rict ed upload speed.
Apply Click t his to save your changes in this sect ion.
Reset Click this t o rest ore previously saved set tings.
Close Click t his t o return t o t he previous screen wit hout saving.
Table 98 Applications > Auto Upload > FTP Uploadr > Preferences (cont inued)
LABEL DESCRIPTION