
User Manual
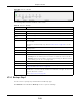
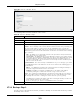
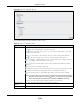
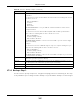
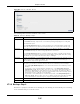
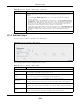
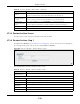
Table Of Contents
- Cloud Storage
- Web Desktop at a Glance
- Web Configurator
- Storage Manager
- Status Center
- Control Panel
- Videos, Photos, Music, & File Browser
- Administrator
- Managing Packages
- Tutorials
- 14.1 Overview
- 14.2 Windows 7 Network
- 14.3 Windows 7 Network Map
- 14.4 Playing Media Files in Windows 7
- 14.5 Windows 7 Devices and Printers
- 14.6 File Sharing Tutorials
- 14.7 Download Service Tutorial
- 14.8 Printer Server Tutorial
- 14.9 Copy and Flickr Auto Upload Tutorial
- 14.10 FTP Uploadr Tutorial
- 14.11 Web Configurator’s Security Sessions
- 14.12 Using FTPES to Connect to the NAS
- 14.13 Using a Mac to Access the NAS
- 14.14 How to Use the BackupPlanner
- Technical Reference
- Status Screen
- System Setting
- Applications
- Packages
- Auto Upload
- Dropbox
- Using Time Machine with the NAS
- Users
- Groups
- Shares
- WebDAV
- Maintenance Screens
- Protect
- Troubleshooting
- 28.1 Troubleshooting Overview
- 28.2 Power, Hardware, Connections, and LEDs
- 28.3 NAS Starter Utility
- 28.4 NAS Login and Access
- 28.5 I Cannot Access The NAS
- 28.6 Users Cannot Access the NAS
- 28.7 External USB Drives
- 28.8 Storage
- 28.9 Firmware
- 28.10 File Transfer
- 28.11 Networking
- 28.12 Some Features’ Screens Do Not Display
- 28.13 Media Server Functions
- 28.14 Download Service Functions
- 28.15 Web Publishing
- 28.16 Auto Upload
- 28.17 Package Management
- 28.18 Backups
- 28.19 Google Drive
- Product Specifications
- Customer Support
- Legal Information
- Index

Chapter 27 Protect
Cloud Storage User’s Guide
326
Figure 203 Protect > Backup: St ep 3
The following table describes t he labels in this screen.
27.3.4 Backup: Step 4
Click t his t o specify t he schedule for t he backup j ob. The backup j ob aut om at ically runs according
to t he schedule t hat you set in this screen.
Table 131 Protect > Backup: Step 3
LABEL DESCRIPTION
Com pression Select Ye s if you want NAS t o com press the files for your backup. Ot herwise, choose N o.
I n an Archive backup, com pression is a m ethod of packing com put ing files in a way t hat
saves hard disk space.
For a Synchroniza tion back up ( to a rem ote t arget) , the source dat a will be com pr essed
before the t ransm ission t o reduce the transm ission t im e. I t is used in slow network s only.
Encrypt ion Select Ye s if you want NAS t o encrypt t he files for your backup. Otherwise, choose N o.
I n an Archive backup, t his m eans using a password t o secure files.
For a Synchroniza tion back up ( to a rem ote t arget) , this m eans securing t he file t ransfer
session. However t he final file stored on t he rem ot e NAS is unencrypted. This t akes a long
tim e. Make sure you really need t his feat ure before enabling it.
Bandwidth Rest rict t he bandwidt h of synchronizat ion backups to help st op t hem fr om using all of your
net work connect ion’s available bandwidth. This is m ore im por t ant when backing up to a
rem ot e NAS or com put er through t he I nt ernet.
Purge Policy The NAS m aint ains t he files t hat have been included in your backups. How ever t o save hard
disk space, you can choose t o delete files t hat have been included in previous backups.
• Select Ke ep All Old Backup files t o store all files that have been included in previous
backups.
• I f you want to store a cert ain num ber of backup files, select Keep Only t he last n
backup files ( 1 - 3 0 ) . Ent er a value ( n) from 1 t o 30 t o specify how m any backups the
NAS stores. All backup files older t han t he last one are deleted. You w ill not be able t o
recover files t hat exist ed ( only) in t hose previous backups. Select this if backup space is
lim ited and recovery of old files is not im port ant .
• I f you want to st ore all backups for a cert ain tim e period, select Ke ep Back u ps for n
day( s) ( 1 - 3 6 5 0 ) . Enter a value ( n) from 1 t o 3650 t o specify how m any days the NAS
st ores all backup files. After this day has expired, all back up files will be delet ed.
Previous Click t his t o go back t o t he pr evious screen.
Next Click this to go t o t he next screen.