
User Manual


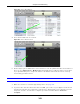
Table Of Contents
- Cloud Storage
- Web Desktop at a Glance
- Web Configurator
- Storage Manager
- Status Center
- Control Panel
- Videos, Photos, Music, & File Browser
- Administrator
- Managing Packages
- Tutorials
- 14.1 Overview
- 14.2 Windows 7 Network
- 14.3 Windows 7 Network Map
- 14.4 Playing Media Files in Windows 7
- 14.5 Windows 7 Devices and Printers
- 14.6 File Sharing Tutorials
- 14.7 Download Service Tutorial
- 14.8 Printer Server Tutorial
- 14.9 Copy and Flickr Auto Upload Tutorial
- 14.10 FTP Uploadr Tutorial
- 14.11 Web Configurator’s Security Sessions
- 14.12 Using FTPES to Connect to the NAS
- 14.13 Using a Mac to Access the NAS
- 14.14 How to Use the BackupPlanner
- Technical Reference
- Status Screen
- System Setting
- Applications
- Packages
- Auto Upload
- Dropbox
- Using Time Machine with the NAS
- Users
- Groups
- Shares
- WebDAV
- Maintenance Screens
- Protect
- Troubleshooting
- 28.1 Troubleshooting Overview
- 28.2 Power, Hardware, Connections, and LEDs
- 28.3 NAS Starter Utility
- 28.4 NAS Login and Access
- 28.5 I Cannot Access The NAS
- 28.6 Users Cannot Access the NAS
- 28.7 External USB Drives
- 28.8 Storage
- 28.9 Firmware
- 28.10 File Transfer
- 28.11 Networking
- 28.12 Some Features’ Screens Do Not Display
- 28.13 Media Server Functions
- 28.14 Download Service Functions
- 28.15 Web Publishing
- 28.16 Auto Upload
- 28.17 Package Management
- 28.18 Backups
- 28.19 Google Drive
- Product Specifications
- Customer Support
- Legal Information
- Index

Chapter 28 Troubleshooting
Cloud Storage User’s Guide
341
• I f you are t rying t o login directly by t yping t he server nam e int o your web browser’s address
field, m ake sure you are using t he correct server nam e as t he web site address.
• The default server nam e is ‘NAS’ follow ed by t he num ber of your m odel (‘NAS5 4 0 ’ for
exam ple) . I f you have changed t he server nam e, use t he new one.
• I f the server nam e has been changed and you do not know t he new server nam e, see t he
troubleshoot ing suggest ions for
I forgot the server nam e of the NAS.
• I f it still doesn’t work, try using t he NAS Starter Ut ility.
• Check t he hardware connections, and m ake sure t he LEDs are behaving as expect ed. See t he
Quick Start Guide and Table 1 on page 15.
• By default, t he NAS gets an I P address aut om at ically. The NAS assigns it self an I P address if no
device assigns one. I f your com put er is also set t o get an I P address aut om atically, t he com puter
and t he NAS can both assign t hem selves I P addresses and com m unicate. See
Section 10.4 on
page 107
if you need t o configure t he NAS with a st at ic I P address.
• I f you are connecting to t he NAS by it s I P address, m ake sure you use t he correct one. I f t he NAS
has a wired Ethernet connect ion and a wireless connection t hrough an attached USB wireless
dongle, the NAS has a different I P address for each connection. To connect through the wired
Ethernet connect ion, use t he w ired Ethernet connect ion’s I P address. To connect through t he
wireless connection, use t he w ireless connection’s I P address.
• Make sure your com put er’s I P address is in t he sam e subnet as t he NAS’s I P address. You can use
the NAS St art er Ut ilit y t o find the NAS’s I P address. Skip t his if you know t hat t here are rout ers
bet ween your com put er and t he NAS.
• Ping t he NAS from your com put er. Make sure your com put er’s Ethernet adapt er is installed and
functioning properly. I n a ( Windows) com puter, click St art , ( All) Pr ogram s, Accessor ie s and
then Com m a nd Prom pt . I n t he Com m a nd Pr om pt w indow, t ype “ ping” followed by t he NAS’s
I P address ( use t he NAS Starter Utility t o find t he NAS’s I P address if you don’t know it ) and then
press [ ENTER] .
• Make sure you are using I nternet Explorer 6.0 ( and lat er) or Firefox 1.07 ( and lat er) .
• Make sure your I nt ernet browser does not block pop- up windows and has JavaScript and Java
enabled. With I nt ernet Explorer 6, you m ay also have t o enable scripting of safe Act iveX controls.
See
Section 28.4.1 on page 341.
I forgot t he password.
• The default password is 1 2 3 4 .
• I f you have changed t he password and forgot ten it, you will have t o reset t he NAS.
28.4.1 Enabling Scripting of Safe ActiveX Controls
I f pages of the web configurator do not display properly in I nt ernet Explorer, check that scripting of
safe ActiveX cont rols is enabled.
1 I n I nt ernet Explorer, click Tools, I nt e rnet Opt ion s and then the Securit y t ab.