Quick Start Guide (English)
Contents 1 First Steps ...................................................................................................3 1.1 Connecting Pads .........................................................................................3 1.2 Connecting the Hi-Hat .................................................................................3 2 Operation ....................................................................................................4 3 Menu Structure ..............................
Thank you… for choosing a 2BOX DrumIt Three module. You have chosen wisely. Your new sound module comes with an open sound architecture and a universal trigger interface. To get up and running with your DrumIt Three module, we recommend taking the time to read this Quick Start manual. It provides a concise presentation of all functions you need to be aware of and everything you need to know to come to grips with this feature-rich instrument. Have fun! 1 1.
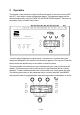
2 Operation The module’s user interface is highly intuitive and based on two menu items (UNIT and KIT), each with a number of parameter pages. The parameter pages can be selected sequentially using the PAGE UP and PAGE DOWN buttons. There are no secondary levels or hidden menu items. The main page comprises six logical areas. The three DATA buttons above the display are assigned to the values or functions that appear in the top row.
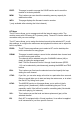
3 Menu Structure UNIT Menu The UNIT menu contains settings that apply to the module as a whole. This means that they affect all KITs (presets). MIX: This is where the internal mixer is located. The mixer allows you to set and balance the levels of all channels/instruments. CHAN: This is where you can select trigger channels for editing (although you can also select trigger channels simply by hitting the corresponding pad). TRIG: This is where you will find the main trigger settings for each channel.
PREF: This page is used to manage the SAVE function and to reset the module to its factory defaults. MEM: This is where you can check the remaining memory capacity for additional sounds. INFO: This page displays the firmware’s version number. * (only available after selecting the hi-hat channel) KIT Menu The KIT menu allows you to manage and edit the internal memory slots. The module comes with 100 factory KITs (memory slots). Those KITs can be edited and overwritten with your own settings.
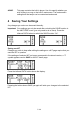
ACMP: This page contains the built-in player. Use it to specify whether you wish to play to a song or the built-in metronome. The metronome’s settings and the tempo can be customized and saved. 4 Saving Your Settings Any changes you make can be saved internally. Important: Your settings can only be saved after unlocking the SAVE function in the UNIT-PREF menu (you only need to do so once). Press the leftmost DATA button to switch the SAVE function “On”.
Renaming a KIT To rename a KIT, press the button above SAVE on the KIT home page. You can use uppercase and lowercase letters, numbers as well as several special characters for the names you enter. Use the knob to select the desired character (KEY flashes) or hold down the MORE button while pressing the knob to insert a space. Press the knob without holding down the MORE button to select the CUR parameter. Now, the knob can be used to move the flashing underline cursor to another position you want to edit.
If you like, you can rename the settings during the COPY, MOVE or SWAP operation. Saving Your UNIT Settings When you change a setting in the UNIT menu, a “?” appears next to SAVE. Press the leftmost DATA button to save the changes if you want to keep them. The “?” disappears and your changes will be remembered. Please be aware that this is only possible if SAVE mode on the PREF page has been switched on.
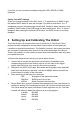
5. Start the calibration process: 5.1. Press the leftmost DATA button once. A closed hi-hat icon appears in the display and starts flashing. 5.2. Close the hi-hat pad or press the controller’s pedal with your foot. 5.3. Press the leftmost DATA button a second time. An open hi-hat icon appears in the display and starts flashing. 6. 7. 5.4. Open the hi-hat pad or remove your foot from the pedal. 5.5. Press the leftmost DATA button yet again to exit the calibration function. 5.6. The display shows “done”.
UNIT-TRIG This is where you set the hi-hat pedal’s response and sensitivity. Set the main parameters (GAIN, THRES, CURVE) to match your playing style. The most important of these is GAIN. Set it so that only the most forceful strikes produce a Level value of 0.0. UNIT-HSET This page is used to set the hi-hat pedal’s sensitivity/level (SENS) and its dynamic response (CURVE).
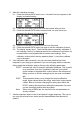
OUT 1~4 These are the DrumIt Three’s outputs, which can be connected to a mixer or amplifier. By default, OUT1 and 2 transmit the mixed stereo signal. OUT3 and 4, on the other hand, are assigned to BUS3 and BUS4 respectively. If necessary, OUT 1 and 2 can also output BUS signals (BUS1 and BUS2). This can be set on the UNIT-OUT page. PHONES This is where you can connect a commercially available pair of headphones (recommended impedance 32 Ω - 600 Ω).
severing the USB connection while the module is in Read (R) or Write (W) mode may damage the data file structure. Below please find an explanation of the DrumIt Three’s file and folder system. 8 File System At the root level, you will find the following files: DrumIt3.dkit Standard User KIT Bank. This file contains your own KIT and UNIT settings. DrumItInit.dkit This file contains the KIT and UNIT settings programmed at the factory. This file is required to perform a factory reset of the unit.
Note By pressing the MORE and the KIT button for 2 seconds you will enter a menu where you are able to switch to another KIT Bank. At next power up, DrumIt Three will start with the last chosen KIT Bank. The folders contain the 2BOX sound files in the DSND format as well as play-along songs in the WAV format. Feel free to change the folder structure so as to organize the files in a way that works for you.
9 KIT Bank The KIT Bank contains 90 freely editable preset KITs plus 10 empty memory slots. The first 40 KITs are a selection of various kits taken from the 2box sound library. Amongst them are several Signature KITs recorded by the following artists: Randy Black, Simon Phillips, Mike Müller, and Marco Minneman. Another 50 KITs were custom-programmed to match various songs/artist. These KITs are created by 2box and reflect our taste and ideas. Feel free to edit them to fit your own style.
10 Editor Software The 2BOX sound universe is virtually open-ended. Using 2BOX’s free editor software, you can create your own sounds and set the main KIT parameters on your PC/Mac. The editor makes converting WAV files to highly usable 2BOX sounds a breeze. This includes multilayers with up to 127 velocity levels! To work with the editor software, you need to put the module in USB mode. See the following URL for details about the software and tutorial videos: www.open-sound-system.
13 Compatibility List The following list is not exhaustive, because testing all current and legacy pads on the market would be rather time-consuming. We do promise, however, to keep this list up-to-date whenever we are able to confirm the compatibility of products we haven’t tested so far. If you don’t see the type or manufacturer of (one of) your pads, please do not conclude that your pad(s) won’t work with the DrumIt Three.
14 Connection Options and Trigger Types Zones – Configuration Type Brands (examples) Head /Bow Rim/ Edge Crossstick/ Bell Instrument Choke Information PadP 2box, Roland Piezo Piezo - PaPSS Huaxin Piezo Switch Switch PaPSY Yamaha Piezo Switch Switch PadPS Roland, Alesis Piezo Switch - Rim Various CyPSV 2box Piezo Switch Velocity yes CyPSB Roland Piezo Switch Switch yes CyPS Alesis, Roland Piezo Switch - yes CyPSS Huaxin, Alesis Piezo Switch Switch yes CyPS
Instrument Snare 1 zone 2 zones x x Tom 3 zones Rim 1 zone 2 zones x x 1 zone Cymbal 2 3 zones zones Acoustic Various Trigger x x x x x x x x x x x x x x x x x x 19 / 20
15 Important Safety Precautions Never try to open or modify the power supply adapter. If the power supply is damaged, be sure to purchase a new 2BOX adapter. When using a third-party adapter, make sure it is a 12V/1000mA DC power supply (100-240V). Never use the power supply outdoors or in damp locations. The DrumIt Three module operates at low power and should therefore pose no particular hazard. We nevertheless urge you to operate it in a responsible manner.