
User manual, 1510 v1.13 Owner's manual


Mounting - Completion
2.4
36
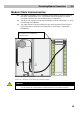
2.4 Mounting - Completion
1. Remember to seal the 2N
®
Helios IP cable passage hole properly to avoid moisture
in-leak and damage to electronics due to condensation.
2. Make sure that the wires inside 2N
®
Helios IP are not squeezed and insert the
plastic top cover (a transparent plastic mould) carefully making its contacts plug
into the electronics board connectors. Push the plastic cover into position
moderately. If the part swings over an obstacle or one corner is higher than the
others, remove the cover and find the obstacle. Then tighten the corner screws
properly.
3. Mounting the metal sheet cover follow the steps included in the subsection
dedicated to name plate removal. Make sure that the cover fits well and is
perfectly flat. If its bottom part is loose, the mounting wall is probably uneven.
Support the corners to avoid 2N
®
Helios IP bending.
Caution
An improper mounting may significantly deteriorate the button function.
A poor outdoor mounting may cause water in-leak and damage to the
electronics.
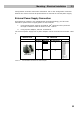
Most Frequent Mounting Errors
For illustration, a part of the plastic cover is removed in the figures below to reveal the
sealed loudspeaker and the cover–seal touch point. The cross section plane is marked
white for better orientation.
Poorly tightened screw
(a squeezed wire has the same
effect)
WRONG
Gap between plastic cover and
loudspeaker seal
- water may leak in and
damage electronics