Owner’s manual Mode d’emploi Manual de instrucciones AM/FM CD/MD PLAYER WITH CD/MD CHANGER CONTROL • RADIO AM/FM-LECTEUR CD/MD AVEC PILOTAGE DE CHANGEUR CD/MD • RADIO DE AM/FM Y REPRODUCTOR DE CD/MD CON CONTROL DE CAMBIADOR DE CD/MD Clarion Co., Ltd. 1999/3 (To·K) All Rights Reserved. Copyright © 1999: Clarion Co., Ltd.
Thank you for purchasing the Clarion DMX5555z. ∗ Please read this owner’s manual in its entirety before operating this equipment. ∗ After reading this manual, be sure to keep it in a handy place (e.g., glove compartment). ∗ Check the contents of the enclosed warranty card and keep it carefully with this manual. ∗ This manual includes the operating procedures of the CD changer, MD changer and TV connected via the CeNET cable.
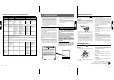
Functions of Remote Control Unit Buttons Mode Button £ FUNC Radio CD MD Switches reception band. ; VOLUME Increases and decreases volume (in all modes). § SEARCH Moves preset channels up and down. ¶ PLAY/PAUSE CD changer MD changer TV Turns power on and off. When pressed and held for 1 second: Turns power off. Switches among radio, CD, MD, CD changer, MD changer and TV. ¢ BAND DISC UP PROG TOP No function. Plays the first track. Top play. Plays the first track. Top play.
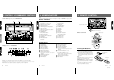
3. CONTROLS / LES COMMANDES / CONTROLES 5. REMOTE CONTROL 4. NOMENCLATURE Note: • Be sure to read this chapter referring to the front diagrams of chapter “3. CONTROLS” on page 5 (unfold).
6. OPERATIONS Basic Operations Note: Be sure to read this chapter referring to the front diagrams of chapter “3. CONTROLS” on page 5 (unfold). CAUTION Be sure to lower the volume before switching off the unit power or the ignition key. The unit remembers its last volume setting. If you switch the power off with the volume up, when you switch the power back on, the sudden loud volume may hurt your hearing and damage the unit.
Basic Operations ∗ Once selected, the preferred display becomes the display default. When a function adjustment such as volume is made, the screen will momentarily switch to that function’s display, then revert back to the preferred display several seconds after the adjustment. ∗ When you have entered a title in a CD, it appears in the sub display. If you have not entered a title, “USER TTL” appears in the title display instead.
CD Operations Radio Operations Manual tuning Recalling a preset station Loading a CD There are 2 ways available: Quick tuning and step tuning. When you are in the step tuning mode, the frequency changes one step at a time. In quick tuning mode, you can quickly tune the desired frequency. 1. Press BAND button ! and select the desired band (FM or AM). Pressing the corresponding preset button recalls the stored radio frequency automatically. 1.
CD Operations MD Operations Repeat play Loading an MD Selecting a track Random play The repeat play continuously plays the current track. This function continues automatically until it is canceled. 1. Press RPT button 6. “RPT” lights in the display and the current track is repeated. 2. To cancel the repeat play, press RPT button 6 again. “RPT” goes off from the display and normal play resumes. After confirming the orientation of an MD, insert the MD into the insertion slot.
Other Handy Functions Setting the clock 1. Press and hold ADJ button # for 1 second or longer to switch to the adjustment selection display. 2. Press Right button ¥ or Left button % to select “CLOCK”. 3. Press ENT button @. 4. Press Right button ¥ or Left button % to select the hour or the minute. 5. Press Up button & or press Down button * to set the correct time. ∗ The clock is displayed in 12-hour format. 6. Press ENT button @ to store the time into memory. 7.
7. OPERATIONS OF ACCESSORIES CD Changer Operations CD changer functions Selecting a CD When an optional CD changer is connected through the CeNET cable, this unit controls all the CD changer functions. This unit can control a total of 2 changers (MD and/or CD). Press FUNC button 7 and select the CD changer mode to star t play. If 2 CD changers are connected, press FUNC button 7 to select the CD changer for play. Each of the Direct button 1 corresponds to a disc loaded into the magazine.
MD Changer Operations MD changer functions When an optional MD changer is connected through the CeNET cable, this unit controls all the MD changer functions. This unit can control a total of 2 changers (MD and/or CD). Press FUNC button 7 and select the MD changer mode to start play. If 2 MD changers are connected, press FUNC button 7 to select the MD changer for play. ∗ If “NO DISC” appears in the display, load MDs into the MD changer. Pausing play 1. Press Play/pause button @ to pause play.
Manual tuning Auto store There are 2 ways available: Quick tuning and step tuning. When you are in the step tuning mode, the frequency changes one step at a time. In quick tuning mode, you can quickly tune the desired frequency. 1. Press BAND button ! and select the desired band (TV1 or TV2). Auto store selects 6 TV stations automatically and stores each one into a preset memory.
9. ERROR DISPLAYS 10. SPECIFICATIONS If an error occurs, one of the following displays is displayed. Take the measures described below to eliminate the problem. Error Display Measure ERROR 2 A CD is caught inside the CD deck and is not ejected. This is a failure of CD deck’s mechanism and consult your store of purchase. ERROR 3 A CD cannot be played due to scratches, etc. Replace with a non-scratched, non-warped disc. ERROR 2 An MD is caught inside the MD deck and is not ejected.