USER'S MANUAL FOR INDUCTION HOBS cod.
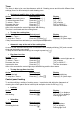
Dear client, Thank you for having chosen our induction ceramic hob. In order to make the best use of your appliance, we would advise you to read carefully the following notes and to keep them for a later consulting. SUMMARY SAFETY..................................................................................................................................... 16 PRECAUTIONS BEFORE USING ....................................................................................................
SAFETY Precautions before using Unpack all the materials. The installation and connecting of the appliance have to be done by approved specialists. The manufacturer can not be responsible for damage caused by building-in or connecting errors. To be used, the appliance must be well-equipped and installed in a kitchen unit and an adapted and approved work surface.
Precautions not to damage the appliance Raw pan bottoms or damaged saucepans (not enamelled cast iron pots,) may damage the ceramic glass. Sand or other abrasive materials may damage ceramic glass. Avoid dropping objects, even little ones, on the vitroceramic. Make sure that the ventilation of the appliance works according to the manufacturer’s instructions. Do not hit the edges of the glass with saucepans. Do not put or leave empty saucepans on the vitroceramic hobs.
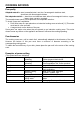
DESCRIPTION OF THE APPLIANCE Technical data Type Total Power Position Nominal Power* Booster Power* Diameter 7321240 3000W Front 2300W 3000W 250 mm 7322240 3400W Front left Rear right 1200W 2300W 1400W 3000W 160 mm 200 mm * The given power may change according to the dimensions and material of the pan.
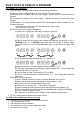
Display Display Designation Function 0 Zero The heating zone is activated 1…9 Power level Selection of the cooking level U Pan Detection No pan or inadequate pan E Error message Electronic failure H Residual heat The heating zone is hot P Booster The boosted power is activated Ventilation The cooling system is fully automatic. The cooling fan starts with a low speed when the calories brought out by the electronic system reach a certain level.
Start-up/ switch off the heating zone : Action Control panel Display Increase power Decrease power Stop Press key [ + ] Press key [ - ] Press simultaneous[ + ] and [ - ] or press [ - ] [ 4 ] to [ 9 ] [ 9 ] to [ 1 ] [ 0 ] or [ H ] [ 0 ] or [ H ] If no setting are made in 20 seconds the hob return in waiting position. Pan detection The pan detection ensures a perfect safety. The induction doesn’t work: If there is no pan on the heating zone or if this pan is not adapted to the induction.
Timer The timer is able to be used simultaneous with all 2 heating zones and this with different time settings (from 0 to 99 minutes) for each heating zone. Setting and modification of the cooking time Action Control panel To select the heating zone Press key [ + ] or [ - ] To select the power level Press key [ + ] or [ - ] To select « Timer » Press key [ ] Decrease the time Press key [ - ] Increase the time Press key [ + ] After a few seconds the control light stops with blinking.
COOKING ADVICES Pan quality Adapted materials : steel, enamelled steel, cast iron, ferromagnetic stainless-steel, aluminium with ferromagnetic bottom. Not adapted materials : aluminium and stainless-steel without ferromagnetic bottom, cupper, brass, glass, ceramic, porcelain. The manufacturers specify if their products are compatible induction. To check if pans are compatibles: Put a littler water in a pan placed on an induction heating zone set at level [ 9 ].This water must heat in a few seconds.
WHAT TO DO IN CASE OF A PROBLEM The symbol [ E 4 ] displays : The hob must be configured according to the following procedure. I) Warning : before starting all pots must be removed from the cooktop. II) Disconnect the cooktop from the main supply : remove fuse or disconnect circuit breaker. III) Connect the cooktop to the main supply : replace the fuse or connect the circuit breaker. IV) Procedure : You must provide yourself with a ferromagnetic bottom container 16 cm minimum diametre.
The symbol [ U ] displays There is no pan on the cooking zone. The pan is not compatible with induction. The bottom diameter of the pan is too small. The symbol [ C ] or [ E ] displays Call the After-sales Service. One or all cooking zones cut-off The safety system functioned You forgot to cut-off the cooking zone for a long time. One or more sensitive keys are covered. The pan is empty and its bottom overheated.
INSTALLATION INSTRUCTIONS The installation comes under the exclusive responsibility of specialists. The installer is held to respect the legislation and the standards enforce in his home country. How to stick the gasket The gasket supplied with the hob avoids all infiltration of liquids in the cabinet. His installation has to be done carefully, in conformity of the following drawing. Stick the gasket (2) two millimeters from the external edge of the glass, after removing the protection sheet (3).
ELECTRICAL CONNECTION The installation of this appliance and the connection to the electrical network should be entrusted only to an electrician perfectly to the fact of the normative regulations and which respects them scrupulously. Protection against the parts under tension must be ensured after the building-in. The data of connection necessary are on the stickers place on the hob casing near the connection box.
cod. 9606885 Foster spa 42041 Brescello (RE) - Italy tel. +39.0522.687425 - tel. Servizio Assistenza +39.0522.684450 fax +39.0522.686019 - fax Servizio Ricambi +39.0522.962166 e-mail: service@fosterspa.com www.fosterspa.
Dear client, Thank you for having chosen our induction ceramic hob. In order to make the best use of your appliance, we would advise you to read carefully the following notes and to keep them for a later consulting. SUMMARY SAFETY....................................................................................................................................... 3 PRECAUTIONS BEFORE USING ......................................................................................................
SAFETY Precautions before using Unpack all the materials. The installation and connecting of the appliance have to be done by approved specialists. The manufacturer can not be responsible for damage caused by building-in or connecting errors. To be used, the appliance must be well-equipped and installed in a kitchen unit and an adapted and approved work surface.
Precautions not to damage the appliance Raw pan bottoms or damaged saucepans (not enamelled cast iron pots,) may damage the ceramic glass. Sand or other abrasive materials may damage ceramic glass. Avoid dropping objects, even little ones, on the vitroceramic. Make sure that the ventilation of the appliance works according to the manufacturer’s instructions. Do not hit the edges of the glass with saucepans. Do not put or leave empty saucepans on the vitroceramic hobs.
DESCRIPTION OF THE APPLIANCE Technical data Type Total Power Position Nominal Power* Booster Power* Diameter 7322230 3700W Front Rear 1200W 2000W 1400W 2300W 150 mm 220 mm * The given power may change according to the dimensions and material of the pan. Control panel Control light timer Locking key Timer / Power display [ - ] key Timer key [ + ] / Booster key Locking light On / Off key USE Sensitive touches Your ceramic hob is equipped with electronic controls with sensitive touch keys.
Display Display Designation Function 0 Zero The heating zone is activated 1…9 Power level Selection of the cooking level U Pan Detection No pan or inadequate pan E Error message Electronic failure H Residual heat The heating zone is hot P Booster The boosted power is activated Ventilation The cooling system is fully automatic. The cooling fan starts with a low speed when the calories brought out by the electronic system reach a certain level.
Starting-up You must first start-up the hob, then the heating zone : Start-up/ switch off the hob : Action Control panel Display To start To stop Press key [ 0/I ] Press key [ 0/I ] 2x[0] nothing or [ H ] Start-up/ switch off the heating zone : Action Control panel Display Increase power Decrease power Stop Press key [ + ] Press key [ - ] Press simultaneous[ + ] and [ - ] or press [ - ] [ 4 ] to [ 9 ] [ 9 ] to [ 1 ] [ 0 ] or [ H ] [ 0 ] or [ H ] If no setting are made in 20 seconds the h
Power management : The cooking hob is equipped with a power limiting system. When the booster function is activated, and not to exceed the maximum power, the electronic system orders to reduce automatically the power level of an other heating zone. The display is blinking on [ 9 ] during a few seconds and then shows the maximum of power allowed.
Control panel locking To avoid modifying a setting of cooking zones , in particular with within the framework of cleaning the control panel can be locked (with exception to the On/Off key [ 0/I ]).
Examples of power setting (The values below are indicative) 1 to 2 Melting Reheating Simmering 2 to 3 Defrosting 3 to 4 Steam 4 to 5 Water 6 to 7 Sauces, butter, chocolate, gelatine Dishes prepared beforehand Rice, pudding, sugar syrop Dried vegetables, fish, frozen products Vegetables, fish, meat Steamed potatoes, soups, pasta, fresh vegetables Meat, liver, eggs, sausages Goulash, roulade, tripe Potatoes, fritters, wafers Steaks, omelettes, fried dishes Water Boiling significant quantities of water Mediu
3) The left display shows alternatively a [ C ] and a [ 0 ] 4) Press the key lock until both displays indicate either [ C ] or [ - ]. 5) Take your fingers away from the keys and press again the [ - ] key during a few seconds until some [ E ] appear. 6) You will hear a "beep" sound and the [ E ] will blink. 7) The [ E ] are automatically transformed into [ C ] → The configuration has been canceled. VI) How to configure the hob ? 1) Use a suitable induction pot with a minimum diametre size of 16cm.
MAINTENANCE AND CLEANING Switch-off the appliance before cleaning. Do not clean the hob if the glass is too hot: risk of burn. Remove light marks with a damp cloth with cleaning liquid diluted in a little water. Then rinse with cold water and dry the surface thoroughly. Highly corrosive or abrasive detergents and cleaning equipment likely to cause scratches must be absolutely avoided. Do not ever use any steam-driven or pressure appliance. Do not use any object that may scratch the ceramic glass.
INSTALLATION INSTRUCTIONS The installation comes under the exclusive responsibility of specialists. The installer is held to respect the legislation and the standards enforce in his home country. How to stick the gasket The gasket supplied with the hob avoids all infiltration of liquids in the cabinet. His installation has to be done carefully, in conformity of the following drawing. Stick the gasket (2) two millimeters from the external edge of the glass, after removing the protection sheet (3).
ELECTRICAL CONNECTION The installation of this appliance and the connection to the electrical network should be entrusted only to a professionally trained and authorized eletrician, and performed in full respect of all enforced regulations. Protection against the parts under tension must be ensured after the building-in. The data of connection necessary are on the stickers place on the hob casing near the connection box.
cod. 9606886 Foster spa 42041 Brescello (RE) - Italy tel. +39.0522.687425 - tel. Servizio Assistenza +39.0522.684450 fax +39.0522.686019 - fax Servizio Ricambi +39.0522.962166 e-mail: service@fosterspa.com www.fosterspa.