
Manual

3B Scientific GmbH • Rudorffweg 8 • 21031 Hamburg • Germany • www.3bscientific.com
Subject to technical amendments
© Copyright 2007 3B Scientific GmbH
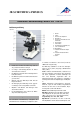
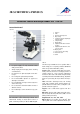
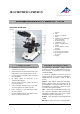
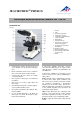
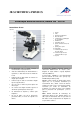
pendicular to the object stage, adjustment range
70 x 30 mm
2
Illumination: 5 W incandescent lamp incorporated
in the base integrated in base, with a converging
lens in lamp shaft, power supply 115 V resp. 230 V
50/60 Hz
Condenser: Abbe condenser N.A.1.25 NA 0.65 with
iris diaphragm , filter holder and blue filter, focus-
sed via rack and pinion drive
Dimensions: 220 x 154 x 359 mm³ approx.
Weight: 5.2 kg approx.
3. Unpacking and assembly
The microscope is packed in a molded styrofoam
container.
• Take the container out of the carton remove
the tape and carefully lift the top half off the
container. Be careful not to let the optical i-
tems (objectives and eyepieces) drop down.
• To avoid condensation on the optical compo-
nents, leave the microscope in the original pa-
cking to allow it to adjust to room tempera-
ture.
• Using both hands (one around the pillar and
one around the base), lift the microscope from
the container and put it on a stable desk.
• The objectives will be found within individual
protective vials. Install the objectives into the
microscope nosepiece from the lowest magni-
fication to the highest, in a clockwise direction
from the rear.
• Put the binocular head onto the top of the
stand and tighten the head-lock-screw. Insert
the eyepieces into the tube.
4. Operation
4.1 General information
• Set the microscope on a level table.
• Place the object to be observed in the centre of
the specimen stage and clamp it to the object
guide.
• Connect the mains cable to the net and turn on
the switch to get the object illuminated.
• Make certain that the specimen is centered
over the opening in the stage.
• Adjust the interpupillary distance so that one
circle of light can be seen.
• Make the necessary eyepiece dioptre adjust-
ments to suit your eyes.
• Adjust the aperture of the iris diaphragm to get
the background brightness suitable for a high
contrast image.
• Rotate the nosepiece until the objective with
the lowest magnification is pointed at the
specimen. There is a definite “click” when each
objective is lined up properly.
NOTE: It is best to begin with the lowest power
objective. This is important to reveal general struc-
tural details with the largest field of view first.
Than you may increase the magnification as nee-
ded to reveal small details. When 100x (oil) objec-
tive is chosen, objective oil must be dripped onto
the slide.
To determine the magnification at which you are
viewing a specimen, multiply the power of the
eyepiece by the power of the objective.
• Adjust the coarse-focusing-knob which moves
the stage up until the specimen is focused. Be
careful that the objective does not make con-
tact with the slide at any time. This may cause
damage to the objective and/or crack your
slide.
• Adjust the fine-focusing-knob to get the image
more sharp and more clear.
• Colour filters may be inserted into the filter
holder for definition of specimen parts. Swing
the filter holder out and insert colour filters.
• Use the knobs of the mechanical stage to move
the slide side-, back- and forwards. The vernier
provides accurate location of the specimen
area.
4.2 Changing the fuse
• Turn off the power switch and unplug the
mains plug.
• Unscrew the fuse holder on the back of the
stand base with a screwdriver.
• Replace the fuse and reinsert the holder in its
socket.
5. Storage and cleaning
• Keep the microscope in a clean, dry and dust
free place.
• When not in use always cover the microscope
with the dust cover.
• Do not expose it to temperatures below 0°C
and above 40°C and a max. relative humidity
of over 85%.
• Always turn off the light immediately after use.
• Use a soft linen cloth and some ethanol to
clean the microscope.
• Use a soft lens tissue to clean the optics.